Ingredients
- For the Crust:
- All-Purpose Flour: 2 ½ cups – Provides the structure for the crust, creating a sturdy base for the lemon and raspberry filling.
- Powdered Sugar: ½ cup – Adds sweetness and tenderness to the crust, giving it a melt-in-your-mouth texture.
- Salt: ¼ teaspoon – Enhances the flavors of the other ingredients in the crust and filling.
- Unsalted Butter: 1 cup (2 sticks), cold and cubed – Essential for a flaky and buttery crust. Cold butter is key for creating layers and a tender texture.
- For the Filling:
- Granulated Sugar: 1 ¾ cups – Sweetens the filling and balances the tartness of the lemon juice.
- All-Purpose Flour: ¼ cup – Helps to thicken the lemon filling, creating a smooth and cohesive texture.
- Large Eggs: 4 – Provide structure and richness to the filling, binding the ingredients together and adding a creamy consistency.
- Fresh Lemon Juice: ¾ cup (from about 4-5 lemons) – The star of the show! Freshly squeezed lemon juice delivers that bright, tangy flavor that defines lemon bars.
- Lemon Zest: 2 tablespoons (from about 2 lemons) – Amplifies the lemon flavor, adding aromatic oils that enhance the overall citrusy profile.
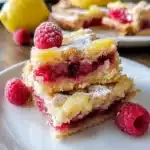
- Fresh Raspberries: 1 ½ cups – Bring a burst of juicy sweetness and a beautiful color contrast to the lemon bars. Frozen raspberries can be used if fresh are not available, but thaw and drain them well to avoid excess moisture.
- Powdered Sugar: For dusting (optional) – Adds a delicate sweetness and a beautiful finish to the bars.
Instructions
- Preheat the Oven and Prepare the Pan: Preheat your oven to 350°F (175°C). Position a rack in the center of the oven for even baking. Take an 9×13 inch baking pan and line it with parchment paper, leaving an overhang on the sides. This parchment paper sling will make it incredibly easy to lift the finished bars out of the pan later, ensuring clean edges and no sticking. Lightly grease the parchment paper with cooking spray or butter to further prevent sticking and ensure easy removal. Setting up your pan properly at the beginning makes the whole process smoother.
- Make the Crust Dough: In a large mixing bowl, whisk together the all-purpose flour, powdered sugar, and salt until well combined. This dry mixture forms the base of your crust. Adding powdered sugar instead of granulated sugar contributes to a more tender and less grainy crust. The salt is crucial for balancing the sweetness and enhancing all the flavors.
- Cut in the Cold Butter: Add the cold, cubed unsalted butter to the flour mixture. Using a pastry blender or your fingertips, cut the butter into the dry ingredients. The goal is to break down the butter into smaller pieces that are about the size of small peas. If using your fingertips, work quickly to keep the butter cold, as warm butter will result in a tougher crust. You’re looking for a mixture that resembles coarse crumbs. Don’t overmix at this stage; some small butter pieces are desirable for flakiness.
- Press the Crust into the Pan: Transfer the crumbly dough into the prepared baking pan. Using your fingers or the bottom of a measuring cup, firmly press the dough evenly into the bottom of the pan. Ensure the crust is uniformly thick across the entire pan and slightly up the sides to create a neat edge for the filling. A level crust is important for even baking and a professional-looking final product.
- Pre-bake the Crust: Place the pan in the preheated oven and bake the crust for 18-20 minutes, or until it is lightly golden brown around the edges. Pre-baking the crust is essential because it sets the base and prevents it from becoming soggy when the moist lemon filling is added. Keep an eye on it, as oven temperatures can vary. The crust should be just starting to color.
- Prepare the Lemon Filling while the Crust Bakes: While the crust is pre-baking, prepare the lemon filling. In a separate large mixing bowl, whisk together the granulated sugar and all-purpose flour until well combined. The flour in the filling helps to stabilize and thicken the lemon mixture as it bakes, preventing it from being too runny.
- Add Eggs and Lemon Juice: To the sugar and flour mixture, add the large eggs, fresh lemon juice, and lemon zest. Whisk everything together until the filling is smooth and well combined. Ensure there are no lumps of flour or sugar. The mixture should be bright yellow and smell wonderfully lemony. Fresh lemon juice is crucial for the best flavor; bottled lemon juice often lacks the same bright, zesty quality.
- Gently Fold in Raspberries: Once the lemon filling is smooth, gently fold in the fresh raspberries. Distribute them evenly throughout the filling. Be careful not to overmix at this stage, as you want to keep the raspberries intact and prevent them from bleeding too much color into the filling. Gently folding ensures they remain whole and juicy.
- Pour Filling over Pre-baked Crust: Once the crust is lightly golden and has finished pre-baking, carefully remove it from the oven. Pour the raspberry lemon filling evenly over the hot, pre-baked crust. Ensure the filling is spread uniformly to ensure even baking and a consistent texture across the bars.
- Bake the Bars: Return the pan to the oven and bake for another 25-30 minutes, or until the filling is set and no longer jiggly in the center. The edges should be lightly golden, and the center should be firm to the touch but still slightly soft. The baking time can vary depending on your oven, so start checking for doneness around 25 minutes. If the edges are browning too quickly, you can loosely tent the pan with foil for the last part of the baking time.
- Cool Completely: Once baked, remove the Raspberry Lemon Bars from the oven and let them cool completely in the pan on a wire rack. This is crucial for the bars to set properly. Resist the temptation to cut into them while they are still warm, as the filling will be too soft. Cooling allows the filling to firm up and makes for cleaner cuts. Cooling completely will typically take at least 2-3 hours at room temperature, or you can speed up the process by refrigerating them once they are slightly cooled.
- Cut and Serve: Once the bars are completely cooled, use the parchment paper overhang to lift them out of the pan. Place them on a cutting board and cut them into squares or bars. For clean cuts, use a sharp knife and wipe it clean between cuts, especially if the filling is still slightly sticky. Dust the bars with powdered sugar just before serving, if desired, for an extra touch of sweetness and visual appeal. Serve chilled or at room temperature. They are delicious on their own or paired with a dollop of whipped cream or a scoop of vanilla ice cream.
Nutrition
- Serving Size: one normal portion
- Calories: 250
- Fat: 12g
- Saturated Fat: 7g