Ingredients
To whip up this delightful White Chocolate Bunny Bark, you only need a handful of simple ingredients. Each ingredient plays a vital role in creating the perfect balance of flavor, texture, and visual appeal. Here’s what you’ll need:
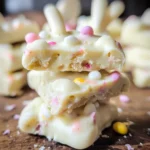
- White Chocolate: The star of the show! You’ll need approximately 1 pound (16 ounces) of high-quality white chocolate. Opt for bars or wafers rather than chips, as they melt more smoothly. Good quality white chocolate will have a richer flavor and smoother texture, making all the difference in your bark.
- Bunny Candies: These are your adorable focal point! Choose your favorite bunny-shaped candies. You can find these in various colors and sizes, often made of chocolate, gummy, or marshmallow. A mix of different types can add visual interest. About 1 cup should be sufficient for a standard baking sheet.
- Pastel Sprinkles: For that essential Easter charm! A generous ½ cup of pastel sprinkles will add color, texture, and a festive touch. Look for a mix of shapes and sizes, such as jimmies, nonpareils, and confetti sprinkles, to create a dynamic look.
- Optional Decorations: This is where you can get creative! Consider adding other Easter-themed candies like mini chocolate eggs, jelly beans, candy flowers, or even chopped nuts for extra texture and flavor complexity. About ½ cup of additional decorations will complement the bunny candies and sprinkles.
- Parchment Paper or Silicone Baking Mat: Essential for easy removal and cleanup! This will prevent the bark from sticking to your baking sheet and make it effortless to break into pieces once hardened.
Instructions
Creating this White Chocolate Bunny Bark is surprisingly easy, even for beginner bakers! Follow these simple steps to achieve bark perfection every time:
- Prepare Your Baking Sheet: Line a standard baking sheet (approximately 11×17 inches) with parchment paper or a silicone baking mat. Ensure the liner is flat and wrinkle-free to create a smooth surface for your bark. This step is crucial for easy removal and a professional-looking finish.
- Melt the White Chocolate: This is the most important step to get right! There are two main methods for melting white chocolate:
- Microwave Method: Place the white chocolate in a microwave-safe bowl. Microwave in 30-second intervals, stirring well after each interval. It’s crucial to microwave at reduced power (around 50-70%) to prevent scorching. Continue this process until the chocolate is almost completely melted, with just a few small pieces remaining. Stir continuously until the residual heat melts the remaining chocolate and it becomes smooth and glossy. Be patient and avoid overheating, as scorched white chocolate can become grainy and unusable.
- Double Boiler Method: Fill a saucepan with about an inch or two of water and bring it to a gentle simmer. Place a heatproof bowl (glass or stainless steel) over the saucepan, ensuring the bottom of the bowl does not touch the water. Add the white chocolate to the bowl. Stir occasionally as the steam from the simmering water gently melts the chocolate. This method is more gentle and reduces the risk of burning, but it takes slightly longer. Stir until the chocolate is completely smooth and melted.
- Spread the Melted White Chocolate: Once the white chocolate is completely melted and smooth, immediately pour it onto the prepared baking sheet. Use a spatula or offset spatula to spread the melted chocolate evenly into a thin layer, about ¼ inch thick. Work quickly, as white chocolate can start to set relatively fast. Aim for a uniform thickness for even hardening and a consistent texture in your bark.
- Decorate with Bunny Candies and Sprinkles: Now comes the fun part! While the white chocolate is still melted and soft, quickly and generously sprinkle the pastel sprinkles all over the surface. Then, arrange the bunny candies artfully across the bark. You can create patterns or simply scatter them randomly for a whimsical look. If using additional decorations like mini eggs or jelly beans, add them at this stage as well, pressing them gently into the melted chocolate to ensure they adhere. The warmth of the chocolate will help the decorations stick firmly.
- Chill to Set: Carefully transfer the baking sheet to the refrigerator. Chill for at least 30 minutes, or until the white chocolate bark is completely firm and set. You can test if it’s ready by gently pressing on the surface – it should feel solid and not sticky. Chilling allows the chocolate to harden completely, making it easy to break into pieces. For faster setting, you can place it in the freezer for about 15-20 minutes, but be careful not to freeze it for too long, as it might become too brittle.
- Break into Pieces: Once the bark is fully set, remove the baking sheet from the refrigerator. Gently lift the parchment paper or silicone mat from the baking sheet. Place the bark on a cutting board and use your hands to break it into irregular, rustic-looking pieces. Alternatively, you can use a large knife to score the bark before it completely sets if you prefer more uniform pieces, but the charm of bark often lies in its imperfect, organic shapes.
- Store Properly: Store the White Chocolate Bunny Bark in an airtight container at room temperature or in the refrigerator. If storing at room temperature, keep it in a cool, dry place away from direct sunlight and heat to prevent the white chocolate from melting or blooming (developing a white film on the surface). In the refrigerator, it will last longer, especially in warmer climates. Consume within 1-2 weeks for the best taste and texture.
Nutrition
- Serving Size: one normal portion
- Calories: 200
- Fat: 15g