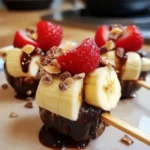
My family absolutely adores banana splits, but let’s be honest, sometimes the full-sized sundae is just a bit too much, especially for a quick weeknight treat or a kids’ party. That’s where these Banana Split Bites come to the rescue! They capture all the iconic flavors of a classic banana split – creamy banana, rich chocolate, sweet strawberry, juicy pineapple, fluffy whipped cream, and crunchy nuts – in a perfectly portioned, fun-to-eat bite. From the moment I first assembled these little delights, they were a hit. The kids loved helping with the toppings, and everyone devoured them in minutes. They’re incredibly easy to make, require no baking, and are endlessly customizable with your favorite toppings. Whether you’re looking for a simple dessert for your family, a crowd-pleasing appetizer for a summer gathering, or just a fun way to enjoy the taste of a banana split without the mess, these Banana Split Bites are guaranteed to be a winner. Get ready to experience all the joy of a banana split in a single, delightful bite!
Ingredients
- 2-3 medium Ripe but Firm Bananas: The star of the show! Choose bananas that are ripe enough to be sweet but still firm enough to hold their shape when sliced and dipped. Overripe bananas will be too mushy.
- 1 cup (about 6 oz or 170g) Melted Chocolate: Semi-sweet, milk, or dark chocolate chips all work wonderfully. The chocolate coating provides a rich, decadent layer and helps to hold the bites together. You can also use melting wafers for a smoother, glossier finish.
- About 1/2 cup Whipped Cream or Whipped Topping: Adds a light and airy creaminess that’s essential to the banana split experience. You can use homemade whipped cream for the best flavor or a store-bought whipped topping for convenience.
- About 1/4 cup (approx. 12-18 cherries), halved or quartered Maraschino Cherries: The classic red cherry on top! These add a pop of color and a sweet, slightly tangy flavor. Don’t forget to drain them well before using.
- About 1/4 cup, well-drained Canned Pineapple Tidbits or Crushed Pineapple: Provides a tropical sweetness and juicy texture. Make sure to drain the pineapple thoroughly to prevent the bites from becoming soggy.
- About 1/4 cup, diced small Fresh Strawberries: Adds a burst of fresh, fruity flavor and a vibrant red color. Choose ripe, red strawberries for the best taste.
- About 1/4 cup Chopped Nuts (Optional): Adds a delightful crunch and nutty flavor. Pecans, walnuts, peanuts, or almonds all work well. You can also use toasted nuts for extra flavor.
- 2-3 tablespoons Sprinkles (Optional): For a fun and festive touch! Rainbow sprinkles, chocolate sprinkles, or any other type of sprinkles will add visual appeal, especially for kids.
Instructions
- Prepare your ingredients: Gather all your ingredients and lay them out on your workspace. This will make the assembly process much smoother and faster. Melt your chocolate in a microwave-safe bowl in 30-second intervals, stirring in between, until smooth and completely melted. Be careful not to overheat the chocolate. If using canned pineapple, drain it thoroughly. Wash and hull the strawberries, and chop them into small pieces. If using nuts, chop them finely.
- Slice the bananas: Peel the bananas and slice them into 1-inch thick rounds. You should get about 6-8 slices from each banana, depending on the size. Try to make the slices as even as possible so they are uniform in size.
- Dip the banana slices in chocolate: One at a time, dip each banana slice into the melted chocolate, ensuring that it is fully coated on all sides. You can use a fork or toothpick to help dip and lift the banana slices.
- Place chocolate-dipped bananas on parchment paper: Line a baking sheet or plate with parchment paper. As you dip each banana slice in chocolate, place it onto the parchment paper-lined surface. This will prevent the banana bites from sticking to the surface and make them easier to remove later.
- Add toppings immediately: While the chocolate is still wet, quickly add your desired toppings. Start with a dollop of whipped cream on top of each chocolate-covered banana slice. Then, add a small piece of strawberry, a few pineapple tidbits (or a sprinkle of crushed pineapple), and a maraschino cherry half on top of the whipped cream. If using, sprinkle chopped nuts and sprinkles over the whipped cream and other toppings. Work quickly so the toppings adhere to the melting chocolate and whipped cream.
- Chill in the refrigerator: Once all the banana bites are topped, place the baking sheet or plate in the refrigerator. Chill for at least 30 minutes, or until the chocolate is completely set and the banana bites are firm. Chilling helps the chocolate harden and keeps the banana slices from becoming too soft.
- Serve and enjoy: Once chilled, carefully remove the Banana Split Bites from the parchment paper and arrange them on a serving platter. Serve immediately and enjoy these miniature bursts of banana split flavor! They are best enjoyed chilled.
Nutrition Facts
(Per serving, approximate – Nutrition facts can vary based on specific ingredients and portion sizes)
- Serving Size: 2 bites
- Calories: 150-200 kcal
- Fat: 8-12g
- Saturated Fat: 5-8g
Note: These values are estimations and can vary based on the type of chocolate, whipped cream, and toppings used. Using dark chocolate and homemade whipped cream with less sugar can slightly reduce the sugar and fat content.
Preparation Time
- Prep Time: 20 minutes
- Chill Time: 30 minutes
- Total Time: 50 minutes
These Banana Split Bites are incredibly quick and easy to prepare! The majority of the time is spent on the fun part – assembling and topping these delightful treats. The chilling time is essential for the chocolate to set and for the bites to firm up, making them perfect for serving. You can easily whip these up in under an hour, making them ideal for last-minute dessert cravings or spontaneous gatherings.
How to Serve
These Banana Split Bites are incredibly versatile and perfect for a variety of occasions. Here are some fun ways to serve them:
- Party Appetizer: Arrange the bites attractively on a platter for a fun and unexpected dessert appetizer at parties, potlucks, or summer barbecues. They are easy to grab and eat, making them perfect for mingling guests.
- Kid-Friendly Dessert: Serve them as a healthier and more manageable dessert option for kids compared to full-sized banana splits. Kids will love the miniature size and the fun toppings.
- After-Dinner Treat: Enjoy a couple of bites as a light and satisfying after-dinner dessert. They are just the right size to satisfy a sweet craving without being too heavy.
- Summer Snack: These chilled bites are a refreshing and delicious snack on a hot summer day. Keep a batch in the fridge for a cool and sweet treat whenever you need one.
- Dessert Board Addition: Include Banana Split Bites as part of a larger dessert board or charcuterie board, alongside other sweet treats like cookies, brownies, and fruit.
- Individual Servings: Place a few bites in small dessert cups or ramekins for elegant individual servings. This is great for a more formal setting or for portion control.
- DIY Topping Bar: Set up a DIY topping bar with various toppings (different types of nuts, sprinkles, sauces, fruits) and let guests customize their own Banana Split Bites. This is a fun and interactive activity, especially for kids’ parties.
- Frozen Treat: For an even cooler treat, freeze the assembled Banana Split Bites for about an hour or two (or until frozen solid). They become like mini frozen banana split pops! Be mindful that frozen bananas can change texture slightly.
Additional Tips for Perfect Banana Split Bites
- Use Ripe but Firm Bananas: The key to preventing mushy bites is to use bananas that are ripe for sweetness but still firm enough to hold their shape after slicing and dipping. Avoid overripe bananas which will be too soft.
- Work Quickly with Melted Chocolate: Melted chocolate can start to set quickly. Work efficiently when dipping the banana slices and adding toppings so everything adheres well before the chocolate hardens too much. If the chocolate starts to thicken, you can gently reheat it in the microwave for a few seconds.
- Don’t Overload with Toppings: While it’s tempting to pile on the toppings, keep in mind these are bites. Too many toppings can make them difficult to eat and may cause them to become unstable. A small dollop of whipped cream, a few pieces of fruit, and a sprinkle of nuts or sprinkles is usually sufficient.
- Toast Your Nuts for Extra Flavor: Toasting nuts before chopping them brings out their natural oils and enhances their nutty flavor. Simply spread the nuts on a baking sheet and toast in a preheated oven at 350°F (175°C) for 5-7 minutes, or until lightly golden and fragrant. Let them cool completely before chopping and using as a topping.
- Customize Your Chocolate: Experiment with different types of chocolate for the coating. Dark chocolate will provide a richer, less sweet flavor, while milk chocolate offers a classic sweetness. White chocolate can also be used for a different flavor profile and visual appeal. You can even drizzle with a combination of different chocolates for a decorative effect.
- Make Them Ahead of Time: You can prepare the Banana Split Bites a few hours ahead of time and store them in the refrigerator until ready to serve. This makes them a great make-ahead dessert option for parties or gatherings. However, it’s best to add the whipped cream and fresh fruit toppings closer to serving time to maintain their freshness. The chocolate-covered banana base can be made a day in advance and stored in an airtight container in the refrigerator.
- Dairy-Free Option: To make these bites dairy-free, use dairy-free chocolate chips and a dairy-free whipped topping (like coconut whipped cream or almond whipped cream). Ensure all other toppings are also dairy-free if needed.
- Get Creative with Toppings: Don’t be afraid to get creative with your toppings! Consider adding other fruits like blueberries, raspberries, or kiwi. You can also drizzle with caramel sauce, hot fudge sauce, or peanut butter sauce for extra indulgence. Mini chocolate chips, shredded coconut, or crushed cookies can also be fun additions.
Frequently Asked Questions (FAQ)
Q1: Can I make these Banana Split Bites ahead of time?
A: Yes, you can definitely make the chocolate-covered banana base ahead of time. Dip the banana slices in chocolate and let them set completely. Then, store them in an airtight container in the refrigerator for up to a day. Add the whipped cream and fresh fruit toppings closer to serving time to maintain their freshness and prevent the bananas from becoming too soft.
Q2: How do I store leftover Banana Split Bites?
A: Leftover Banana Split Bites are best stored in an airtight container in the refrigerator. They will stay good for about 1-2 days, but the bananas may soften slightly over time and the toppings might lose some of their freshness. It’s best to enjoy them as soon as possible for the best texture and flavor.
Q3: Can I freeze Banana Split Bites?
A: While you can freeze them, it’s not highly recommended for long-term storage as the texture of the bananas may change and become slightly mushy upon thawing. However, you can freeze them for a shorter period (about 1-2 hours) to create a frozen banana split bite treat. If freezing, place them in a single layer on a baking sheet lined with parchment paper until frozen solid, then transfer them to an airtight container.
Q4: Can I use a different type of chocolate?
A: Absolutely! You can use any type of chocolate you prefer, such as milk chocolate, dark chocolate, white chocolate, or even flavored melting wafers. Each type of chocolate will impart a slightly different flavor profile to the bites. Experiment to find your favorite!
Q5: What can I use instead of whipped cream?
A: If you don’t have whipped cream or prefer a lighter option, you can use whipped coconut cream (for a dairy-free option), Greek yogurt (for a tangier and healthier alternative), or a store-bought whipped topping.
Q6: Can I make these bites without nuts?
A: Yes, definitely! Nuts are completely optional. If you have nut allergies or simply don’t like nuts, you can easily omit them or substitute them with other toppings like mini chocolate chips, shredded coconut, or extra sprinkles.
Q7: How do I prevent the bananas from turning brown?
A: The chocolate coating helps to create a barrier that slows down oxidation and browning of the bananas. Also, the chilling process helps to further slow down browning. For best results and to minimize browning, use ripe but firm bananas and consume the bites within a day or two. You can also lightly brush the banana slices with lemon juice before dipping them in chocolate as a preventative measure, though the chocolate coating is usually sufficient.
Q8: Can I make these vegan?
A: Yes, you can easily make these Banana Split Bites vegan! Simply use vegan chocolate chips, a vegan whipped topping (like coconut whipped cream), and ensure all other toppings you use are also vegan-friendly. There are many delicious vegan chocolate and whipped topping options available in most grocery stores.
Banana Split Bites Recipe
Ingredients
- Ripe but Firm Bananas: The star of the show! Choose bananas that are ripe enough to be sweet but still firm enough to hold their shape when sliced and dipped. Overripe bananas will be too mushy.
- Melted Chocolate: Semi-sweet, milk, or dark chocolate chips all work wonderfully. The chocolate coating provides a rich, decadent layer and helps to hold the bites together. You can also use melting wafers for a smoother, glossier finish.
- Whipped Cream or Whipped Topping: Adds a light and airy creaminess that’s essential to the banana split experience. You can use homemade whipped cream for the best flavor or a store-bought whipped topping for convenience.
- Maraschino Cherries: The classic red cherry on top! These add a pop of color and a sweet, slightly tangy flavor. Don’t forget to drain them well before using.
- Canned Pineapple Tidbits or Crushed Pineapple: Provides a tropical sweetness and juicy texture. Make sure to drain the pineapple thoroughly to prevent the bites from becoming soggy.
- Fresh Strawberries: Adds a burst of fresh, fruity flavor and a vibrant red color. Choose ripe, red strawberries for the best taste.
- Chopped Nuts (Optional): Adds a delightful crunch and nutty flavor. Pecans, walnuts, peanuts, or almonds all work well. You can also use toasted nuts for extra flavor.
- Sprinkles (Optional): For a fun and festive touch! Rainbow sprinkles, chocolate sprinkles, or any other type of sprinkles will add visual appeal, especially for kids.
Instructions
- Prepare your ingredients: Gather all your ingredients and lay them out on your workspace. This will make the assembly process much smoother and faster. Melt your chocolate in a microwave-safe bowl in 30-second intervals, stirring in between, until smooth and completely melted. Be careful not to overheat the chocolate. If using canned pineapple, drain it thoroughly. Wash and hull the strawberries, and chop them into small pieces. If using nuts, chop them finely.
- Slice the bananas: Peel the bananas and slice them into 1-inch thick rounds. You should get about 6-8 slices from each banana, depending on the size. Try to make the slices as even as possible so they are uniform in size.
- Dip the banana slices in chocolate: One at a time, dip each banana slice into the melted chocolate, ensuring that it is fully coated on all sides. You can use a fork or toothpick to help dip and lift the banana slices.
- Place chocolate-dipped bananas on parchment paper: Line a baking sheet or plate with parchment paper. As you dip each banana slice in chocolate, place it onto the parchment paper-lined surface. This will prevent the banana bites from sticking to the surface and make them easier to remove later.
- Add toppings immediately: While the chocolate is still wet, quickly add your desired toppings. Start with a dollop of whipped cream on top of each chocolate-covered banana slice. Then, add a small piece of strawberry, a few pineapple tidbits (or a sprinkle of crushed pineapple), and a maraschino cherry half on top of the whipped cream. If using, sprinkle chopped nuts and sprinkles over the whipped cream and other toppings. Work quickly so the toppings adhere to the melting chocolate and whipped cream.
- Chill in the refrigerator: Once all the banana bites are topped, place the baking sheet or plate in the refrigerator. Chill for at least 30 minutes, or until the chocolate is completely set and the banana bites are firm. Chilling helps the chocolate harden and keeps the banana slices from becoming too soft.
- Serve and enjoy: Once chilled, carefully remove the Banana Split Bites from the parchment paper and arrange them on a serving platter. Serve immediately and enjoy these miniature bursts of banana split flavor! They are best enjoyed chilled.
Nutrition
- Serving Size: one normal portion
- Calories: 200
- Fat: 12g
- Saturated Fat: 8g