I still remember the first time I made these Beefy Cheesy Taco Cups for a family game night. I was looking for something fun, easy to eat while mingling, and guaranteed to be a crowd-pleaser. Honestly, I wasn’t prepared for how much of a hit they would be! My kids, usually picky eaters, devoured them, asking for seconds (and thirds!). My husband, a taco purist, was initially skeptical about the wonton wrapper “shell” but was quickly won over by the perfect crunch and the flavourful, cheesy beef filling. They disappeared from the platter in record time, accompanied by rave reviews and demands for the recipe. Since then, they’ve become a staple for parties, potlucks, and even quick weeknight dinners when I want something a little more exciting than standard tacos. They offer all the classic taco flavours we love – savoury beef, zesty seasoning, melty cheese – packed into a convenient, crispy, bite-sized cup that’s simply irresistible and incredibly versatile. Making them is straightforward, cleaning up is minimal (thank you, muffin tin!), and the joy they bring to the table is always immense. Trust me, once you try these, they’ll become a regular feature in your recipe rotation too.
Ingredients for Beefy Cheesy Taco Cups
Gather these simple yet flavourful components to create your taco cup masterpieces. Each ingredient plays a crucial role in achieving the perfect balance of taste and texture.
- 1 lb Lean Ground Beef (90/10 or leaner recommended): The star protein of the dish. Using lean beef minimizes excess grease, ensuring the wonton cups stay crispier.
- 1 Packet (about 1 oz) Taco Seasoning: Provides the signature zesty, savoury, and slightly spicy taco flavour. Choose your favourite brand or use a homemade blend.
- ⅔ Cup Water (or Beef Broth): Helps distribute the taco seasoning evenly and creates a slightly saucy consistency for the beef mixture, preventing it from being too dry. Beef broth adds an extra layer of savoury depth.
- 24 Wonton Wrappers: These thin squares of dough bake up incredibly crispy in the muffin tin, forming the perfect edible cup for the filling. Find them in the refrigerated section of most grocery stores, often near the produce or tofu.
- 1 ½ Cups Shredded Cheddar Cheese (or Mexican Blend): Melts beautifully, adding a rich, gooey, cheesy element that binds the filling and complements the beef. A Mexican blend often includes Monterey Jack, Asadero, or Queso Quesadilla for extra flavour complexity. Feel free to use Sharp Cheddar for a bolder taste.
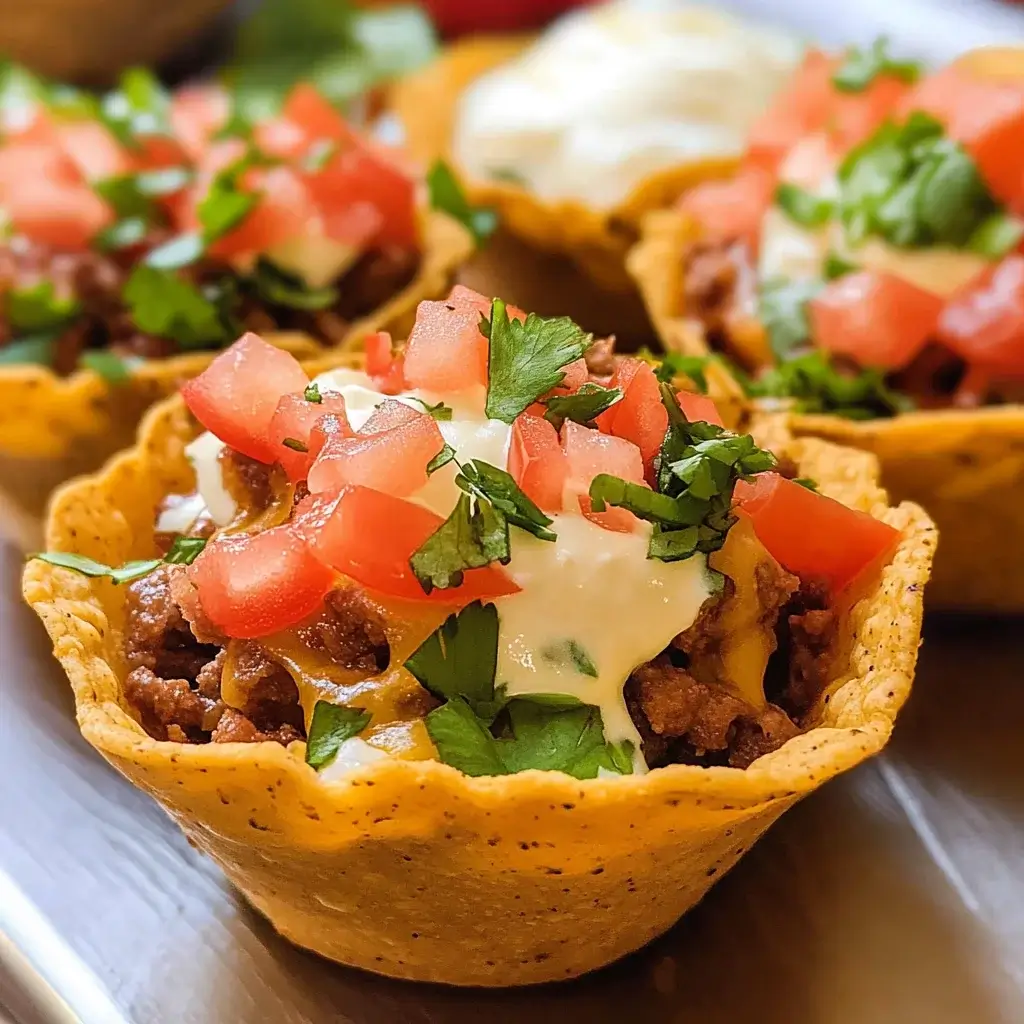
- Optional Toppings (for serving): Sour cream, salsa, diced tomatoes, shredded lettuce, chopped cilantro, sliced jalapeños, guacamole, sliced black olives, diced red onion. These allow for customization and add freshness, creaminess, and extra texture.
- Cooking Spray or Oil: Essential for greasing the muffin tin to prevent the wonton wrappers from sticking, ensuring easy removal and intact cups.
Step-by-Step Instructions
Follow these detailed steps to assemble and bake your delicious Beefy Cheesy Taco Cups to perfection. Precision in preparation leads to the best results!
- Preheat and Prepare: Preheat your oven to 375°F (190°C). Generously grease a standard 12-cup muffin tin with cooking spray or a light coating of oil. If you have two 12-cup tins, prepare both to bake all 24 cups simultaneously, or plan to bake in two batches.
- Brown the Beef: Place the ground beef in a large skillet over medium-high heat. Cook, breaking the meat apart with a spoon, until it’s thoroughly browned and no longer pink (approximately 7-10 minutes).
- Drain the Grease: Once browned, carefully tilt the skillet over a heatproof bowl or container lined with paper towels to drain off any excess fat. This step is crucial for preventing soggy taco cups. Return the skillet to the stovetop.
- Season the Beef: Sprinkle the taco seasoning packet over the cooked ground beef. Stir well to coat the meat evenly.
- Add Liquid and Simmer: Pour the water (or beef broth) into the skillet with the seasoned beef. Stir everything together. Bring the mixture to a gentle simmer and cook for 3-5 minutes, stirring occasionally, until the sauce has thickened slightly and the flavours have melded. Remove from heat.
- Form the Wonton Cups: Carefully press one wonton wrapper into each greased muffin cup. Gently push the center down and crease the sides so the wrapper lines the cup, with the corners pointing up. Try to ensure the bottom lays flat to create a stable base. If using two muffin tins, repeat for all 24 cups.
- Optional Pre-Bake (for extra crispiness): For guaranteed crispy cups, you can lightly pre-bake the empty wonton wrappers for 3-5 minutes at 375°F (190°C) until they are just beginning to turn golden at the edges. Let them cool slightly before filling. This helps prevent the bottoms from becoming soft from the filling.
- Layer the Cheese (Bottom Layer): Sprinkle a small amount of the shredded cheese (about 1 teaspoon) into the bottom of each wonton cup. This creates a barrier that helps protect the wonton wrapper from moisture in the beef filling.
- Fill the Cups: Spoon the seasoned beef mixture evenly into each wonton cup, filling them about two-thirds to three-quarters full. Avoid overfilling, as this can cause spillage during baking and may prevent the wontons from crisping properly.
- Top with More Cheese: Generously sprinkle the remaining shredded cheese over the top of the beef filling in each cup. Ensure the cheese covers the meat well for maximum melty goodness.
- Bake: Carefully place the muffin tin(s) into the preheated oven. Bake for 10-15 minutes, or until the wonton wrapper edges are golden brown and crispy, and the cheese is completely melted and bubbly. Keep a close eye on them during the last few minutes, as wonton wrappers can brown quickly.
- Cool Slightly: Once baked, remove the muffin tin(s) from the oven and let the taco cups cool in the tin for about 5 minutes. This allows them to set slightly, making them easier to remove without breaking.
- Remove and Serve: Gently run a thin knife or small offset spatula around the edges of each taco cup if needed, then carefully lift them out of the muffin tin and arrange them on a serving platter.
- Add Toppings and Enjoy: Serve the Beefy Cheesy Taco Cups warm, garnished with your favourite toppings like sour cream, salsa, lettuce, tomatoes, and cilantro. Enjoy immediately!
Nutrition Facts (Approximate)
Please note that these values are estimates and can vary based on specific ingredients used (like the fat content of the beef, type of cheese, and brand of taco seasoning).
- Serving Size: 2 Taco Cups
- Calories: Approximately 250-350 kcal per serving. Primarily from the beef, cheese, and wonton wrappers.
- Protein: Around 15-20g per serving. An excellent source contributing to satiety, mainly from the ground beef and cheese.
- Fat: Roughly 15-25g per serving (significant variation based on beef leanness and cheese type). Includes saturated fat from beef and cheese. Choosing leaner beef helps reduce this.
- Carbohydrates: Approximately 10-15g per serving. Mostly from the wonton wrappers and sugars in the taco seasoning or toppings.
- Sodium: Can range from 500-800mg per serving. Largely dependent on the taco seasoning packet and cheese used. Using low-sodium seasoning or a homemade blend can help manage this.
Preparation Time Breakdown
These taco cups come together relatively quickly, making them ideal for various occasions.
- Prep time: Approximately 15-20 minutes (includes browning beef, preparing muffin tin, and assembling cups).
- Cook time: Approximately 10-15 minutes (baking time in the oven).
- Total time: Approximately 25-35 minutes (plus 5 minutes cooling time).
Creative Ways to Serve Your Taco Cups
Presentation and accompaniments can elevate your Beefy Cheesy Taco Cups from a simple snack to a festive spread. Here are some ideas:
- The Toppings Bar Extravaganza:
- Set out small bowls filled with a variety of toppings. This allows everyone to customize their taco cups exactly how they like them.
- Include classics: Shredded lettuce, diced ripe tomatoes, finely chopped red onion, sour cream or plain Greek yogurt, your favourite salsa (mild, medium, or hot), sliced black olives.
- Add some flair: Guacamole or diced avocado, chopped fresh cilantro, pickled jalapeños for heat, crumbled queso fresco or cotija cheese for an authentic touch, pico de gallo, corn salsa, a drizzle of lime crema (sour cream mixed with lime juice and zest).
- Don’t forget hot sauce! Offer a few different types for the heat-seekers.
- Platter Presentation:
- Arrange the baked taco cups neatly on a large platter or wooden board.
- Garnish the platter itself with sprigs of cilantro or a sprinkle of chili powder around the edges for visual appeal.
- Place small bowls of the most popular toppings (like sour cream and salsa) directly on the platter for easy access.
- Perfect Pairings (Side Dishes):
- Mexican Rice: Fluffy, seasoned rice is a classic accompaniment.
- Refried Beans or Black Beans: Creamy refried beans or simple seasoned black beans add substance.
- Corn Salad: A bright, fresh salad with corn, black beans, red onion, bell pepper, and a lime vinaigrette.
- Simple Green Salad: A light salad with a citrusy or avocado-based dressing offers a refreshing contrast.
- Guacamole and Chips: Always a crowd-pleaser alongside any Mexican-inspired dish.
- Fruit Salad: Especially with mango or pineapple, offers a sweet counterpoint to the savoury cups.
- Serving Context:
- Appetizer: Serve 2-3 cups per person before a main meal or as part of a larger appetizer spread.
- Main Course: Serve 4-6 cups per person alongside one or two side dishes like rice and beans for a complete meal.
- Party Food: Arrange them for easy grabbing. They are perfect finger food for mingling.
- Kid-Friendly Meal: Kids love the size and the ability to add their own toppings. Serve with simple sides like corn or fruit.
Pro Tips for Perfect Taco Cups Every Time
Unlock the full potential of this recipe with these insider tips for achieving taco cup perfection consistently.
- Drain Beef Thoroughly: Don’t skip draining the fat after browning the beef. Excess grease is the enemy of crispy wonton cups. Tilt the pan and use a spoon to press the meat gently, or even briefly rinse the cooked beef under hot water (though this can remove some flavour). Pat dry if rinsing.
- Master Wonton Placement: Gently press the wonton wrapper into the muffin cup, ensuring the bottom is flat and the sides are creased against the tin. Don’t worry if the corners stick up unevenly – this adds to their rustic charm and creates extra crispy edges. Ensure there are no large air pockets at the bottom.
- Consider the Pre-Bake: While optional, pre-baking the empty wonton cups for 3-5 minutes significantly enhances crispiness, especially on the bottom. If you often struggle with slightly soft bottoms, definitely incorporate this step.
- Strategic Cheese Layering: Placing a small layer of cheese at the very bottom of the wonton cup before adding the beef acts as a delicious barrier, helping to prevent the filling’s moisture from making the wrapper soggy. Then, top generously for that classic cheesy cap.
- Don’t Overfill: Resist the urge to pack the cups too tightly. Filling them about two-thirds to three-quarters full allows space for the cheese topping and prevents the filling from bubbling over during baking, which can make removal difficult and create a mess.
- Make-Ahead Strategy: You can brown the beef mixture up to 2 days in advance and store it in an airtight container in the refrigerator. When ready to serve, gently reheat the beef, assemble the cups with fresh wonton wrappers, and bake as directed. Avoid assembling the cups too far in advance, as the wrappers will get soggy.
- Best Reheating Method: While best served fresh, leftover taco cups can be reheated. The best way is in an oven or toaster oven at 350°F (175°C) for 5-8 minutes, or until heated through and re-crisped. An air fryer also works wonders (around 325°F for 3-5 minutes). Microwaving is not recommended as it will make the wonton wrappers soft and chewy.
- Embrace Variations: This recipe is incredibly adaptable!
- Protein Power: Swap ground beef for ground turkey, ground chicken, chorizo (remove casing and crumble), or even plant-based crumbles for a vegetarian option.
- Seasoning Switch: Use fajita seasoning, chili powder with cumin and oregano, or your own custom spice blend.
- Cheesy Choices: Experiment with Pepper Jack for a kick, Monterey Jack for meltiness, or a sharp white cheddar for tang.
- Filling Add-Ins: Stir in a tablespoon or two of salsa, some drained black beans, corn kernels, or finely diced onions/peppers into the beef mixture for extra flavour and texture.
Frequently Asked Questions (FAQ)
Have questions about making Beefy Cheesy Taco Cups? Find answers to common queries below.
- Can I use something other than ground beef?
Absolutely! Ground turkey or ground chicken are excellent leaner alternatives. Crumbled Italian sausage (mild or hot) or chorizo adds a different flavour profile (be sure to drain fat well). For a vegetarian version, use plant-based meat crumbles, finely diced mushrooms and walnuts pulsed in a food processor, or a mixture of black beans and corn, ensuring the mixture isn’t too wet. - Can I freeze these taco cups?
Yes, you can freeze them, although the texture of the wonton wrapper might change slightly upon reheating. For best results, freeze them after baking and cooling completely. Place them in a single layer on a baking sheet until solid, then transfer to a freezer-safe bag or container for up to 2-3 months. Reheat directly from frozen in a 350°F (175°C) oven or air fryer until heated through and crisp (around 10-15 minutes). Avoid thawing them first, as this can make them soggy. - How can I make these gluten-free?
The main source of gluten is the wonton wrappers. Finding certified gluten-free wonton wrappers can be challenging, though some specialty stores might carry them. Alternatively, you could try using small corn tortillas: warm them slightly to make them pliable, cut them into rounds or press them carefully into the muffin tin (they may not get as uniformly crisp as wontons). Another option is to serve the beefy cheesy filling in lettuce cups (like butter lettuce or iceberg) for a naturally gluten-free, low-carb version. - How do I make a vegetarian version?
Substitute the ground beef with your favourite vegetarian protein source. Options include:- Plant-based ground “beef” crumbles (cook according to package directions).
- A mixture of finely chopped sautéed mushrooms (cremini or shiitake work well) and walnuts, pulsed briefly in a food processor to mimic ground meat texture.
- Cooked lentils (brown or green) mixed with the taco seasoning and a binder like a flax egg or breadcrumbs if needed.
- A hearty mix of black beans, corn, and finely diced bell peppers/onions, seasoned well. Ensure the mixture isn’t too watery.
- How can I adjust the spice level?
- To Increase Heat: Add half a teaspoon of cayenne pepper or red pepper flakes to the taco seasoning. Include finely minced jalapeños (with seeds for more heat) when cooking the beef. Use spicy taco seasoning or hot salsa. Choose Pepper Jack cheese. Offer hot sauce as a topping.
- To Decrease Heat: Use a mild taco seasoning packet. Ensure your chosen salsa is mild. Omit any extra peppers. Consider using a milder cheese like Monterey Jack or a mild cheddar.
- What if I can’t find wonton wrappers?
Wonton wrappers provide the best crispy texture, but you have alternatives:- Flour Tortillas: Cut small (4-5 inch) flour tortillas into rounds using a cookie cutter. Press them into the muffin tin. They will be softer than wontons but still form a cup shape. Baking time might need adjustment.
- Phyllo Dough: Layer 3-4 sheets of phyllo dough, brushing lightly with melted butter between layers. Cut into squares large enough to fit the muffin cups. This creates a very flaky, delicate cup.
- Refrigerated Biscuit Dough: Flatten rounds of biscuit dough and press them into the muffin cups. Bake according to biscuit package directions, adding the filling during the last 10-15 minutes. This results in a soft, bready cup.
- How do I prevent the taco cups from sticking to the muffin tin?
Greasing the muffin tin thoroughly is key, even if it’s non-stick. Use cooking spray generously, ensuring you coat the bottom and sides of each cup well. Alternatively, use a pastry brush to apply a thin layer of vegetable oil or melted butter. Letting the cups cool for about 5 minutes in the tin before attempting removal also helps them release more easily. - How many taco cups should I make for a party?
This depends on whether they are the main attraction or part of a larger spread.- As an appetizer: Plan for 2-3 taco cups per person.
- As a main dish: Plan for 4-6 taco cups per person, especially if served with sides.
- Always consider your guests; it’s often better to overestimate slightly than run out! This recipe makes 24 cups, which typically serves 8-12 people as an appetizer or 4-6 as a main course. You can easily double the recipe using two standard muffin tins or baking in batches.

Beefy Cheesy Taco Cups
Ingredients
Gather these simple yet flavourful components to create your taco cup masterpieces. Each ingredient plays a crucial role in achieving the perfect balance of taste and texture.
- 1 lb Lean Ground Beef (90/10 or leaner recommended): The star protein of the dish. Using lean beef minimizes excess grease, ensuring the wonton cups stay crispier.
- 1 Packet (about 1 oz) Taco Seasoning: Provides the signature zesty, savoury, and slightly spicy taco flavour. Choose your favourite brand or use a homemade blend.
- ⅔ Cup Water (or Beef Broth): Helps distribute the taco seasoning evenly and creates a slightly saucy consistency for the beef mixture, preventing it from being too dry. Beef broth adds an extra layer of savoury depth.
- 24 Wonton Wrappers: These thin squares of dough bake up incredibly crispy in the muffin tin, forming the perfect edible cup for the filling. Find them in the refrigerated section of most grocery stores, often near the produce or tofu.
- 1 ½ Cups Shredded Cheddar Cheese (or Mexican Blend): Melts beautifully, adding a rich, gooey, cheesy element that binds the filling and complements the beef. A Mexican blend often includes Monterey Jack, Asadero, or Queso Quesadilla for extra flavour complexity. Feel free to use Sharp Cheddar for a bolder taste.
- Optional Toppings (for serving): Sour cream, salsa, diced tomatoes, shredded lettuce, chopped cilantro, sliced jalapeños, guacamole, sliced black olives, diced red onion. These allow for customization and add freshness, creaminess, and extra texture.
- Cooking Spray or Oil: Essential for greasing the muffin tin to prevent the wonton wrappers from sticking, ensuring easy removal and intact cups.
Instructions
Follow these detailed steps to assemble and bake your delicious Beefy Cheesy Taco Cups to perfection. Precision in preparation leads to the best results!
- Preheat and Prepare: Preheat your oven to 375°F (190°C). Generously grease a standard 12-cup muffin tin with cooking spray or a light coating of oil. If you have two 12-cup tins, prepare both to bake all 24 cups simultaneously, or plan to bake in two batches.
- Brown the Beef: Place the ground beef in a large skillet over medium-high heat. Cook, breaking the meat apart with a spoon, until it’s thoroughly browned and no longer pink (approximately 7-10 minutes).
- Drain the Grease: Once browned, carefully tilt the skillet over a heatproof bowl or container lined with paper towels to drain off any excess fat. This step is crucial for preventing soggy taco cups. Return the skillet to the stovetop.
- Season the Beef: Sprinkle the taco seasoning packet over the cooked ground beef. Stir well to coat the meat evenly.
- Add Liquid and Simmer: Pour the water (or beef broth) into the skillet with the seasoned beef. Stir everything together. Bring the mixture to a gentle simmer and cook for 3-5 minutes, stirring occasionally, until the sauce has thickened slightly and the flavours have melded. Remove from heat.
- Form the Wonton Cups: Carefully press one wonton wrapper into each greased muffin cup. Gently push the center down and crease the sides so the wrapper lines the cup, with the corners pointing up. Try to ensure the bottom lays flat to create a stable base. If using two muffin tins, repeat for all 24 cups.
- Optional Pre-Bake (for extra crispiness): For guaranteed crispy cups, you can lightly pre-bake the empty wonton wrappers for 3-5 minutes at 375°F (190°C) until they are just beginning to turn golden at the edges. Let them cool slightly before filling. This helps prevent the bottoms from becoming soft from the filling.
- Layer the Cheese (Bottom Layer): Sprinkle a small amount of the shredded cheese (about 1 teaspoon) into the bottom of each wonton cup. This creates a barrier that helps protect the wonton wrapper from moisture in the beef filling.
- Fill the Cups: Spoon the seasoned beef mixture evenly into each wonton cup, filling them about two-thirds to three-quarters full. Avoid overfilling, as this can cause spillage during baking and may prevent the wontons from crisping properly.
- Top with More Cheese: Generously sprinkle the remaining shredded cheese over the top of the beef filling in each cup. Ensure the cheese covers the meat well for maximum melty goodness.
- Bake: Carefully place the muffin tin(s) into the preheated oven. Bake for 10-15 minutes, or until the wonton wrapper edges are golden brown and crispy, and the cheese is completely melted and bubbly. Keep a close eye on them during the last few minutes, as wonton wrappers can brown quickly.
- Cool Slightly: Once baked, remove the muffin tin(s) from the oven and let the taco cups cool in the tin for about 5 minutes. This allows them to set slightly, making them easier to remove without breaking.
- Remove and Serve: Gently run a thin knife or small offset spatula around the edges of each taco cup if needed, then carefully lift them out of the muffin tin and arrange them on a serving platter.
- Add Toppings and Enjoy: Serve the Beefy Cheesy Taco Cups warm, garnished with your favourite toppings like sour cream, salsa, lettuce, tomatoes, and cilantro. Enjoy immediately!
Nutrition
- Serving Size: one normal portion
- Calories: 350
- Sodium: 800mg
- Fat: 25g
- Carbohydrates: 15g
- Protein: 20g