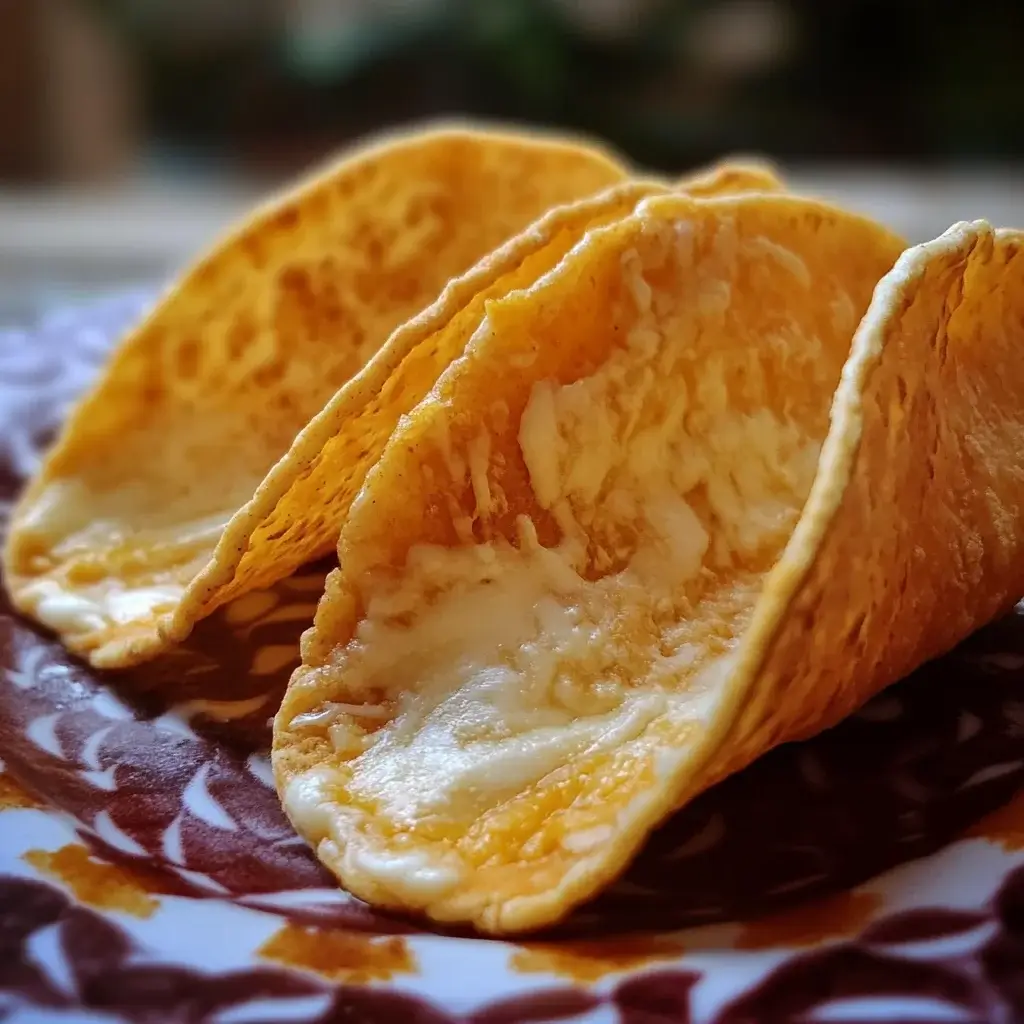
Oh, taco night, how I love thee! But let’s be honest, sometimes those traditional corn or flour tortillas can feel a little… heavy. That’s where these incredible cheese taco shells come in to completely transform your taco game. My family, always eager to try new things, was initially skeptical. Cheese as a taco shell? Really? But one bite, and the skepticism melted away faster than cheddar on a hot skillet. The crispy, savory crunch of the cheese, perfectly cradling our favorite taco fillings, was an absolute revelation. Suddenly, taco night was lighter, more flavorful, and undeniably more fun. If you’re looking to ditch the carbs, boost the protein, or simply add a delicious twist to your usual taco routine, you absolutely must try these cheese taco shells. Trust me, they are a game-changer!
Ingredients for Perfect Cheese Taco Shells
This recipe is delightfully simple, requiring just a few key ingredients. The beauty lies in the quality of your cheese, so choose wisely!
- Cheese: (2 cups, shredded) This is the star of the show! A good melting cheese is essential. Monterey Jack, cheddar, mozzarella, or a blend of these work beautifully. Pre-shredded cheese is convenient, but freshly shredded cheese melts even smoother and often contains fewer additives.
- Optional Spices: (½ teaspoon, each) While optional, a sprinkle of spices can elevate the flavor profile. Consider chili powder for warmth, cumin for earthiness, garlic powder for savory depth, or even a pinch of smoked paprika for a smoky kick. These are finely ground spices to evenly distribute flavor.
Step-by-Step Instructions to Craft Delicious Cheese Taco Shells
Creating these cheesy wonders is easier than you might think. Follow these simple steps for taco shell perfection:
- Preheat Your Oven and Prepare Baking Sheets: Begin by preheating your oven to 375°F (190°C). Line two large baking sheets with parchment paper or silicone baking mats. This is crucial for easy removal and prevents sticking. Parchment paper is preferred for crispier results as it absorbs moisture slightly.
- Shred Your Cheese (If Necessary) and Prepare Spices: If you are using a block of cheese, shred it using a box grater or food processor. Freshly shredded cheese melts more smoothly and often has a better texture. If you are using spices, combine them in a small bowl and set aside. Having everything prepped beforehand will make the process smoother.
- Form Cheese Circles on Baking Sheets: Take approximately ¼ cup of shredded cheese and create a flat, even circle on the prepared baking sheet. Aim for circles about 5-6 inches in diameter. Spacing is important; leave at least 2-3 inches between each cheese circle to allow for spreading and prevent them from merging during baking. Ensure the circles are not too thin, as they may become too fragile, but not too thick, as they may not crisp up properly. For a more uniform shape, you can use a cookie cutter as a guide, but freehand circles work just as well.
- Sprinkle with Spices (Optional): If you are using spices, lightly sprinkle your chosen spice blend evenly over each cheese circle. Be careful not to over-spice, as a little goes a long way. You can also press the spices lightly into the cheese to help them adhere during baking. This step adds an extra layer of flavor and aroma to your taco shells.
- Bake Until Golden and Crispy: Place the baking sheets in the preheated oven and bake for 8-12 minutes, or until the cheese is melted, bubbly, and golden brown around the edges. The baking time can vary slightly depending on your oven and the type of cheese used. Keep a close eye on them, especially in the last few minutes, to prevent burning. The cheese should be visibly melted and starting to crisp up, but not overly browned or burnt, which can make them taste bitter.
- Shape into Taco Shells Immediately: Once the cheese circles are baked to golden perfection, remove the baking sheets from the oven. Work quickly while the cheese is still pliable. Using a spatula, carefully lift each cheese circle and gently drape it over an inverted oven-safe bowl, a rolling pin, or the handle of a wooden spoon to create a taco shell shape. Alternatively, you can hang them between two oven racks to create a more pronounced taco shell curve. Be gentle but firm to shape them without breaking. If the cheese cools too quickly and becomes stiff, you can briefly return them to the oven for a minute or two to soften them again.
- Allow to Cool and Harden: Let the cheese taco shells cool and harden in their taco shell shape for about 5-10 minutes. As they cool, they will become crisp and firm enough to hold their shape and your delicious taco fillings. Do not try to remove them from the shaping mold too soon, as they will still be soft and prone to breaking. Once fully cooled and hardened, they are ready to be filled and enjoyed!
- Repeat for Remaining Cheese: Repeat steps 3-7 with the remaining shredded cheese until you have made the desired number of cheese taco shells. Work in batches to ensure the cheese stays warm and pliable for shaping. If you are making a large batch, you may need to re-line the baking sheets with fresh parchment paper between batches to prevent sticking.
- Storage (If Making Ahead): If you are making these cheese taco shells ahead of time, allow them to cool completely and then store them in an airtight container at room temperature for up to 2 days. They are best consumed fresh, but they can be reheated briefly in a warm oven or air fryer to crisp them up again before serving. Avoid storing them in the refrigerator, as condensation can make them lose their crispness.
Nutrition Facts: Cheesy Goodness in Every Bite
These cheese taco shells are not only delicious but also offer a nutritional profile that aligns with low-carb and keto-friendly diets. Here’s a general nutritional breakdown per serving (approximately 2 shells, depending on cheese type and size):
- Servings: Approximately 6 taco shells (3 servings of 2 shells each)
- Calories per Serving (2 shells): 350-450 kcal (depending on cheese type)
- Fat: 25-35g
- Sodium: Varies depending on cheese type
Note: These values are estimates and can vary based on the specific type and brand of cheese used. For precise nutritional information, refer to the nutritional label of your chosen cheese. Cheese taco shells are naturally gluten-free and are a good source of calcium and protein.
Preparation Time: Quick and Easy Cheesy Shells
The beauty of this recipe lies in its simplicity and speed. From start to finish, you’ll have these delicious cheese taco shells ready in a flash:
- Prep Time: 10 minutes (shredding cheese, preparing baking sheets, optional spice mixing)
- Cook Time: 8-12 minutes (baking in the oven)
- Shaping & Cooling Time: 10-15 minutes (shaping and allowing to harden)
- Total Time: Approximately 30-35 minutes
This quick preparation time makes cheese taco shells perfect for a weeknight meal or a spontaneous taco craving. You can even prep the cheese and spices ahead of time to further streamline the process.
How to Serve Your Amazing Cheese Taco Shells
The possibilities are endless when it comes to filling these crispy cheese taco shells. Get creative and enjoy! Here are some serving suggestions:
- Classic Beef Tacos: Fill with seasoned ground beef, shredded lettuce, diced tomatoes, shredded cheese (ironically!), sour cream, and salsa. The cheesy shell complements the traditional taco flavors beautifully.
- Spicy Chicken Tacos: Use shredded or diced chicken cooked with taco seasoning, chipotle peppers, or your favorite hot sauce. Top with avocado, cilantro, and a squeeze of lime for a zesty kick.
- Carnitas (Pulled Pork) Tacos: Slow-cooked, tender carnitas are a fantastic filling. Add pickled onions, salsa verde, and a dollop of crema for a flavorful and satisfying taco.
- Shrimp or Fish Tacos: Grilled or pan-seared shrimp or flaky white fish seasoned with chili lime or blackened spices are delicious in cheese taco shells. Top with cabbage slaw, mango salsa, and a creamy cilantro lime sauce.
- Vegetarian Black Bean Tacos: Seasoned black beans with corn, bell peppers, and onions make a hearty vegetarian filling. Add salsa, guacamole, and a sprinkle of cotija cheese for a complete vegetarian taco experience.
- Breakfast Tacos: Scrambled eggs, chorizo or bacon, cheese, and salsa are perfect for a cheesy breakfast taco shell. Add avocado or pico de gallo for extra flavor and freshness.
- Dessert Taco Shells (Sweet Version): For a fun dessert twist, use a sweeter cheese like mascarpone or ricotta (mixed with a touch of sweetener and vanilla) to make the shells. Fill with whipped cream, berries, chocolate shavings, or caramel sauce for a unique dessert taco.
- Taco Salad Bowls: For a deconstructed taco salad, crumble the cheese taco shells into a bowl and top with your favorite taco salad ingredients like lettuce, ground beef or chicken, beans, corn, tomatoes, avocado, cheese, and dressing.
Additional Tips for Cheese Taco Shell Success
To ensure your cheese taco shells are perfect every time, here are some helpful tips and tricks:
- Cheese Choice Matters: Opt for cheeses that melt well and crisp up nicely. Monterey Jack, cheddar, mozzarella, provolone, and pepper jack are all excellent choices. Avoid cheeses that are too soft or don’t melt well, like feta or paneer. Experiment with different cheese blends to find your favorite flavor and texture.
- Don’t Overcrowd the Baking Sheet: Give each cheese circle ample space on the baking sheet. Overcrowding can lead to the cheese circles merging together and sticking, making them difficult to shape and remove. Bake in batches if necessary.
- Bake Until Golden Brown: The key to crispy cheese taco shells is baking them until they are golden brown around the edges. This ensures that the cheese is fully melted, and moisture has evaporated, resulting in a crispy texture. Underbaked shells will be soft and floppy.
- Work Quickly When Shaping: Cheese taco shells are easiest to shape while they are still warm and pliable straight from the oven. Have your shaping molds (bowls, rolling pin, etc.) ready and work quickly to drape and shape the shells before they cool and harden.
- Use a Spatula for Lifting: A thin, flexible spatula is essential for carefully lifting the delicate cheese circles from the parchment paper without breaking them. Slide the spatula gently underneath the cheese circle to loosen it before lifting.
- Season Your Cheese (Subtly): While optional spices add flavor, be mindful not to over-season. A light sprinkle is often enough to enhance the cheese flavor without overpowering it. You can also experiment with different spice combinations to create unique flavor profiles.
- Control the Thickness: Aim for even cheese circles that are not too thin or too thick. Thin circles can become too fragile and break easily, while thick circles may not crisp up properly in the center. About ¼ cup of shredded cheese per circle is a good starting point.
- Reheat for Crispness: If your cheese taco shells lose some of their crispness over time or if you are making them ahead, you can briefly reheat them in a warm oven or air fryer for a few minutes to restore their crispy texture. Avoid microwaving, as this can make them soggy.
Frequently Asked Questions About Cheese Taco Shells (FAQ)
Got questions about making cheese taco shells? We’ve got answers! Here are some frequently asked questions to help you on your cheesy taco shell journey:
Q1: Can I make cheese taco shells ahead of time?
A1: Yes, you can make cheese taco shells ahead of time. Allow them to cool completely and store them in an airtight container at room temperature for up to 2 days. They are best served fresh, but can be briefly reheated to crisp them up again.
Q2: My cheese taco shells are sticking to the parchment paper. What am I doing wrong?
A2: Ensure you are using good quality parchment paper or silicone baking mats. Make sure the baking sheet is completely cool before placing new parchment paper for subsequent batches. If they are still sticking slightly, try lightly greasing the parchment paper with cooking spray or using a silicone baking mat, which is naturally non-stick.
Q3: My cheese taco shells are not crispy. How can I make them crispier?
A3: Make sure you bake the cheese circles until they are golden brown around the edges. This indicates that enough moisture has evaporated for them to crisp up. You can also try baking them at a slightly lower temperature for a longer time to allow for more moisture evaporation without burning. Ensure your oven temperature is accurate.
Q4: Can I use different types of cheese?
A4: Absolutely! Experiment with different cheeses or cheese blends to find your favorite flavor. Monterey Jack, cheddar, mozzarella, provolone, and pepper jack are all great options. You can also use a combination of cheeses for a more complex flavor profile.
Q5: Can I add other ingredients to the cheese taco shells?
A5: Yes, you can! Besides spices, you can add finely chopped cooked bacon bits, crumbled sausage, or even finely diced jalapeños to the cheese mixture for added flavor and texture. Make sure any additions are finely chopped and evenly distributed in the cheese circles.
Q6: What if my cheese taco shells break when I try to shape them?
A6: If your cheese taco shells are breaking, they may have cooled down too much and become too brittle. You can briefly return them to the oven for a minute or two to soften them again before shaping. Also, be gentle but firm when shaping, and use a spatula to support the cheese circle as you drape it over your shaping mold.
Q7: Are cheese taco shells keto-friendly and gluten-free?
A7: Yes, cheese taco shells are naturally keto-friendly and gluten-free, as they are made primarily from cheese. They are a great low-carb alternative to traditional corn or flour tortillas for those following keto, low-carb, or gluten-free diets.
Q8: Can I make mini cheese taco shells for appetizers?
A8: Yes, you can easily make mini cheese taco shells! Simply use less cheese per circle (about 1-2 tablespoons) and create smaller circles on the baking sheet. Bake for a shorter time (around 6-8 minutes) and shape them into mini taco shells or bowls for bite-sized appetizers.
Cheese taco shells are more than just a trend; they are a delicious, versatile, and healthy alternative to traditional taco shells. Once you try these crispy, cheesy delights, you might just find yourself making them a regular part of your taco night repertoire. So, ditch the carbs, embrace the cheese, and get ready to elevate your taco game to a whole new level of deliciousness!