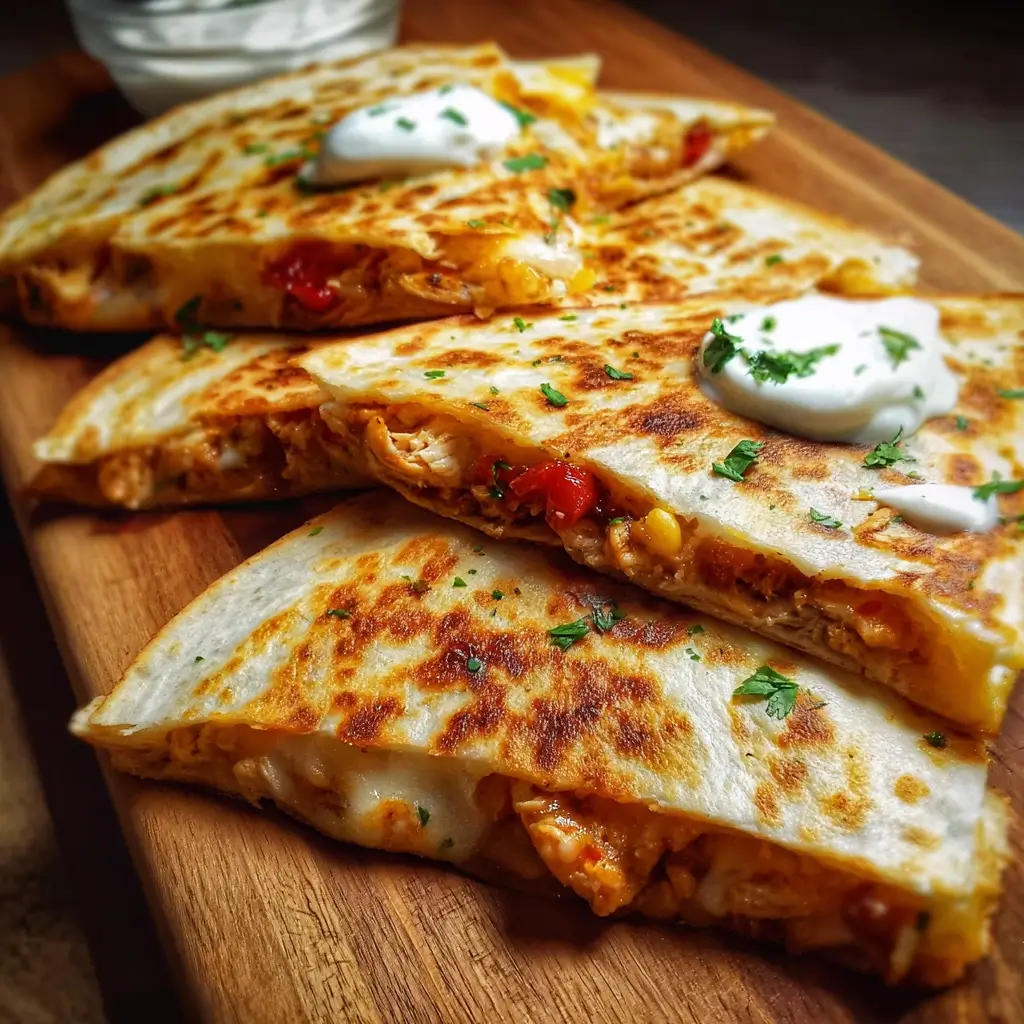
In the endless search for the perfect weeknight meal, my family has declared a clear winner: these Cheesy Chicken Quesadilla Triangles. Last Friday, after a whirlwind of school runs, work deadlines, and forgotten errands, the thought of cooking an elaborate dinner felt monumental. I needed something fast, something everyone would eat without complaint, and frankly, something that felt a little indulgent. I remembered this recipe, a simple concoction of pantry staples that transforms into a golden, crispy, and outrageously cheesy masterpiece. The moment the first triangle hit the hot pan, the kitchen filled with an irresistible aroma. The kids, who were previously glued to their screens, suddenly appeared, drawn by the sizzle and the promise of melted cheese. Watching their faces light up as they took their first crunchy, gooey bite was the highlight of my week. It wasn’t just a meal; it was a moment of shared, simple joy. This recipe is more than just food; it’s our family’s go-to for turning a chaotic day into a delicious, comforting memory, one perfect triangle at a time.
Ingredients
- 2 cups Cooked Chicken, shredded: The heart of our quesadilla. Using a store-bought rotisserie chicken is a fantastic time-saver, but any cooked, shredded chicken breast or thigh meat works beautifully.
- 8 large Flour Tortillas (8-10 inch): These are our canvas. Large, soft flour tortillas are essential for holding the generous filling and folding into perfect triangles.
- 2 ½ cups Shredded Mexican Cheese Blend: The key to that glorious cheese pull. A pre-shredded blend of Monterey Jack, Cheddar, Asadero, and Queso Quesadilla melts into a creamy, flavorful river of deliciousness.
- 1/4 cup Red Onion, finely diced: Adds a subtle, sharp bite that cuts through the richness of the cheese and chicken, providing a layer of fresh flavor.
- 1/4 cup Fresh Cilantro, chopped: This brings a bright, herbaceous note that elevates the entire filling from good to great. If you’re not a fan, you can omit it or substitute with flat-leaf parsley.
- 1 teaspoon Chili Powder: Provides a gentle, smoky warmth without being overly spicy, adding depth to the flavor profile.
- 1/2 teaspoon Cumin: An essential warm, earthy spice that is a cornerstone of Mexican-inspired cuisine.
- 1/2 teaspoon Garlic Powder: A savory all-star that infuses the filling with a gentle, aromatic garlic flavor that pairs perfectly with the chicken and cheese.
- 1/4 teaspoon Salt (or to taste): Enhances all the other flavors in the dish. Adjust based on the saltiness of your chicken and cheese.
- 1/4 teaspoon Black Pepper: Adds a final touch of mild, woody spice.
- 4 tablespoons Unsalted Butter, melted (or vegetable oil): This is the secret to achieving that perfectly golden-brown, crispy exterior on the tortillas.
Instructions
- Prepare the Savory Chicken Filling: In a medium-sized mixing bowl, combine the 2 cups of shredded cooked chicken, 2 cups of the Mexican cheese blend (reserving the last ½ cup for assembly), the finely diced red onion, and the chopped fresh cilantro. Sprinkle in the chili powder, cumin, garlic powder, salt, and black pepper. Use a fork or a spatula to gently toss all the ingredients together until they are evenly distributed. You want every bite to have a perfect ratio of chicken, cheese, and seasoning. Set the bowl aside.
- Assemble the Quesadilla Triangles: Lay one large flour tortilla flat on a clean work surface or cutting board. Mentally divide the tortilla into four quadrants. Spread approximately 1/8th of the chicken and cheese mixture evenly over one quadrant of the tortilla, leaving a small border around the edge. Sprinkle a little of the reserved ½ cup of cheese over the filling for extra gooeyness.
- Master the Triangle Fold: This folding technique is what makes these so easy to handle and cook.
- Take the empty quadrant to the left (or right) of your filling and fold it over the filling. You should now have a half-moon shape with filling in one half.
- Take the folded half-moon and fold it in half again over the remaining empty quadrant. You will now have a filled triangle shape, one-quarter the size of the original tortilla. This method creates neat layers and ensures the filling stays securely inside.
- Repeat this assembly and folding process for the remaining 7 tortillas until you have 8 perfectly folded quesadilla triangles.
- Cook to Golden Perfection: Place a large non-stick skillet, griddle, or pan over medium heat. It’s important not to have the heat too high, as this can burn the tortilla before the cheese has a chance to fully melt. Once the pan is preheated, lightly brush one side of a quesadilla triangle with the melted butter or oil. Place it butter-side down in the hot skillet. While it’s cooking, brush the top side with more melted butter.
- Flip and Finish: Cook for 2-4 minutes per side. You are looking for a deep golden-brown color and a crispy texture on the tortilla. You’ll know the inside is ready when the cheese is visibly melted and oozing slightly from the edges. Use a spatula to carefully flip the triangle and cook the other side for another 2-4 minutes until it matches the first side.
- Serve Immediately: Remove the golden, crispy quesadilla triangle from the pan and place it on a cutting board. You can serve it whole or slice it in half to reveal the cheesy, steamy interior. Repeat the cooking process with the remaining triangles, adding more butter or oil to the pan as needed. Serve hot with your favorite dips and sides.
Nutrition Facts
- Servings: 8 triangles (serves 4 people, 2 triangles per person)
- Calories per serving (2 triangles): Approximately 580 kcal
- Protein (35g): An excellent source of protein from the chicken and cheese, crucial for muscle maintenance and keeping you feeling full and satisfied.
- Carbohydrates (40g): Primarily from the flour tortillas, providing the energy needed to power through your day.
- Fat (30g): A significant portion of the flavor and satisfying richness comes from the cheese and butter, making this a wonderfully indulgent treat.
- Sodium (950mg): Mainly from the cheese and added salt. Be mindful of this if you are monitoring your sodium intake; you can adjust by using low-sodium cheese and less added salt.
- Fiber (3g): The tortillas and vegetables contribute a small amount of dietary fiber, which is important for digestive health.
Preparation Time
This recipe is designed for speed and efficiency, making it an ideal choice for busy weeknights or a quick lunch.
- Preparation Time: 10 minutes (If using pre-cooked chicken)
- Cooking Time: 20-25 minutes (Cooking the triangles in batches)
- Total Time: Approximately 30-35 minutes from start to finish.
How to Serve
The beauty of these Cheesy Chicken Quesadilla Triangles lies in their versatility. They can be a simple snack or the star of a full-blown feast. Here’s how to serve them for maximum enjoyment:
Classic Dipping Sauces:
A quesadilla is only as good as its dips! Offer a variety so everyone can customize their experience.
- Classic Salsa: A chunky or smooth tomato salsa provides a fresh, acidic counterpoint.
- Sour Cream or Plain Greek Yogurt: A cool and creamy dollop tames any heat and adds a pleasant tang.
- Guacamole: Rich, creamy, and packed with flavor, homemade or store-bought guacamole is a must-have.
- Pico de Gallo: This fresh, uncooked salsa made from chopped tomato, onion, cilantro, and lime juice adds a vibrant, crunchy texture.
- Chipotle Aioli: For a smoky and creamy kick, mix mayonnaise with a bit of adobo sauce from a can of chipotles, lime juice, and garlic.
Hearty Side Dishes:
Turn your quesadillas into a complete and satisfying meal with these complementary sides.
- Mexican Rice: Fluffy rice seasoned with tomato, onion, and spices is a classic pairing that absorbs any extra sauces.
- Black Bean and Corn Salad: A simple salad of black beans, corn, red onion, and bell pepper tossed in a lime vinaigrette adds freshness and fiber.
- Cilantro Lime Slaw: A crunchy, tangy slaw without the heavy mayo offers a refreshing contrast to the rich quesadilla.
- Simple Green Salad: A bed of crisp lettuce with a light vinaigrette can make the meal feel more balanced.
Finishing Touches and Garnishes:
Elevate the presentation and add another layer of flavor right before serving.
- Drizzle with a bit of Mexican crema or thinned sour cream.
- Sprinkle with extra chopped fresh cilantro or crumbled cotija cheese.
- Serve with lime wedges on the side for a fresh squeeze of citrus.
Additional Tips
- The Secret to a Truly Crispy Tortilla: The key is twofold: butter and medium-low heat. Brushing the outside of the tortilla with melted butter (not just oil) gives it a richer flavor and a more satisfying, golden-brown crunch. Cooking on medium-low heat allows the tortilla to slowly toast and crisp up while giving the cheese ample time to melt into a gooey river of deliciousness without burning the exterior.
- Choose Your Cheese Wisely: While a pre-shredded Mexican blend is convenient, for the ultimate melt, shred your own cheese from a block. Pre-shredded cheeses are often coated in starches to prevent clumping, which can inhibit a perfectly smooth melt. Great melting cheeses include Oaxaca, Monterey Jack, Asadero, and low-moisture mozzarella. A sharp cheddar adds fantastic flavor.
- Don’t Overstuff the Quesadilla: It’s tempting to load up each quadrant with as much filling as possible, but this is a common mistake. Overstuffing leads to a messy cooking process where the filling spills out, and it can prevent the quesadilla from sealing properly, making it difficult to flip. A thin, even layer is all you need.
- Keep Them Warm While You Cook: If you’re cooking for a crowd, you’ll be making the quesadillas in batches. To ensure everyone eats a hot, crispy quesadilla at the same time, preheat your oven to a low temperature (around 200°F or 95°C). As you finish cooking each triangle, place it on a baking sheet lined with a wire rack and keep it in the warm oven. The wire rack is crucial as it allows air to circulate, preventing the bottoms from getting soggy.
- Get Creative with Fillings: This recipe is a fantastic base for experimentation. Add a can of drained and rinsed black beans or corn to the chicken mixture for more texture and fiber. Sautéed bell peppers and onions make a great addition. For a different protein, try using leftover shredded beef or even seasoned ground beef. You could also incorporate some diced cooked ham for a salty, savory twist.
- Make-Ahead Magic for Busy Nights: The entire chicken filling can be prepared up to 2 days in advance. Simply mix all the filling ingredients, store them in an airtight container in the refrigerator, and you’ve cut your prep time on a busy night down to just a few minutes of assembly and cooking.
- Use a Dry Pan First: Before you add any butter or oil, you can place the folded, dry quesadilla triangle in the heated pan for about 30 seconds per side. This initial dry toasting helps to firm up the tortilla and create a better seal, making it less likely to fall apart when you add the butter and continue cooking.
- The Pizza Cutter is Your Best Friend: For perfectly clean, sharp cuts without squishing out the filling, use a pizza cutter instead of a knife. Simply roll it across the finished triangle to slice it in half for easy dipping and serving. It’s faster, cleaner, and more effective.
Frequently Asked Questions (FAQ)
1. Can I make these Cheesy Chicken Quesadilla Triangles in an air fryer?
Absolutely! The air fryer is a fantastic tool for making quesadillas extra crispy. To do so, preheat your air fryer to 375°F (190°C). Brush the assembled triangles with melted butter or give them a light spray of cooking oil on both sides. Place them in the air fryer basket in a single layer, making sure not to overcrowd it. Air fry for 4-6 minutes, flipping halfway through, until they are golden brown and the cheese is thoroughly melted.
2. What is the best way to store and reheat leftovers?
Store any leftover quesadilla triangles in an airtight container or wrapped tightly in aluminum foil in the refrigerator for up to 3 days. To reheat and bring back their crispiness, avoid the microwave, which will make them soft and soggy. The best method is to reheat them in a dry non-stick skillet over medium-low heat for 2-3 minutes per side. Alternatively, you can use the oven or an air fryer at 350°F (175°C) for about 5-8 minutes.
3. My quesadillas always come out soggy. What am I doing wrong?
Sogginess is usually caused by two things: excess moisture in the filling or the wrong cooking heat. Ensure your ingredients, like the chicken or any added vegetables, are as dry as possible. Also, avoid cooking on heat that is too low for too long, as this can cause the tortilla to steam rather than toast. Conversely, heat that is too high will burn the outside before the inside is heated through. The sweet spot is a consistent medium heat.
4. Can I use corn tortillas instead of flour tortillas for this recipe?
You can, but the folding technique will be much more difficult. Corn tortillas are smaller and less pliable than flour tortillas and are prone to cracking when folded this way. If you want to use corn tortillas, it’s better to make traditional quesadillas by placing the filling between two whole tortillas or on one half of a single tortilla and folding it over into a half-moon.
5. How do I make these quesadillas spicier?
There are several ways to turn up the heat! You can add finely diced jalapeños (with or without seeds, depending on your heat preference) to the chicken mixture. Alternatively, add a pinch of cayenne pepper or a dash of your favorite hot sauce to the filling. Serving them with a spicy salsa or a chipotle-based dip is another easy way to add a fiery kick.
6. Can I freeze these quesadillas for later?
Yes, these freeze remarkably well, making them a great option for meal prep. Assemble the quesadillas completely but do not cook them. Place the uncooked, folded triangles on a baking sheet in a single layer and flash-freeze them for about an hour. Once they are solid, transfer them to a freezer-safe bag or container, separating them with sheets of parchment paper to prevent sticking. They can be stored for up to 3 months. Cook them directly from frozen in a skillet or oven, adding a few extra minutes to the cooking time.
7. I don’t have a Mexican cheese blend. What other cheeses can I use?
No problem! The goal is a good melting cheese with great flavor. A 50/50 mix of Monterey Jack (for its superior melting quality) and medium or sharp Cheddar (for its robust flavor) is a perfect substitute. Colby, Provolone, or even a low-moisture mozzarella would also work well in a pinch.
8. What’s the point of folding it into a triangle instead of the usual half-moon?
The triangle fold is more than just a novelty; it’s a structural advantage. This method creates multiple layers of tortilla within the quesadilla, resulting in a sturdier, more compact package. It holds the filling in much more securely, making them easier for kids (and adults!) to handle without the contents spilling out. They are also perfect for dipping and fit neatly into a lunchbox.

Cheesy Chicken Quesadilla Triangles
Ingredients
- 2 cups Cooked Chicken, shredded: The heart of our quesadilla. Using a store-bought rotisserie chicken is a fantastic time-saver, but any cooked, shredded chicken breast or thigh meat works beautifully.
- 8 large Flour Tortillas (8-10 inch): These are our canvas. Large, soft flour tortillas are essential for holding the generous filling and folding into perfect triangles.
- 2 ½ cups Shredded Mexican Cheese Blend: The key to that glorious cheese pull. A pre-shredded blend of Monterey Jack, Cheddar, Asadero, and Queso Quesadilla melts into a creamy, flavorful river of deliciousness.
- 1/4 cup Red Onion, finely diced: Adds a subtle, sharp bite that cuts through the richness of the cheese and chicken, providing a layer of fresh flavor.
- 1/4 cup Fresh Cilantro, chopped: This brings a bright, herbaceous note that elevates the entire filling from good to great. If you’re not a fan, you can omit it or substitute with flat-leaf parsley.
- 1 teaspoon Chili Powder: Provides a gentle, smoky warmth without being overly spicy, adding depth to the flavor profile.
- 1/2 teaspoon Cumin: An essential warm, earthy spice that is a cornerstone of Mexican-inspired cuisine.
- 1/2 teaspoon Garlic Powder: A savory all-star that infuses the filling with a gentle, aromatic garlic flavor that pairs perfectly with the chicken and cheese.
- 1/4 teaspoon Salt (or to taste): Enhances all the other flavors in the dish. Adjust based on the saltiness of your chicken and cheese.
- 1/4 teaspoon Black Pepper: Adds a final touch of mild, woody spice.
- 4 tablespoons Unsalted Butter, melted (or vegetable oil): This is the secret to achieving that perfectly golden-brown, crispy exterior on the tortillas.
Instructions
- Prepare the Savory Chicken Filling: In a medium-sized mixing bowl, combine the 2 cups of shredded cooked chicken, 2 cups of the Mexican cheese blend (reserving the last ½ cup for assembly), the finely diced red onion, and the chopped fresh cilantro. Sprinkle in the chili powder, cumin, garlic powder, salt, and black pepper. Use a fork or a spatula to gently toss all the ingredients together until they are evenly distributed. You want every bite to have a perfect ratio of chicken, cheese, and seasoning. Set the bowl aside.
- Assemble the Quesadilla Triangles: Lay one large flour tortilla flat on a clean work surface or cutting board. Mentally divide the tortilla into four quadrants. Spread approximately 1/8th of the chicken and cheese mixture evenly over one quadrant of the tortilla, leaving a small border around the edge. Sprinkle a little of the reserved ½ cup of cheese over the filling for extra gooeyness.
- Master the Triangle Fold: This folding technique is what makes these so easy to handle and cook.
- Take the empty quadrant to the left (or right) of your filling and fold it over the filling. You should now have a half-moon shape with filling in one half.
- Take the folded half-moon and fold it in half again over the remaining empty quadrant. You will now have a filled triangle shape, one-quarter the size of the original tortilla. This method creates neat layers and ensures the filling stays securely inside.
- Repeat this assembly and folding process for the remaining 7 tortillas until you have 8 perfectly folded quesadilla triangles.
- Cook to Golden Perfection: Place a large non-stick skillet, griddle, or pan over medium heat. It’s important not to have the heat too high, as this can burn the tortilla before the cheese has a chance to fully melt. Once the pan is preheated, lightly brush one side of a quesadilla triangle with the melted butter or oil. Place it butter-side down in the hot skillet. While it’s cooking, brush the top side with more melted butter.
- Flip and Finish: Cook for 2-4 minutes per side. You are looking for a deep golden-brown color and a crispy texture on the tortilla. You’ll know the inside is ready when the cheese is visibly melted and oozing slightly from the edges. Use a spatula to carefully flip the triangle and cook the other side for another 2-4 minutes until it matches the first side.
- Serve Immediately: Remove the golden, crispy quesadilla triangle from the pan and place it on a cutting board. You can serve it whole or slice it in half to reveal the cheesy, steamy interior. Repeat the cooking process with the remaining triangles, adding more butter or oil to the pan as needed. Serve hot with your favorite dips and sides.
Nutrition
- Serving Size: one normal portion
- Calories: 580
- Sodium: 950mg
- Fat: 30g
- Carbohydrates: 40g
- Fiber: 3g
- Protein: 35g


