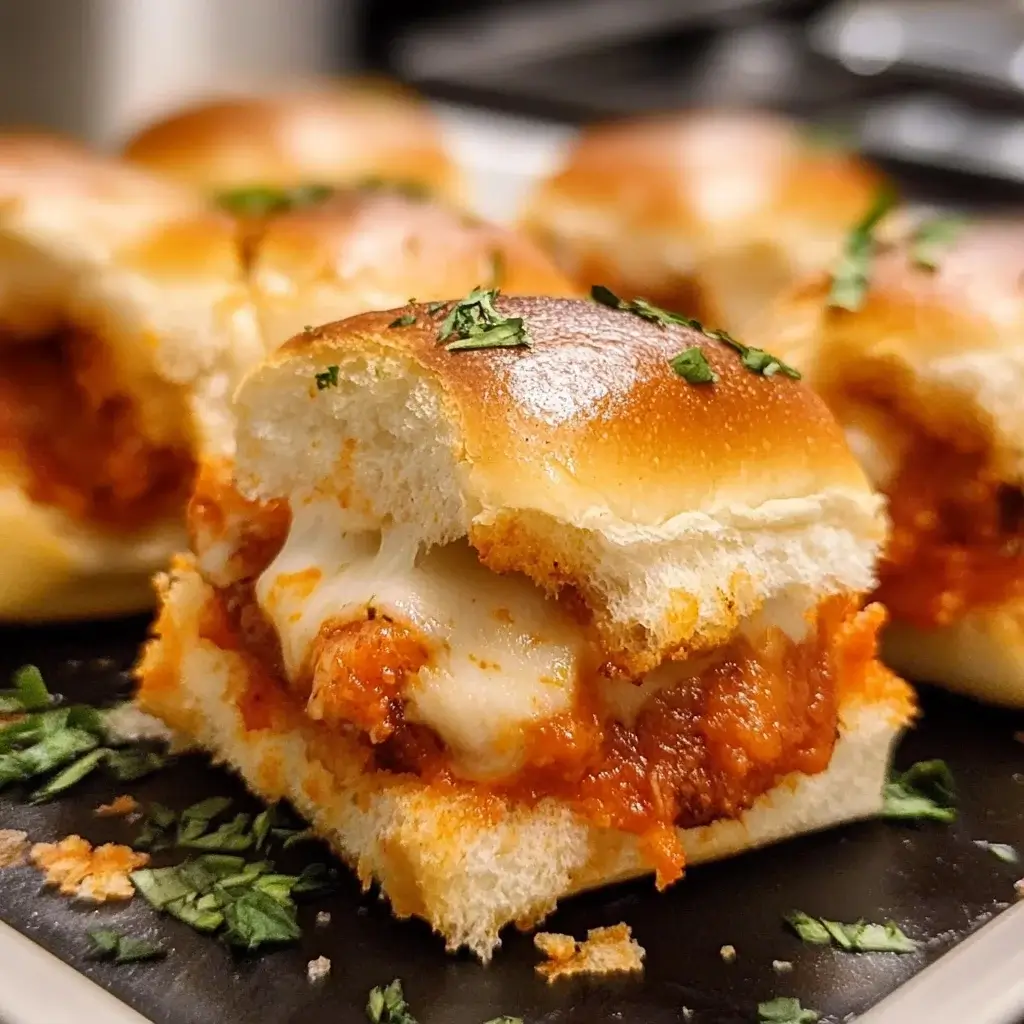
These Chicken Parmesan Sliders have become an absolute legend in my household. I first whipped them up for a casual family game night, thinking they’d be a fun, easy snack. Little did I know they’d steal the show! The kids, who can be notoriously picky, devoured them, their little faces smeared with marinara and melted cheese – a sure sign of success. My husband, a man of few words but strong culinary opinions, declared them “restaurant-quality good” and immediately requested them for our next potluck. What I love most is their versatility; they’re hearty enough for a quick weeknight dinner with a side salad, yet perfectly portioned and impressive enough for entertaining guests. The combination of crispy chicken, tangy marinara, gooey mozzarella, and those iconic sweet Hawaiian rolls, all brushed with a savory garlic herb butter, is just an explosion of comforting, irresistible flavors. They are, without a doubt, a guaranteed crowd-pleaser, bringing smiles and satisfying sighs with every single bite.
Ingredients
- 12 Hawaiian sweet rolls (or similar soft dinner rolls): The slight sweetness of these rolls perfectly complements the savory filling. One standard package is usually 12 rolls.
- 1 lb boneless, skinless chicken breasts (about 2 medium): Cut into 12 small, slider-sized pieces. Alternatively, you can use pre-cooked chicken tenders or even shredded rotisserie chicken for a quicker version.
- 1/2 cup all-purpose flour: For dredging the chicken, creating a light coating for crispiness.
- 2 large eggs, beaten: Acts as a binder for the breadcrumbs to adhere to the chicken.
- 1 cup Italian-style breadcrumbs: These come pre-seasoned, adding an extra layer of flavor. Panko breadcrumbs can be used for extra crispiness.
- 1/4 cup grated Parmesan cheese (plus extra for topping): Adds a salty, nutty flavor to the breading and topping.
- Salt and freshly ground black pepper, to taste: Essential for seasoning the chicken and flour.
- 1/4 cup olive oil or vegetable oil (for frying): Needed to achieve that golden-brown crisp on the chicken. More may be needed depending on your pan.
- 1.5 cups marinara sauce (good quality store-bought or homemade): The heart of the “Parmesan” flavor; choose one you love.
- 12 slices mozzarella cheese (or 1.5 cups shredded mozzarella): For that essential cheesy melt. Low-moisture, part-skim mozzarella works best.
- 1/4 cup (1/2 stick) unsalted butter, melted: Forms the base of the delicious topping brushed over the rolls.
- 1 tablespoon grated Parmesan cheese: Mixed into the butter topping for extra flavor.
- 1 teaspoon garlic powder: Adds a savory kick to the butter topping.
- 1/2 teaspoon dried Italian seasoning (or a mix of dried oregano and basil): Enhances the Italian flavors in the butter topping.
- Fresh basil or parsley, chopped (for garnish, optional): Adds a touch of freshness and color before serving.
Instructions
- Prepare the Chicken:
- If using chicken breasts, slice them horizontally to make thinner cutlets, then cut each cutlet into approximately 6 smaller, slider-sized pieces (aiming for 12 pieces total).
- Pat the chicken pieces dry with a paper towel. Season generously with salt and pepper.
- Set up your breading station: Place the flour in one shallow dish. In a second shallow dish, whisk the eggs. In a third shallow dish, combine the Italian breadcrumbs and 1/4 cup of grated Parmesan cheese.
- Dredge each chicken piece first in flour (shaking off excess), then dip into the beaten eggs (letting excess drip off), and finally coat thoroughly with the breadcrumb-Parmesan mixture, pressing gently to help it adhere. Place breaded chicken on a clean plate or baking sheet.
- Cook the Chicken:
- Heat the olive oil in a large skillet over medium-high heat. Once the oil is shimmering, carefully add the breaded chicken pieces in a single layer (you may need to do this in batches to avoid overcrowding the pan).
- Cook for 3-4 minutes per side, or until golden brown, crispy, and cooked through (internal temperature should reach 165°F or 74°C).
- Remove the cooked chicken from the skillet and place it on a wire rack or paper towel-lined plate to drain any excess oil.
- Assemble the Sliders:
- Preheat your oven to 375°F (190°C).
- Without separating the Hawaiian rolls, use a long serrated knife to slice the entire slab of rolls in half horizontally, creating a top “lid” and a bottom “base.”
- Place the bottom half of the rolls into a 9×13 inch baking dish or onto a baking sheet.
- Spread about 1/2 cup of marinara sauce evenly over the cut side of the bottom rolls.
- Arrange the cooked chicken pieces evenly on top of the sauced rolls.
- Spoon the remaining 1 cup of marinara sauce over the chicken pieces.
- Top each chicken piece with a slice of mozzarella cheese (or sprinkle shredded mozzarella evenly over the chicken).
- Place the top half of the rolls over the cheese.
- Prepare the Topping and Bake:
- In a small bowl, whisk together the melted butter, 1 tablespoon of grated Parmesan cheese, garlic powder, and dried Italian seasoning.
- Evenly brush this butter mixture over the tops of the rolls. You can sprinkle a little extra Parmesan on top if desired.
- Cover the baking dish loosely with aluminum foil to prevent the tops from burning too quickly.
- Bake for 15-20 minutes, or until the cheese is fully melted and bubbly, and the sliders are heated through.
- Remove the foil for the last 5 minutes of baking to allow the tops of the rolls to get golden brown and slightly crispy.
- Serve:
- Let the sliders rest for 5-10 minutes after removing them from the oven. This helps the cheese set a bit and makes them easier to cut and serve.
- If desired, garnish with fresh chopped basil or parsley.
- Use a sharp knife or a pizza cutter to cut along the individual roll lines to separate the sliders. Serve immediately.
Nutrition Facts
- Servings: 12 sliders
- Calories per serving (1 slider): Approximately 280-350 calories (This is an estimate and can vary based on specific ingredients like roll size, type of chicken, and amount of cheese/sauce used).
- Protein: Approximately 15-20g. Crucial for muscle repair and satiety, making these sliders surprisingly filling.
- Fat: Approximately 12-18g (with saturated fat from cheese and butter). Provides flavor and energy.
- Carbohydrates: Approximately 25-30g. Primarily from the rolls and breadcrumbs, offering quick energy.
- Sodium: Can be significant due to cheese, processed meats (if used), and marinara sauce. Important to be mindful of for those watching sodium intake.
(Note: These are estimates. Actual nutritional values will vary based on specific brands and quantities of ingredients used.)
Preparation Time
- Prep Time: Approximately 25-30 minutes (includes breading the chicken and assembling). If using pre-cooked chicken, this can be reduced to 10-15 minutes.
- Cook Time: Approximately 20-25 minutes (includes frying the chicken and baking the sliders).
- Total Time: Approximately 45-55 minutes from start to finish, making them a fantastic option for a relatively quick and incredibly satisfying meal or appetizer.
How to Serve
Chicken Parmesan Sliders are wonderfully versatile and can be the star of many occasions. Here are some serving suggestions:
- As an Appetizer/Party Food:
- Arrange them on a large platter for easy grabbing at parties, game days, or potlucks.
- Serve alongside other classic party snacks like wings, dips, or a vegetable crudité platter.
- Provide small plates and plenty of napkins – they can get delightfully messy!
- As a Main Course:
- Pair 2-3 sliders per person with a fresh side salad (Caesar salad, simple green salad with Italian vinaigrette) for a balanced meal.
- Serve with a side of crispy French fries, sweet potato fries, or tater tots.
- A light pasta salad or a Caprese salad would also complement them beautifully.
- Consider a side of steamed or roasted vegetables like broccoli, green beans, or asparagus.
- With Dipping Sauces (Optional):
- Offer extra warm marinara sauce on the side for dipping.
- Some might enjoy a garlic aioli or even a pesto dip.
- For Different Occasions:
- Game Day: The ultimate football food! Easy to eat while cheering.
- Family Dinners: A kid-friendly meal that adults will love too.
- Casual Get-Togethers: Impressive yet low-effort.
- Potlucks: They travel reasonably well (assemble just before leaving or at the location if possible) and are always a hit.
Additional Tips
- Shortcut with Rotisserie Chicken: For an ultra-quick version, shred a store-bought rotisserie chicken. Skip the breading and frying steps. Simply layer the shredded chicken with marinara and cheese on the rolls. While you’ll miss the crispy chicken texture, it’s a fantastic time-saver. You could also use pre-cooked frozen chicken tenders, cooked according to package directions and then chopped.
- Bread Matters: While Hawaiian rolls are classic for their sweetness, any soft dinner rolls or brioche slider buns will work. Ensure they are connected so you can slice the slab in half easily. Toasting the cut sides of the buns lightly before assembly can help prevent sogginess.
- Don’t Skimp on Sauce Quality: The marinara sauce is a key flavor component. Use a good quality store-bought sauce you enjoy, or if you have a favorite homemade recipe, even better! A robust, flavorful sauce makes a big difference.
- Cheese Choices: Low-moisture mozzarella is best for that classic “cheese pull” without making the sliders too watery. Provolone is another excellent melting cheese that pairs well. A mix of mozzarella and provolone can be delicious. For an extra flavor kick, add a sprinkle of Pecorino Romano along with the Parmesan.
- Make-Ahead Magic: You can bread the chicken and store it in the refrigerator for a few hours before frying. You can also fully cook the chicken, let it cool, and store it. Assemble the sliders just before baking for the best results. Assembled, unbaked sliders can be covered and refrigerated for a few hours, but they might get a bit soggy if left too long.
- Herb Butter Power: Don’t skip the garlic herb butter topping! It adds incredible flavor and helps the tops of the rolls get beautifully golden and slightly crisp. Fresh garlic (minced) can be used instead of garlic powder for a more intense flavor.
- Preventing Sogginess: To minimize sogginess on the bottom buns, you can lightly toast the cut side of the bottom slab of rolls under the broiler for 1-2 minutes before adding the marinara sauce. Also, don’t overdo the sauce on the bottom layer.
- Customize Your Heat: If you like a bit of spice, add a pinch of red pepper flakes to your marinara sauce or sprinkle some onto the chicken layer before adding the cheese. You could also incorporate a dash of hot sauce into the egg wash for the chicken.
FAQ Section
Q1: Can I use ground chicken instead of chicken breasts?
A1: Yes, you can make mini chicken patties from ground chicken. Season the ground chicken well, form small patties about the size of the rolls, cook them through, and then proceed with assembly. This changes the texture but can be a tasty alternative.
Q2: How do I store and reheat leftovers?
A2: Store leftover sliders in an airtight container in the refrigerator for up to 3 days. To reheat, the oven or a toaster oven is best to maintain crispness. Place them on a baking sheet and heat at 350°F (175°C) for 10-15 minutes, or until warmed through. Microwaving will work but can make the buns soft.
Q3: Can I make these sliders gluten-free?
A3: Yes, with a few substitutions. Use gluten-free slider buns, gluten-free all-purpose flour blend for dredging, and gluten-free breadcrumbs (or crush gluten-free crackers/cereal). Ensure your marinara sauce is also certified gluten-free.
Q4: What if I don’t have Italian breadcrumbs?
A4: You can use plain breadcrumbs or panko breadcrumbs and add your own Italian seasoning. Mix 1 cup of plain breadcrumbs with 1-2 teaspoons of dried Italian seasoning, 1/2 teaspoon garlic powder, 1/4 teaspoon onion powder, and a pinch of salt and pepper.
Q5: Can I assemble the sliders completely ahead of time and bake later?
A5: You can assemble them a few hours ahead, cover, and refrigerate. However, for the best texture and to prevent the bottom buns from becoming too soggy, it’s ideal to assemble just before baking or no more than 1-2 hours in advance. If making further ahead, keep the cooked chicken, sauce, and rolls separate and assemble just before baking.
Q6: My sliders came out a bit soggy on the bottom. What can I do next time?
A6: Several things can help: 1) Lightly toast the bottom half of the rolls before assembling. 2) Use a thicker marinara sauce. 3) Don’t use an excessive amount of sauce on the bottom layer; focus more sauce on top of the chicken. 4) Ensure your chicken isn’t overly greasy when you place it on the rolls.
Q7: Can I freeze Chicken Parmesan Sliders?
A7: It’s best to freeze components separately if possible (cooked chicken, sauce). Assembled and baked sliders can be frozen, but the texture of the rolls may suffer upon thawing and reheating. If freezing baked sliders, wrap them tightly in plastic wrap and then foil. Thaw in the refrigerator and reheat in the oven. For best results, consider freezing unbaked, assembled sliders (without the butter topping), then thaw, add topping, and bake.
Q8: What’s the best way to cut the sliders apart after baking?
A8: Let them rest for 5-10 minutes after taking them out of the oven. This allows the cheese to set slightly. Then, use a long, sharp serrated knife or a pizza cutter. Guide your knife along the natural separations of the rolls for clean, individual sliders. If they were baked in a dish, it might be easier to lift the entire slab out onto a cutting board first.
Chicken Parmesan Sliders
Ingredients
- 12 Hawaiian sweet rolls (or similar soft dinner rolls): The slight sweetness of these rolls perfectly complements the savory filling. One standard package is usually 12 rolls.
- 1 lb boneless, skinless chicken breasts (about 2 medium): Cut into 12 small, slider-sized pieces. Alternatively, you can use pre-cooked chicken tenders or even shredded rotisserie chicken for a quicker version.
- 1/2 cup all-purpose flour: For dredging the chicken, creating a light coating for crispiness.
- 2 large eggs, beaten: Acts as a binder for the breadcrumbs to adhere to the chicken.
- 1 cup Italian-style breadcrumbs: These come pre-seasoned, adding an extra layer of flavor. Panko breadcrumbs can be used for extra crispiness.
- 1/4 cup grated Parmesan cheese (plus extra for topping): Adds a salty, nutty flavor to the breading and topping.
- Salt and freshly ground black pepper, to taste: Essential for seasoning the chicken and flour.
- 1/4 cup olive oil or vegetable oil (for frying): Needed to achieve that golden-brown crisp on the chicken. More may be needed depending on your pan.
- 1.5 cups marinara sauce (good quality store-bought or homemade): The heart of the “Parmesan” flavor; choose one you love.
- 12 slices mozzarella cheese (or 1.5 cups shredded mozzarella): For that essential cheesy melt. Low-moisture, part-skim mozzarella works best.
- 1/4 cup (1/2 stick) unsalted butter, melted: Forms the base of the delicious topping brushed over the rolls.
- 1 tablespoon grated Parmesan cheese: Mixed into the butter topping for extra flavor.
- 1 teaspoon garlic powder: Adds a savory kick to the butter topping.
- 1/2 teaspoon dried Italian seasoning (or a mix of dried oregano and basil): Enhances the Italian flavors in the butter topping.
- Fresh basil or parsley, chopped (for garnish, optional): Adds a touch of freshness and color before serving.
Instructions
- Prepare the Chicken:
- If using chicken breasts, slice them horizontally to make thinner cutlets, then cut each cutlet into approximately 6 smaller, slider-sized pieces (aiming for 12 pieces total).
- Pat the chicken pieces dry with a paper towel. Season generously with salt and pepper.
- Set up your breading station: Place the flour in one shallow dish. In a second shallow dish, whisk the eggs. In a third shallow dish, combine the Italian breadcrumbs and 1/4 cup of grated Parmesan cheese.
- Dredge each chicken piece first in flour (shaking off excess), then dip into the beaten eggs (letting excess drip off), and finally coat thoroughly with the breadcrumb-Parmesan mixture, pressing gently to help it adhere. Place breaded chicken on a clean plate or baking sheet.
- Cook the Chicken:
- Heat the olive oil in a large skillet over medium-high heat. Once the oil is shimmering, carefully add the breaded chicken pieces in a single layer (you may need to do this in batches to avoid overcrowding the pan).
- Cook for 3-4 minutes per side, or until golden brown, crispy, and cooked through (internal temperature should reach 165°F or 74°C).
- Remove the cooked chicken from the skillet and place it on a wire rack or paper towel-lined plate to drain any excess oil.
- Assemble the Sliders:
- Preheat your oven to 375°F (190°C).
- Without separating the Hawaiian rolls, use a long serrated knife to slice the entire slab of rolls in half horizontally, creating a top “lid” and a bottom “base.”
- Place the bottom half of the rolls into a 9×13 inch baking dish or onto a baking sheet.
- Spread about 1/2 cup of marinara sauce evenly over the cut side of the bottom rolls.
- Arrange the cooked chicken pieces evenly on top of the sauced rolls.
- Spoon the remaining 1 cup of marinara sauce over the chicken pieces.
- Top each chicken piece with a slice of mozzarella cheese (or sprinkle shredded mozzarella evenly over the chicken).
- Place the top half of the rolls over the cheese.
- Prepare the Topping and Bake:
- In a small bowl, whisk together the melted butter, 1 tablespoon of grated Parmesan cheese, garlic powder, and dried Italian seasoning.
- Evenly brush this butter mixture over the tops of the rolls. You can sprinkle a little extra Parmesan on top if desired.
- Cover the baking dish loosely with aluminum foil to prevent the tops from burning too quickly.
- Bake for 15-20 minutes, or until the cheese is fully melted and bubbly, and the sliders are heated through.
- Remove the foil for the last 5 minutes of baking to allow the tops of the rolls to get golden brown and slightly crispy.
- Serve:
- Let the sliders rest for 5-10 minutes after removing them from the oven. This helps the cheese set a bit and makes them easier to cut and serve.
- If desired, garnish with fresh chopped basil or parsley.
- Use a sharp knife or a pizza cutter to cut along the individual roll lines to separate the sliders. Serve immediately.
Nutrition
- Serving Size: one normal portion
- Calories: 350
- Fat: 18g
- Carbohydrates: 30g
- Protein: 20g