Dive into a world of pure chocolate bliss with this Chocolate Silk Pie recipe! For years, this dessert has been a staple in our family gatherings, morphing from a simple request into a much-anticipated tradition. There’s something undeniably magical about the first spoonful – the velvety smooth texture melting on your tongue, the intense chocolate flavor that’s rich but not overwhelming, and the satisfying crunch of the crust that perfectly complements the creamy filling. Whether it’s a holiday celebration, a birthday treat, or just a cozy weekend indulgence, this Chocolate Silk Pie never fails to impress. It’s surprisingly easy to make, yet it tastes like it came straight from a high-end patisserie. Prepare to be the star baker, because this pie is guaranteed to steal the show and leave everyone begging for seconds (and the recipe!).
Ingredients
- Chocolate: 8 ounces of high-quality semi-sweet or dark chocolate. Using good quality chocolate is key to achieving that rich, decadent flavor that defines a truly exceptional chocolate silk pie. Choose chocolate bars rather than chips for smoother melting and superior taste.
- Unsalted Butter: 1 cup (2 sticks) of unsalted butter, softened. Softened butter is crucial for creating a light and airy filling. Make sure it’s at room temperature to properly cream with the sugar.
- Granulated Sugar: 1 cup of granulated sugar. Sugar sweetens the pie and also helps to create the desired texture when creamed with the butter.
- Eggs: 4 large eggs, separated. Egg yolks add richness and stability to the filling, while the beaten egg whites contribute to the silky smooth texture and lightness that makes this pie so irresistible.
- Vanilla Extract: 1 teaspoon of pure vanilla extract. Vanilla enhances the chocolate flavor and adds a touch of warmth and complexity to the overall taste profile.
- Heavy Cream: 1 ½ cups of heavy cream, cold. Cold heavy cream whips up beautifully to create the light and airy whipped cream topping that perfectly complements the rich chocolate filling.
- Pie Crust: 1 pre-made or homemade 9-inch pie crust, baked and cooled. You can use your favorite homemade pie crust recipe or opt for a store-bought crust for convenience. A graham cracker crust also works wonderfully for a different textural dimension.
Instructions
- Melt the Chocolate: Begin by melting the chocolate. In a heatproof bowl set over a saucepan of simmering water (double boiler method), or in short intervals in the microwave, gently melt the chocolate. Stir frequently to ensure it melts evenly and doesn’t burn. If using a microwave, heat in 30-second intervals, stirring after each interval, until just melted. Once melted, remove from heat and set aside to cool slightly. It’s important not to let the chocolate get too hot as this can affect the texture of the filling. Allowing it to cool slightly will prevent it from scrambling the eggs in the next step.
- Cream Butter and Sugar: In a large mixing bowl, cream together the softened butter and granulated sugar until light and fluffy. This step is crucial for incorporating air into the filling, which contributes to its silky smooth and light texture. Use an electric mixer (stand mixer or hand mixer) for best results, and beat for 3-5 minutes until the mixture is pale and fluffy. Scrape down the sides of the bowl occasionally to ensure everything is evenly incorporated. The mixture should almost double in volume and become much lighter in color.
- Incorporate Egg Yolks: Add the egg yolks one at a time to the creamed butter and sugar mixture, beating well after each addition. Ensure each yolk is fully incorporated before adding the next. Beat for another 2-3 minutes after all yolks are added, until the mixture is smooth and creamy. The egg yolks add richness, color, and emulsification to the filling, contributing to its smooth texture and stable structure.
- Blend in Melted Chocolate and Vanilla: Gradually pour the slightly cooled melted chocolate into the butter, sugar, and yolk mixture while mixing on low speed. Mix until just combined. Be careful not to overmix at this stage. Stir in the vanilla extract. The vanilla enhances the chocolate flavor and adds a subtle warmth to the pie. Mix until everything is evenly incorporated and the batter is smooth and homogenous.
- Beat Egg Whites to Stiff Peaks: In a separate clean, grease-free bowl, beat the egg whites until stiff peaks form. This is a critical step for achieving the “silk” in Chocolate Silk Pie. Make sure the bowl and beaters are completely clean and dry, as any grease can prevent the egg whites from whipping properly. Start beating on medium speed and gradually increase to high speed. Beat until the egg whites form stiff, glossy peaks that hold their shape when the beaters are lifted. Be careful not to overwhip, as this can make the egg whites dry and grainy.
- Fold Egg Whites into Chocolate Mixture: Gently fold the beaten egg whites into the chocolate mixture in three additions. Folding is a technique used to gently combine light and airy mixtures into heavier ones without deflating them. Start by adding about one-third of the egg whites to the chocolate mixture and gently fold them in to lighten the batter. Then, add the remaining egg whites in two additions, folding gently until just combined after each addition. Be careful not to overmix, as this will deflate the egg whites and result in a dense pie. The goal is to incorporate the egg whites fully while maintaining their volume and airiness.
- Pour Filling into Crust: Pour the chocolate silk filling into the prepared baked and cooled pie crust. Spread it evenly to the edges of the crust using a spatula or spoon. Ensure the filling is level for a neat and professional presentation.
- Chill the Pie: Cover the pie loosely with plastic wrap, being careful not to let the plastic wrap touch the surface of the filling. Refrigerate for at least 4-6 hours, or preferably overnight, to allow the pie to set completely. Chilling is essential for the pie to firm up and develop its signature silky texture. The longer it chills, the firmer and more flavorful it will become.
- Make Whipped Cream Topping: Just before serving, prepare the whipped cream topping. In a chilled bowl, beat the cold heavy cream with an electric mixer until stiff peaks form. You can add a tablespoon of powdered sugar and a splash of vanilla extract for a slightly sweetened and flavored whipped cream, if desired. Be careful not to overwhip, as this can turn the cream into butter.
- Decorate and Serve: Spoon or pipe the whipped cream over the chilled chocolate silk pie. You can create decorative swirls or simply spread it evenly over the top. Garnish with chocolate shavings, cocoa powder, or fresh berries, if desired. Slice and serve chilled. Enjoy the decadent and silky smooth texture of your homemade Chocolate Silk Pie!
Nutrition Facts
(Per serving, based on 8 servings. Note: Nutritional values are estimates and can vary based on specific ingredients and brands used.)
- Serving Size: 1 slice (1/8 of pie)
- Calories: Approximately 450-550 kcal
- Fat: 30-35g
Preparation Time
Prep time: 30 minutes
Chill time: 4-6 hours (or overnight)
Total time: 4 hours 30 minutes (minimum chilling)
This Chocolate Silk Pie requires a bit of preparation, mainly for melting chocolate, creaming butter and sugar, and whipping egg whites and cream. However, the active cooking time is relatively short. The majority of the time is spent chilling, which is crucial for the pie to set properly and achieve its signature silky texture. While it requires planning ahead due to the chilling time, the hands-on preparation is straightforward and rewarding for the delicious dessert it yields.
How to Serve
- Classic Whipped Cream: A generous dollop of freshly made whipped cream is the quintessential topping for Chocolate Silk Pie. Its light and airy texture perfectly complements the rich and dense chocolate filling.
- Chocolate Shavings: Garnish with dark or semi-sweet chocolate shavings for an extra layer of chocolate intensity and visual appeal. Use a vegetable peeler or a sharp knife to create elegant chocolate curls.
- Cocoa Powder Dusting: A light dusting of unsweetened cocoa powder adds a touch of bitterness that balances the sweetness of the pie and creates a sophisticated look.
- Fresh Berries: Serve with fresh raspberries, strawberries, or blueberries. The tartness of the berries provides a delightful contrast to the rich chocolate and adds a pop of color to the presentation.
- Mint Sprigs: A sprig of fresh mint not only adds a refreshing aroma but also provides a visually appealing garnish.
- Coffee or Tea: Pair a slice of Chocolate Silk Pie with a cup of hot coffee or tea. The bitterness of coffee or tea cuts through the richness of the pie, making it a perfect after-dinner treat.
- Vanilla Ice Cream: For an extra indulgent experience, serve alongside a scoop of vanilla ice cream. The cold ice cream and warm chocolate pie create a delightful temperature contrast.
- Chocolate Sauce Drizzle: For the ultimate chocolate lover, drizzle a warm chocolate sauce over the pie before serving. This intensifies the chocolate flavor and adds a glossy finish.
- Individual Servings: For an elegant presentation, serve the pie in individual dessert cups or glasses. Layer the crushed pie crust at the bottom, followed by the chocolate silk filling and whipped cream topping.
Additional Tips for Perfect Chocolate Silk Pie
- Use High-Quality Chocolate: The star of this pie is undoubtedly the chocolate. Invest in good quality semi-sweet or dark chocolate bars (not chips) for the best flavor and texture. The difference in taste is significant and will elevate your pie to another level. Look for chocolate with a cocoa percentage of 60-70% for a rich but not overly bitter flavor.
- Room Temperature Butter is Key: Ensure your butter is properly softened to room temperature before creaming it with sugar. Softened butter incorporates air more easily, resulting in a lighter and fluffier filling. If your butter is too cold, it will be difficult to cream smoothly. If it’s too melted, the filling may become greasy.
- Don’t Overheat the Chocolate: When melting chocolate, do so gently to prevent it from seizing or burning. Low and slow is the key. Whether using a double boiler or microwave, melt it gradually and stir frequently. Overheated chocolate can become grainy and lose its smooth texture.
- Whip Egg Whites to Stiff Peaks Correctly: Achieving stiff peaks with egg whites is crucial for the pie’s signature silkiness. Ensure your bowl and beaters are completely clean and grease-free. Beat until the peaks stand straight up when you lift the beaters. Be careful not to overwhip, which can make the egg whites dry.
- Fold Gently, Don’t Mix: When folding the egg whites into the chocolate mixture, use a gentle hand. Overmixing will deflate the egg whites, resulting in a denser, less airy pie. Fold just until the egg whites are incorporated, leaving a few streaks is okay, they will incorporate during chilling.
- Chill Thoroughly: Resist the urge to rush the chilling process. Allow the pie to chill for at least 4-6 hours, or preferably overnight. This allows the filling to fully set and develop its signature silky smooth texture. Proper chilling also enhances the flavors and makes slicing easier.
- Make Ahead for Convenience: Chocolate Silk Pie is a fantastic make-ahead dessert. You can prepare the pie a day or two in advance and store it in the refrigerator. This makes it perfect for dinner parties or holidays when you want to get ahead of your dessert preparation. Just add the whipped cream topping shortly before serving.
- Customize Your Crust: While a traditional pie crust is delicious, feel free to experiment with different crusts. A graham cracker crust adds a lovely buttery and slightly crumbly texture that complements the chocolate filling beautifully. An Oreo cookie crust or even a chocolate wafer crust can also be fantastic variations for a more intense chocolate experience.
FAQ – Frequently Asked Questions about Chocolate Silk Pie
Q1: Can I use milk chocolate instead of semi-sweet or dark chocolate?
A: While you can use milk chocolate, the flavor will be significantly sweeter and less intense. For a true Chocolate Silk Pie experience, semi-sweet or dark chocolate is highly recommended as they provide a richer, more balanced chocolate flavor that isn’t overly sugary. If you prefer a sweeter pie, you can use a mix of milk and semi-sweet chocolate.
Q2: Can I make this pie without eggs?
A: This recipe relies on eggs for both richness (yolks) and texture (whites). Replacing eggs in this recipe will drastically alter the texture and may not result in a true “silk pie.” For an egg-free chocolate pie, you would need to look for a recipe specifically designed to be eggless, often using ingredients like avocado or silken tofu to achieve a creamy texture.
Q3: How long does Chocolate Silk Pie last in the refrigerator?
A: Chocolate Silk Pie will last in the refrigerator for 3-4 days, covered tightly. The quality is best within the first 2-3 days as the crust might start to soften slightly after that. Store it in an airtight container or loosely covered with plastic wrap to prevent it from absorbing odors from the refrigerator.
Q4: Can I freeze Chocolate Silk Pie?
A: Yes, you can freeze Chocolate Silk Pie, but the texture might change slightly upon thawing. Freeze it without the whipped cream topping for best results. Wrap the pie tightly in plastic wrap and then in foil. It can be frozen for up to 2-3 months. Thaw it in the refrigerator overnight before serving and add the whipped cream topping just before serving.
Q5: My pie filling is not setting. What did I do wrong?
A: There are a few reasons why your pie filling might not set:
* Not Chilling Long Enough: The most common reason is insufficient chilling time. Ensure you chill the pie for at least 4-6 hours or preferably overnight.
* Incorrect Egg White Whipping: If the egg whites weren’t whipped to stiff peaks, they won’t provide enough structure for the pie to set firmly.
* Overmixing After Folding Egg Whites: Overmixing after folding in the egg whites can deflate them, leading to a looser filling.
* Chocolate Too Hot When Mixed with Yolks: If the melted chocolate was too hot when added to the egg yolks, it could have partially cooked the yolks, preventing proper setting. Ensure the chocolate is slightly cooled before incorporating.
Q6: Can I use a store-bought pie crust?
A: Absolutely! Using a store-bought pie crust is a great time-saver and works perfectly for this recipe. Choose a good quality pre-made pie crust, either refrigerated or frozen, and bake it according to package directions before filling. You can also use a graham cracker crust for a no-bake option if preferred.
Q7: How can I prevent cracks in the top of my pie?
A: Cracking is sometimes unavoidable, but you can minimize it by:
* Gentle Cooling: Avoid sudden temperature changes. Let the melted chocolate cool slightly before adding it to the egg yolks.
* Proper Chilling: Chill the pie slowly and evenly in the refrigerator.
* Don’t Overbake Crust: If making a homemade crust, avoid overbaking it, as an overly dry crust can contribute to cracking.
Q8: Can I add coffee flavor to my Chocolate Silk Pie?
A: Yes, adding a coffee flavor can beautifully enhance the chocolate. You can add 1-2 teaspoons of instant espresso powder to the melted chocolate or to the butter and sugar mixture. This will create a mocha-like flavor profile that complements the richness of the chocolate. You can also use coffee extract instead of vanilla extract for a subtle coffee note.
Print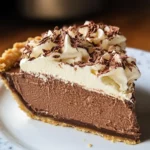
Chocolate Silk Pie Recipe
Ingredients
- Chocolate: 8 ounces of high-quality semi-sweet or dark chocolate. Using good quality chocolate is key to achieving that rich, decadent flavor that defines a truly exceptional chocolate silk pie. Choose chocolate bars rather than chips for smoother melting and superior taste.
- Unsalted Butter: 1 cup (2 sticks) of unsalted butter, softened. Softened butter is crucial for creating a light and airy filling. Make sure it’s at room temperature to properly cream with the sugar.
- Granulated Sugar: 1 cup of granulated sugar. Sugar sweetens the pie and also helps to create the desired texture when creamed with the butter.
- Eggs: 4 large eggs, separated. Egg yolks add richness and stability to the filling, while the beaten egg whites contribute to the silky smooth texture and lightness that makes this pie so irresistible.
- Vanilla Extract: 1 teaspoon of pure vanilla extract. Vanilla enhances the chocolate flavor and adds a touch of warmth and complexity to the overall taste profile.
- Heavy Cream: 1 ½ cups of heavy cream, cold. Cold heavy cream whips up beautifully to create the light and airy whipped cream topping that perfectly complements the rich chocolate filling.
- Pie Crust: 1 pre-made or homemade 9-inch pie crust, baked and cooled. You can use your favorite homemade pie crust recipe or opt for a store-bought crust for convenience. A graham cracker crust also works wonderfully for a different textural dimension.
Instructions
- Melt the Chocolate: Begin by melting the chocolate. In a heatproof bowl set over a saucepan of simmering water (double boiler method), or in short intervals in the microwave, gently melt the chocolate. Stir frequently to ensure it melts evenly and doesn’t burn. If using a microwave, heat in 30-second intervals, stirring after each interval, until just melted. Once melted, remove from heat and set aside to cool slightly. It’s important not to let the chocolate get too hot as this can affect the texture of the filling. Allowing it to cool slightly will prevent it from scrambling the eggs in the next step.
- Cream Butter and Sugar: In a large mixing bowl, cream together the softened butter and granulated sugar until light and fluffy. This step is crucial for incorporating air into the filling, which contributes to its silky smooth and light texture. Use an electric mixer (stand mixer or hand mixer) for best results, and beat for 3-5 minutes until the mixture is pale and fluffy. Scrape down the sides of the bowl occasionally to ensure everything is evenly incorporated. The mixture should almost double in volume and become much lighter in color.
- Incorporate Egg Yolks: Add the egg yolks one at a time to the creamed butter and sugar mixture, beating well after each addition. Ensure each yolk is fully incorporated before adding the next. Beat for another 2-3 minutes after all yolks are added, until the mixture is smooth and creamy. The egg yolks add richness, color, and emulsification to the filling, contributing to its smooth texture and stable structure.
- Blend in Melted Chocolate and Vanilla: Gradually pour the slightly cooled melted chocolate into the butter, sugar, and yolk mixture while mixing on low speed. Mix until just combined. Be careful not to overmix at this stage. Stir in the vanilla extract. The vanilla enhances the chocolate flavor and adds a subtle warmth to the pie. Mix until everything is evenly incorporated and the batter is smooth and homogenous.
- Beat Egg Whites to Stiff Peaks: In a separate clean, grease-free bowl, beat the egg whites until stiff peaks form. This is a critical step for achieving the “silk” in Chocolate Silk Pie. Make sure the bowl and beaters are completely clean and dry, as any grease can prevent the egg whites from whipping properly. Start beating on medium speed and gradually increase to high speed. Beat until the egg whites form stiff, glossy peaks that hold their shape when the beaters are lifted. Be careful not to overwhip, as this can make the egg whites dry and grainy.
- Fold Egg Whites into Chocolate Mixture: Gently fold the beaten egg whites into the chocolate mixture in three additions. Folding is a technique used to gently combine light and airy mixtures into heavier ones without deflating them. Start by adding about one-third of the egg whites to the chocolate mixture and gently fold them in to lighten the batter. Then, add the remaining egg whites in two additions, folding gently until just combined after each addition. Be careful not to overmix, as this will deflate the egg whites and result in a dense pie. The goal is to incorporate the egg whites fully while maintaining their volume and airiness.
- Pour Filling into Crust: Pour the chocolate silk filling into the prepared baked and cooled pie crust. Spread it evenly to the edges of the crust using a spatula or spoon. Ensure the filling is level for a neat and professional presentation.
- Chill the Pie: Cover the pie loosely with plastic wrap, being careful not to let the plastic wrap touch the surface of the filling. Refrigerate for at least 4-6 hours, or preferably overnight, to allow the pie to set completely. Chilling is essential for the pie to firm up and develop its signature silky texture. The longer it chills, the firmer and more flavorful it will become.
- Make Whipped Cream Topping: Just before serving, prepare the whipped cream topping. In a chilled bowl, beat the cold heavy cream with an electric mixer until stiff peaks form. You can add a tablespoon of powdered sugar and a splash of vanilla extract for a slightly sweetened and flavored whipped cream, if desired. Be careful not to overwhip, as this can turn the cream into butter.
- Decorate and Serve: Spoon or pipe the whipped cream over the chilled chocolate silk pie. You can create decorative swirls or simply spread it evenly over the top. Garnish with chocolate shavings, cocoa powder, or fresh berries, if desired. Slice and serve chilled. Enjoy the decadent and silky smooth texture of your homemade Chocolate Silk Pie!
Nutrition
- Serving Size: one normal portion
- Calories: 550
- Fat: 35g