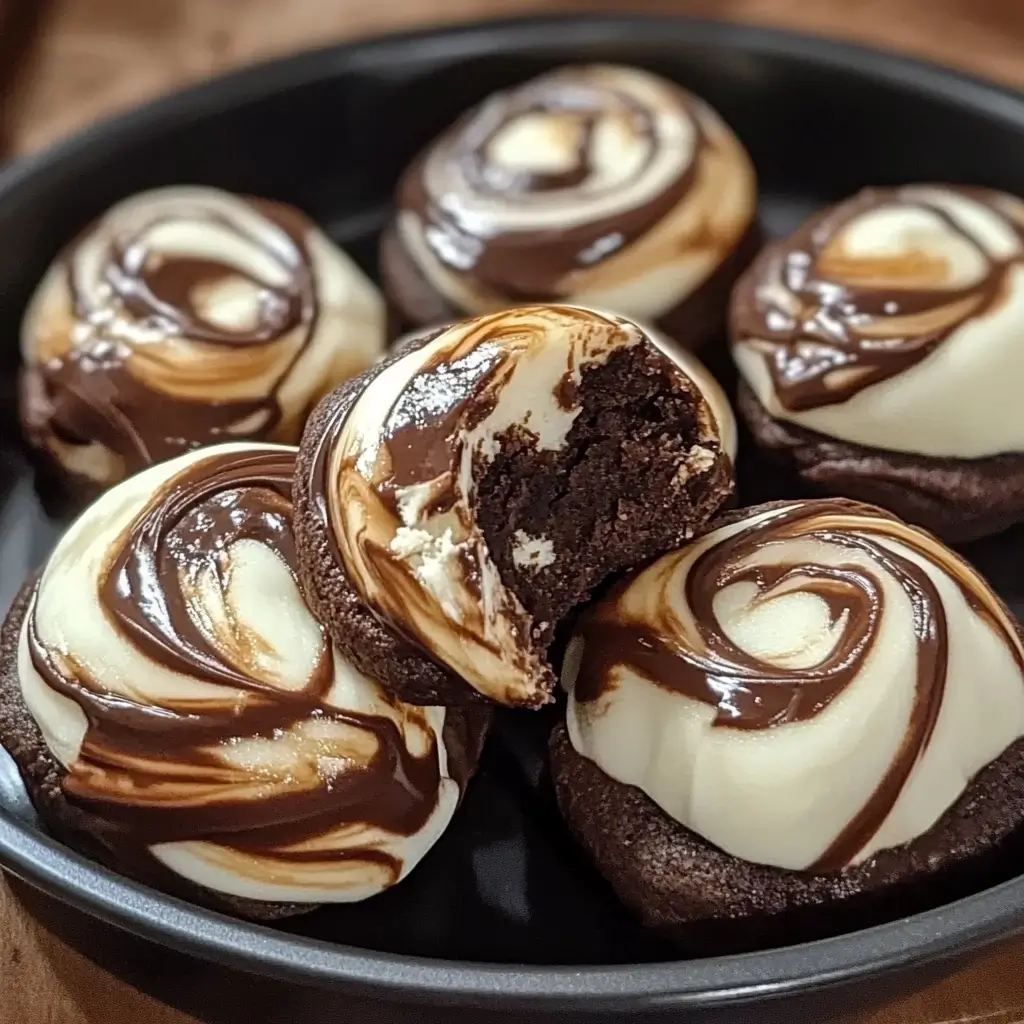
Of all the sweet treats I’ve whipped up in my kitchen over the years, some just have a special kind of magic. They’re the ones that bring an instant hush to a room, followed by contented sighs and the inevitable question, “Can I have another one?” These Chocolate Swirl Marshmallow Bites fall firmly into that magical category. I first made them on a whim one dreary Saturday afternoon. The kids were restless, and I was craving something that was both incredibly simple and satisfyingly decadent. I rummaged through the pantry and found a bag of jumbo marshmallows, some semi-sweet chocolate chips, and a forgotten bag of white chocolate from a previous baking adventure. What started as a simple “let’s dip marshmallows in chocolate” experiment quickly evolved into an art project. As we drizzled the white chocolate over the dark and used a toothpick to create elegant swirls, the kitchen transformed into a confectioner’s studio. The end result was breathtaking—glossy, marbled little domes of chocolate hiding a fluffy, pillowy secret. When my husband came home, he saw them cooling on the counter and thought I’d bought them from a fancy candy shop. The look of surprise on his face when I told him we made them was almost as sweet as the treats themselves. They’ve since become our go-to for everything: movie nights, last-minute bake sale contributions, holiday dessert platters, and a simple, joyful way to make any ordinary day feel a little more special.
Ingredients
- 1 bag (10 ounces) of large or jumbo marshmallows: These form the fluffy, chewy heart of our recipe. Using large marshmallows provides a substantial base, making them easier to handle for dipping and offering a satisfyingly pillowy bite that perfectly contrasts with the crisp chocolate shell.
- 2 cups (12 ounces) of high-quality semi-sweet chocolate chips or wafers: This is the rich, dark canvas for our swirl. Semi-sweet chocolate provides a wonderful balance, its slight bitterness cutting through the sweetness of the marshmallow and white chocolate. Using good quality chocolate ensures a smoother melt and a richer flavor.
- 1 cup (6 ounces) of high-quality white chocolate chips or wafers: This is the star of the “swirl.” The creamy, sweet flavor and bright white color of the white chocolate create the beautiful marbled effect and add another layer of decadent flavor.
- 2 teaspoons of coconut oil or vegetable shortening, divided: This is our secret weapon for perfectly smooth, glossy chocolate. Adding one teaspoon to each type of chocolate as it melts helps to thin it slightly, making it ideal for dipping and drizzling, and it gives the finished bites a professional, shiny finish.
- Optional Toppings: A sprinkle of flaky sea salt, colorful sprinkles, crushed peppermint, or finely chopped nuts (like pecans or almonds) can be added for extra flavor, texture, and visual appeal.
Instructions
- Prepare Your Workspace: The key to a stress-free chocolate-dipping session is preparation. Line a large baking sheet or a few large plates with parchment paper or a silicone baking mat. This is a non-negotiable step; it will prevent the marshmallow bites from sticking as they cool and make cleanup an absolute breeze. Set it aside within easy reach of where you will be working.
- Melt the Semi-Sweet Chocolate: Place the semi-sweet chocolate chips and one teaspoon of the coconut oil or shortening into a microwave-safe bowl. Microwave in 30-second intervals, stirring thoroughly after each interval. It’s crucial to use short bursts of heat and stir well each time to prevent the chocolate from scorching. Continue this process until the chocolate is about 90% melted, with just a few small lumps remaining. Remove from the microwave and continue stirring until the residual heat melts the remaining lumps, leaving you with a smooth, glossy, and perfectly tempered chocolate sauce. Alternatively, you can use a double boiler: place the chocolate and oil in a heatproof bowl set over a saucepan of simmering (not boiling) water, ensuring the bottom of the bowl does not touch the water. Stir gently and continuously until melted and smooth.
- Melt the White Chocolate: In a separate microwave-safe bowl, combine the white chocolate chips and the remaining one teaspoon of coconut oil or shortening. White chocolate can be more temperamental and prone to seizing than dark chocolate, so it’s even more important to use low power or very short (15-20 second) intervals in the microwave. Stir well after each interval until it is completely smooth. If using the double boiler method, be extra cautious not to let any steam or water get into the bowl, as this will cause the white chocolate to become grainy and unusable.
- The Dipping Process: Now for the fun part! Hold a large marshmallow by the top. You can either use your fingers or, for a cleaner approach, stick a toothpick or a small skewer into the top of the marshmallow to act as a handle. Dip the bottom two-thirds of the marshmallow into the melted semi-sweet chocolate. As you lift it out, gently swirl it and tilt it to allow the excess chocolate to drip back into the bowl. This ensures a clean, even coat without a thick “foot” of chocolate at the base.
- Place and Prepare for the Swirl: Immediately place the chocolate-dipped marshmallow onto your prepared parchment-lined baking sheet. Continue this process with a few more marshmallows, leaving a bit of space between each one. It’s best to work in small batches of 4-5 marshmallows at a time so the dark chocolate doesn’t set before you have a chance to add the swirl.
- Create the Swirl: Take a small spoon or a fork and drizzle the melted white chocolate over the still-wet semi-sweet chocolate on the marshmallows. You can do this in lines, zig-zags, or random splatters—there’s no wrong way! For a more defined marbled or feathered look, immediately take a clean toothpick and gently drag it through the white and dark chocolate drizzles. This simple motion will pull the colors together, creating a beautiful and unique pattern on each bite.
- Add Optional Toppings: If you wish to add toppings like sprinkles, sea salt, or crushed nuts, now is the time to do it. Sprinkle them over the marshmallows while the chocolate is still wet so they adhere properly.
- Chill and Set: Repeat the dipping, swirling, and topping process for all the remaining marshmallows. Once all your bites are decorated, place the entire baking sheet into the refrigerator for at least 30 minutes, or until the chocolate is completely firm to the touch. This chilling step is essential for creating that satisfyingly crisp chocolate shell. Once set, they can be removed from the parchment paper and are ready to be enjoyed.
Nutrition Facts
- Servings: This recipe yields approximately 24 marshmallow bites.
- Calories per serving (1 bite): Approximately 110 kcal.
- Sugar (18g): The primary source of sweetness comes from the marshmallow and both types of chocolate, making this a truly decadent treat.
- Fat (4g): This comes mainly from the cocoa butter in the chocolate and the added coconut oil, which contributes to the smooth texture and rich flavor.
- Carbohydrates (20g): The carbohydrates are almost entirely from the sugars in the ingredients, providing a quick burst of energy and sweetness.
Disclaimer: The nutritional information provided is an estimate and can vary based on the specific brands of ingredients used.
Preparation Time
This recipe is wonderfully quick and efficient. The total time is broken down into active preparation and passive chilling time. You will need approximately 20-25 minutes of active time for melting the chocolate and dipping the marshmallows. Following this, the bites require a crucial 30 minutes of chilling time in the refrigerator for the chocolate to fully harden and set into a perfect, crisp shell.
How to Serve
These Chocolate Swirl Marshmallow Bites are incredibly versatile and can be presented in numerous delightful ways. Here are some ideas to inspire you:
- Elegant Party Platter: Arrange the bites in neat rows or a circular pattern on a beautiful white or slate platter. The contrast of the dark and white chocolate will look stunning and create an inviting centerpiece for a dessert table at parties, showers, or family gatherings.
- Dessert Charcuterie Board: Elevate your dessert game by including these bites on a dessert charcuterie board. Pair them with fresh berries (like strawberries and raspberries), a variety of cookies, pretzels, sliced apples, and a bowl of caramel or fruit dip for a truly interactive and impressive dessert experience.
- Gourmet Hot Chocolate Toppers: Forget plain old marshmallows! Float one of these chocolate-swirled beauties on top of a steaming mug of hot chocolate. As it slowly melts, it will infuse the drink with extra chocolatey richness and leave a gooey marshmallow center.
- Ice Cream Sundae Garnish: Chop a few bites into smaller pieces or use them whole as a dramatic and delicious topping for a bowl of vanilla, chocolate, or strawberry ice cream. They add a wonderful combination of textures—chewy, soft, and crunchy.
- Thoughtful Homemade Gifts: These bites make for a perfect homemade gift. Package them in clear cellophane bags tied with a festive ribbon, or arrange them in a small, elegant gift box lined with parchment paper. They are ideal for holiday gifts, teacher appreciation presents, or as a thank-you to a neighbor.
- Fun Coffee Break Treat: Serve one alongside a cup of coffee or an espresso for a sophisticated and simple mid-afternoon pick-me-up. The rich chocolate pairs beautifully with the bitterness of the coffee.
Additional Tips
- Chocolate Quality is Key: The final taste and texture of your bites are heavily dependent on the quality of your chocolate. Opt for chocolate wafers (also called melting wafers) or high-quality chocolate bars/chips that you enjoy eating on their own. They tend to melt more smoothly and have a richer, less waxy flavor than cheaper alternatives.
- Master the Melt: The number one rule of melting chocolate is “low and slow.” Whether using a microwave or a double boiler, avoid high heat, which can cause the chocolate to burn or “seize” (become a thick, grainy mess). If your chocolate does seize, you can sometimes save it by vigorously stirring in another teaspoon of hot water or oil, but prevention is always the best course of action.
- Use the Right Tools: A simple toothpick or bamboo skewer inserted into the top of the marshmallow makes the dipping process much cleaner and easier. It gives you a handle to hold, allowing you to dip and swirl without getting chocolate all over your fingers. For the swirl, a toothpick is perfect for creating fine, detailed patterns.
- Room Temperature Marshmallows: For the best results, make sure your marshmallows are at room temperature. If they are too cold (straight from a chilly pantry), they can cause the warm chocolate to set too quickly as you dip, resulting in a thick, clumpy, and uneven coating.
- Get Creative with Colors and Flavors: Don’t be afraid to experiment! You can use food-grade oil-based food coloring (never water-based, as it will seize the chocolate) to tint your white chocolate for themed events—think pink and red for Valentine’s Day, or orange and green for Halloween. You can also add a drop of peppermint or orange extract to the dark chocolate for a flavor twist.
- Perfect Storage for Lasting Freshness: To keep your marshmallow bites fresh, store them in a single layer in an airtight container at a cool room temperature. Avoid stacking them, as they can stick together. If you must stack, place a layer of parchment paper between each layer. Try to avoid refrigerating them for long-term storage, as condensation can make the marshmallows sticky once they return to room temperature. They are best enjoyed within 3-4 days.
- Make it a Kid-Friendly Activity: This recipe is perfect for getting kids involved in the kitchen. Set up a “decorating station” with the melted chocolates and several small bowls of different toppings like various colored sprinkles, mini chocolate chips, and crushed cookies. Let them dip and decorate their own marshmallows. It’s a fun, creative, and delicious activity for the whole family.
- The Flaky Sea Salt Finish: Even if you don’t add other toppings, consider a tiny pinch of flaky sea salt on top of each bite. The salt crystals not only look beautiful against the dark chocolate but also enhance the chocolate’s flavor and provide a perfect counterpoint to the sweetness, creating a more complex and gourmet taste.
FAQ Section
1. Can I use mini marshmallows for this recipe?
While you technically can, it is significantly more challenging. Mini marshmallows are much smaller, making them very difficult to dip individually without making a huge mess. The ratio of chocolate to marshmallow will also be much higher, potentially overwhelming the fluffy texture. If you want to use mini marshmallows, a better approach would be to create marshmallow clusters: stir a large handful of mini marshmallows directly into the melted chocolate, then drop spoonfuls of the mixture onto parchment paper to set.
2. My chocolate seized and became thick and grainy. What went wrong?
Chocolate seizing is a common and frustrating problem! It is almost always caused by one of two things: overheating or contact with water. Even a tiny droplet of water or steam can cause the chocolate to clump up. When melting, always use a completely dry bowl and utensils. Overheating scorches the sugar in the chocolate, also causing it to seize. This is why using short intervals in the microwave and stirring frequently is so important.
3. Are these Chocolate Swirl Marshmallow Bites gluten-free?
This depends entirely on the specific ingredients you use. Most plain marshmallows are naturally gluten-free, as are pure chocolate chips. However, you must check the packaging of your specific brands of marshmallows and chocolate chips to ensure they are certified gluten-free and produced in a facility that avoids cross-contamination, especially if you are making them for someone with Celiac disease.
4. How far in advance can I make these for a party?
You can comfortably make these bites up to two days in advance. Store them in a single layer in an airtight container in a cool, dry place (like a pantry, not the refrigerator). They are at their absolute best within the first 48 hours, when the marshmallow is still perfectly soft and the chocolate shell is crisp. After a few days, the marshmallow can begin to dry out slightly.
5. Can I freeze the marshmallow bites for longer storage?
Freezing is not recommended for this particular treat. While the chocolate would be fine, the freezing and thawing process does strange things to the texture of the marshmallow. It can become tough, overly chewy, and sometimes a bit watery from condensation upon defrosting, ruining the delightful pillowy texture that makes these bites so special.
6. Why aren’t my swirls as defined as the ones in the picture?
The key to a sharp, defined swirl is temperature and timing. If your dark chocolate has already started to set before you drizzle the white chocolate, the two won’t blend together. Conversely, if both chocolates are extremely hot and runny, they might just meld into a muddy light-brown color. The sweet spot is when the base coat of dark chocolate is still wet and glossy, and you immediately drag a toothpick through the freshly drizzled white chocolate. Work in small batches (dipping and swirling 4-5 at a time) to ensure your timing is perfect.
7. What’s the best way to transport these treats to a party or bake sale?
The best method is to use a flat, sturdy container with a lid, like a baking pan or a large food storage container. Arrange the marshmallow bites in a single layer on the bottom. If you need to create a second layer, place a sheet of parchment or wax paper firmly on top of the first layer before adding more. Transport them flat and try to keep them in a cool environment (like an air-conditioned car) to prevent the chocolate from softening or melting in transit.
8. Is it possible to make a vegan version of this recipe?
Absolutely! It’s quite simple to adapt this recipe for a vegan diet. You will need to source vegan marshmallows (traditional marshmallows contain gelatin). Many brands now offer gelatin-free versions, which can be found online or in health food stores. For the chocolate, simply ensure that both your semi-sweet and white chocolate chips are certified vegan and do not contain any dairy products like milk fat or whey. The coconut oil is already vegan, so no substitution is needed there. The result will be just as delicious