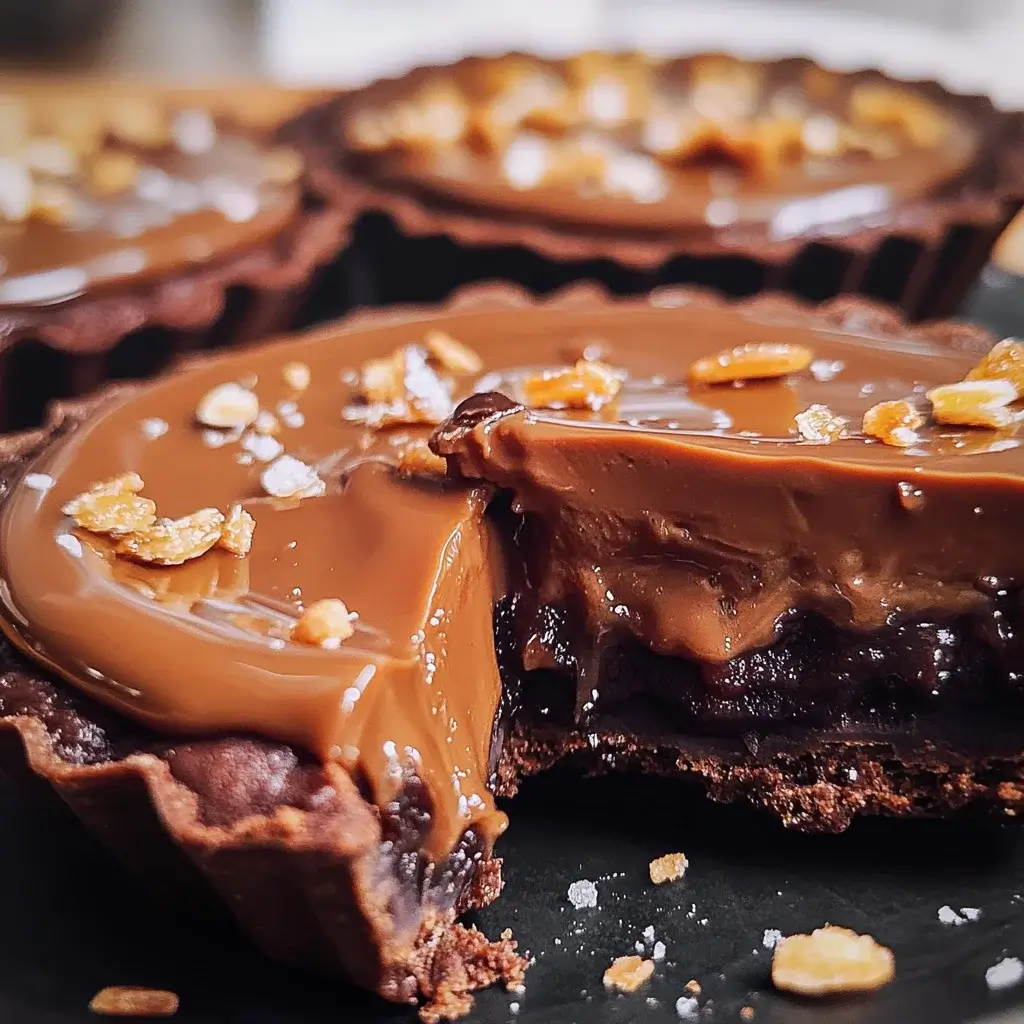
Chocolate Tartlets with Salted Caramel have become an absolute staple in our home, and for good reason! There’s just something undeniably magical about the combination of rich, dark chocolate and the sweet, buttery allure of salted caramel. The first time I made these, it was for a small family gathering, and they vanished in minutes. Even my notoriously picky brother-in-law, who usually sticks to savory dishes, couldn’t resist a second (and maybe even a sneaky third!). The flaky, buttery tart shell gives way to a decadent chocolate filling that’s perfectly balanced by the gooey, salty-sweet caramel. It’s a dessert that feels both elegant and comforting, sophisticated yet utterly approachable. Whether you’re looking to impress guests or simply treat yourself, these Chocolate Tartlets with Salted Caramel are guaranteed to be a crowd-pleaser, and I’m thrilled to share my version of this irresistible treat with you.
Ingredients
- For the Sweet Tart Crust:
- All-Purpose Flour: 2 cups (250g), provides the structure for the tart crust, creating a tender yet sturdy base.
- Powdered Sugar: ½ cup (60g), adds sweetness and contributes to the delicate, melt-in-your-mouth texture of the crust.
- Salt: ¼ teaspoon, enhances the flavors and balances the sweetness in the crust.
- Unsalted Butter: 1 cup (225g), cold and cubed, crucial for creating flaky layers and rich flavor in the crust.
- Large Egg Yolk: 1, binds the dough together and adds richness and tenderness.
- Ice Water: 3-5 tablespoons, added gradually to bring the dough together without overworking it, ensuring a tender crust.
- For the Salted Caramel:
- Granulated Sugar: 1 cup (200g), the base for the caramel, melting and caramelizing to create that signature flavor.
- Unsalted Butter: ½ cup (113g), adds richness, smoothness, and that classic buttery caramel taste.
- Heavy Cream: ½ cup (120ml), adds creaminess and helps to create a smooth, pourable caramel sauce.
- Sea Salt Flakes: 1 teaspoon (or to taste), elevates the caramel with a delightful salty counterpoint, enhancing the sweetness.
- For the Chocolate Filling:
- Semi-Sweet Chocolate: 8 ounces (225g), high-quality, finely chopped, provides the deep, rich chocolate flavor of the filling. You can also use dark chocolate for a more intense flavor.
- Heavy Cream: ½ cup (120ml), heated, used to create a smooth and luscious ganache-like filling.
- Unsalted Butter: 2 tablespoons (30g), adds shine, richness, and a smoother texture to the chocolate filling.
- Vanilla Extract: 1 teaspoon, enhances the chocolate flavor and adds a touch of warmth.
Instructions
Step 1: Prepare the Sweet Tart Crust Dough
In a large bowl, whisk together the all-purpose flour, powdered sugar, and salt. This ensures that the dry ingredients are evenly distributed, which is important for a consistent crust texture.
Add the cold, cubed unsalted butter to the dry ingredients. Using your fingertips or a pastry blender, cut the butter into the flour mixture until it resembles coarse crumbs. The goal here is to keep the butter cold and in small pieces. These small pieces of butter will create pockets of steam when baking, resulting in a flaky crust. If using your fingertips, work quickly to prevent the butter from melting due to the warmth of your hands.
In a small bowl, whisk together the egg yolk and 3 tablespoons of ice water. The egg yolk adds richness and helps bind the dough, while ice water keeps the dough cold, which is crucial for flakiness.
Gradually add the egg yolk mixture to the flour and butter mixture. Mix gently with a fork until the dough just comes together. Be careful not to overmix the dough. Overmixing develops the gluten in the flour, which can lead to a tough crust. If the dough seems too dry, add ice water one tablespoon at a time until it forms a shaggy dough.
Turn the dough out onto a lightly floured surface. Gently bring the dough together into a disc about 1 inch thick. Avoid kneading the dough; just press it together to form a cohesive disc. Kneading will develop gluten.
Wrap the dough disc tightly in plastic wrap and refrigerate for at least 1 hour, or preferably 2 hours. Chilling the dough is essential. It allows the gluten to relax, making the dough easier to roll out and preventing it from shrinking too much during baking. Cold butter also contributes to a flakier crust.
Step 2: Roll Out and Shape the Tart Crusts
Preheat your oven to 375°F (190°C). Position a rack in the center of the oven for even baking.
Remove the chilled tart dough from the refrigerator. Let it sit at room temperature for about 5-10 minutes to soften slightly, making it easier to roll out. If it’s too cold, it might crack when you try to roll it.
Lightly flour your work surface and rolling pin. Divide the dough in half for easier handling. Roll out one half of the dough to about 1/8 inch thickness. Roll from the center outwards, rotating the dough as you go to ensure even thickness and a circular shape.
Using a cookie cutter or a sharp knife, cut out circles of dough that are slightly larger than your tartlet pans. You’ll need enough circles to line your tartlet pans. For standard tartlet pans, circles that are about 4-5 inches in diameter should work well.
Gently press the dough circles into the tartlet pans, ensuring they fit snugly into the corners and up the sides. Trim off any excess dough hanging over the edges using a sharp knife or kitchen scissors. You can also use the rolling pin to roll over the top edges of the tartlet pans to cleanly trim the dough.
Step 3: Blind Bake the Tart Crusts
Dock the bottom of each tart crust with a fork several times. This prevents the crust from puffing up too much during baking.
Line each tart crust with parchment paper or foil and fill with pie weights or dried beans. Pie weights or beans weigh down the crust, preventing it from puffing up and shrinking during blind baking.
Bake for 15-20 minutes, or until the edges are lightly golden. Remove the parchment paper and pie weights.
Return the tart crusts to the oven and bake for another 5-7 minutes, or until the bottoms are lightly golden and fully baked. This second bake ensures the crust is fully cooked and crisp.
Remove the tart crusts from the oven and let them cool completely in the tartlet pans on a wire rack. Cooling completely is important before adding the fillings, otherwise the fillings might melt or become runny.
Step 4: Make the Salted Caramel
In a medium saucepan, melt the granulated sugar over medium heat. Stir constantly with a heatproof spatula or wooden spoon until the sugar melts and turns into a deep amber caramel. Be patient and stir continuously to prevent the sugar from burning. The color should be a rich amber, not too light and not too dark.
Once the sugar is fully caramelized, remove the saucepan from the heat. Carefully add the cold unsalted butter to the caramel. It will bubble up vigorously when you add the butter, so be cautious and stand back slightly. Stir until the butter is completely melted and incorporated into the caramel.
Slowly pour in the heavy cream, stirring constantly. Again, the mixture will bubble up, so pour slowly and stir continuously to prevent splattering and ensure the cream is fully incorporated.
Return the saucepan to low heat and cook for 1-2 minutes, stirring constantly, until the caramel is smooth and thickened slightly. This step ensures the caramel is homogenous and reaches the desired consistency.
Remove the caramel from the heat and stir in the sea salt flakes. Adjust the amount of salt to your preference. The salt is what elevates the caramel to “salted caramel,” so don’t be shy, but start with the recommended amount and taste as you go.
Let the salted caramel cool slightly for about 10-15 minutes before pouring it into the tart crusts. Cooling slightly will help the caramel thicken a bit and prevent it from being too runny.
Step 5: Make the Chocolate Filling
Finely chop the semi-sweet chocolate and place it in a heatproof bowl. Finely chopping the chocolate helps it melt smoothly and evenly.
In a small saucepan, heat the heavy cream over medium heat until it just comes to a simmer. Do not boil the cream. Simmering is sufficient to heat it enough to melt the chocolate.
Pour the hot heavy cream over the chopped chocolate. Let it sit for about 1 minute to allow the heat to melt the chocolate.
Add the unsalted butter and vanilla extract to the chocolate and cream mixture. Stir gently until the chocolate and butter are completely melted and smooth. Stir from the center outwards in small circles to emulsify the ganache properly.
Step 6: Assemble the Chocolate Tartlets
Pour a layer of salted caramel into each cooled tart crust, filling them about halfway. Don’t overfill with caramel, as you need space for the chocolate filling.
Pour the warm chocolate filling over the salted caramel in each tartlet, filling them to the top. You can gently tap the tartlet pans on the counter to help settle the filling and remove any air bubbles.
Step 7: Chill and Set
Refrigerate the chocolate tartlets for at least 2-3 hours, or preferably overnight, to allow the chocolate filling to set completely and the caramel to firm up slightly. Chilling is essential for the tartlets to be easily sliceable and enjoyable.
Step 8: Serve
Once chilled and set, carefully remove the chocolate tartlets from the tartlet pans. They should release easily. If needed, you can gently run a thin knife or offset spatula around the edges to loosen them.
Serve chilled or at room temperature. Garnish with extra sea salt flakes, cocoa powder, or a dusting of powdered sugar, if desired, just before serving.
Nutrition Facts
(Per Serving, Makes approximately 12 tartlets – Note: Nutritional values are estimates and may vary based on specific ingredients and portion sizes.)
- Serving Size: 1 tartlet
- Calories: Approximately 450-550 kcal
- Total Fat: 30-35g
Preparation Time
- Active Time: Approximately 1 hour 30 minutes (includes making dough, caramel, chocolate filling, and assembly)
- Inactive Time: 3-4 hours (includes chilling dough and tartlets)
- Total Time: Approximately 4 hours 30 minutes (including chilling time)
While the total preparation time might seem long, much of it is inactive chilling time. The hands-on time is manageable, and the results are well worth the effort for a truly decadent homemade dessert.
How to Serve
These Chocolate Tartlets with Salted Caramel are versatile and can be served in various ways to elevate your dessert experience:
- Classic Dessert: Serve them as is, chilled, for a rich and satisfying after-dinner treat. The combination of textures and flavors is delightful on its own.
- With a Dollop of Whipped Cream: A light and airy whipped cream complements the richness of the tartlets perfectly. It adds a cool contrast and enhances the overall sweetness.
- Alongside Fresh Berries: Serve with a side of fresh raspberries, strawberries, or blueberries. The tartness of the berries cuts through the richness of the chocolate and caramel, creating a balanced flavor profile.
- With Vanilla Ice Cream or Custard: For a more indulgent dessert, pair the tartlets with a scoop of high-quality vanilla ice cream or a creamy vanilla custard. The coldness of the ice cream and the warmth of the custard (if served slightly warm) create a delightful temperature contrast.
- Garnished with Cocoa Powder or Sea Salt: Dust the tartlets with a light coating of unsweetened cocoa powder for a touch of bitterness and visual appeal. Alternatively, sprinkle extra sea salt flakes on top to enhance the salty-sweet contrast.
- As Part of a Dessert Platter: Include these tartlets as part of a dessert platter alongside other small treats like macarons, mini cheesecakes, and fruit tarts for a diverse and impressive spread.
- For Special Occasions: These tartlets are elegant enough for special occasions like birthdays, anniversaries, holidays, or dinner parties. Their sophisticated flavor and presentation make them a memorable dessert.
- With Coffee or Tea: The rich flavors of chocolate and caramel pair beautifully with a cup of hot coffee or tea. The bitterness of coffee and the warmth of tea complement the sweetness of the tartlets.
Additional Tips
- Use High-Quality Chocolate: The quality of the chocolate significantly impacts the flavor of the filling. Opt for a good quality semi-sweet or dark chocolate for the best results. Using couverture chocolate will give an even more professional shine and snap.
- Don’t Overwork the Dough: Overworking the tart crust dough will develop the gluten, resulting in a tough crust. Mix the dough just until it comes together and handle it gently.
- Chill the Dough Properly: Chilling the dough for at least an hour is crucial. It makes the dough easier to roll out, prevents shrinking during baking, and contributes to a flakier crust.
- Blind Bake Thoroughly: Blind baking the tart crusts ensures they are fully cooked and crisp before adding the fillings. This prevents a soggy bottom and provides a sturdy base for the caramel and chocolate.
- Watch the Caramel Carefully: Caramelizing sugar requires patience and attention. Keep a close eye on the sugar as it melts and caramelizes, stirring constantly to prevent burning. The color should be a deep amber, not black or burnt.
- Salted Caramel Variations: Experiment with different types of salt in your caramel. Fleur de sel, Himalayan pink salt, or smoked sea salt can add unique nuances to the flavor profile. You can also adjust the amount of salt to your preference.
- Make Ahead and Freeze: You can make the tart crusts ahead of time and freeze them, unbaked or blind-baked. The salted caramel and chocolate filling can also be made a day ahead and stored separately in the refrigerator. Assemble the tartlets just before serving or a few hours in advance. Fully assembled tartlets can also be frozen for up to a month. Thaw in the refrigerator overnight before serving.
- Get Creative with Toppings: While sea salt flakes are a classic topping, you can also get creative with other garnishes. Try chopped toasted nuts (like pecans or hazelnuts), cocoa nibs, chocolate shavings, edible gold dust, or a drizzle of extra melted chocolate for added visual appeal and flavor complexity.
FAQ
Q1: Can I use store-bought tart shells to save time?
A: Yes, you can definitely use store-bought sweet tart shells to shorten the preparation time. However, homemade tart crusts offer a superior flavor and texture that really elevates the dessert. If you’re short on time, look for high-quality pre-made shells. Blind bake them briefly according to package instructions to ensure they are crisp.
Q2: How do I prevent the caramel from becoming too hard after chilling?
A: The key is to cook the caramel to the right consistency. Don’t overcook it, as it will harden too much when cooled. Cook it until it’s smooth and slightly thickened, but still pourable. Also, using enough heavy cream in the caramel recipe helps keep it softer and more pliable even after refrigeration. If your caramel does become too firm, you can gently warm it up in the microwave for a few seconds to soften it slightly before serving.
Q3: Can I make these tartlets gluten-free?
A: Yes, you can make these tartlets gluten-free by using a gluten-free all-purpose flour blend for the tart crust. Ensure the blend is designed for baking and substitute it measure for measure for the regular all-purpose flour. Double-check that all other ingredients (especially chocolate) are also certified gluten-free if necessary, although most dark and semi-sweet chocolates are naturally gluten-free.
Q4: What’s the best way to store leftover chocolate tartlets?
A: Store leftover chocolate tartlets in an airtight container in the refrigerator for up to 3-4 days. The cold temperature will help maintain the texture and prevent the caramel and chocolate filling from becoming too soft. For longer storage, you can freeze them (see tip #7 above).
Q5: Can I use dark chocolate instead of semi-sweet chocolate for the filling?
A: Absolutely! Using dark chocolate will result in a richer, more intense chocolate flavor in the filling. If you prefer a less sweet dessert, dark chocolate is an excellent choice. You can even use a mix of semi-sweet and dark chocolate to customize the flavor profile to your liking.
Q6: My tart crusts shrunk during baking. What did I do wrong?
A: Tart crust shrinkage is a common baking issue. Several factors can contribute: overworking the dough (develops gluten), not chilling the dough long enough, or not using pie weights properly during blind baking. Ensure you chill the dough for at least an hour, handle it gently, and use sufficient pie weights to weigh down the crust during the initial baking phase. Docking the crust with a fork also helps prevent puffing and shrinkage.
Q7: Can I make a large tart instead of tartlets?
A: Yes, you can adapt this recipe to make one large tart instead of individual tartlets. Use a 9-inch or 10-inch tart pan with a removable bottom. You may need to increase the baking time for the blind-baked crust slightly and adjust the amount of caramel and chocolate filling accordingly. The baking time for the filling will also be longer for a large tart. Keep an eye on it and bake until the filling is set around the edges but still slightly soft in the center.
Q8: What if I don’t have sea salt flakes? Can I use regular table salt?
A: While sea salt flakes are ideal for salted caramel due to their texture and flavor, you can use regular table salt or kosher salt if that’s what you have on hand. However, table salt is more intensely salty, so start with a smaller amount (about half the amount of sea salt flakes) and taste as you go, adding more to your preference. Kosher salt is less salty than table salt but saltier than sea salt flakes, so adjust accordingly and taste as you add. Sea salt flakes provide a more nuanced saltiness and a pleasant crunch, which enhances the overall experience.