

Introduction
In recent years, the demand for gluten-free desserts has surged, and with good reason. Whether it’s due to gluten intolerance, celiac disease, or personal dietary preferences, many people are seeking delicious alternatives to traditional wheat-based treats. Enter coconut flour brownies—a fudgy, rich, and incredibly satisfying dessert that caters to the gluten-free community. Not only are these brownies a delightful indulgence, but they also offer a unique flavor profile thanks to the subtle sweetness of coconut flour. In this article, we’ll delve into the world of coconut flour brownies, exploring their ingredients, preparation, and how to make them the centerpiece of any dessert table.
Ingredients
Creating these mouthwatering coconut flour brownies requires a few simple ingredients. Most of these items are likely already in your pantry, making this recipe both convenient and cost-effective. Here’s what you’ll need:
- 1/2 cup coconut flour
- 1/2 cup unsweetened cocoa powder
- 1 cup sugar (or a sugar substitute for a lower-calorie option)
- 1/2 cup unsalted butter, melted
- 4 large eggs
- 1 teaspoon vanilla extract
- 1/4 teaspoon salt
- 1/2 cup chocolate chips (optional, for extra chocolatey goodness)
- 1/4 cup chopped nuts (optional, for added texture)
Instructions
Follow these straightforward steps to create your very own batch of delicious coconut flour brownies. Ensure you have all your ingredients prepped and ready to go before you begin.
- Preheat the Oven: Start by preheating your oven to 350°F (175°C). Line an 8×8 inch baking pan with parchment paper or lightly grease it to prevent sticking.
- Combine Dry Ingredients: In a large mixing bowl, sift together the coconut flour, unsweetened cocoa powder, and salt. This helps to remove any lumps and ensures a smooth brownie batter.
- Melt the Butter: In a separate microwave-safe bowl, melt the unsalted butter. Allow it to cool slightly before proceeding to the next step.
- Mix Wet Ingredients: In another bowl, whisk together the sugar, eggs, vanilla extract, and melted butter until smooth and well combined.
- Incorporate Dry and Wet Mixtures: Gradually add the dry ingredients to the wet mixture, stirring continuously to create a homogeneous batter. Ensure there are no lumps remaining.
- Fold in Extras: If you’re using chocolate chips and/or nuts, gently fold them into the batter until evenly distributed.
- Pour into Pan: Carefully pour the brownie batter into the prepared baking pan, spreading it evenly with a spatula.
- Bake: Place the pan in the preheated oven and bake for 25-30 minutes, or until a toothpick inserted into the center comes out mostly clean with a few moist crumbs.
- Cool and Serve: Once baked, remove the brownies from the oven and allow them to cool in the pan for about 10 minutes. Then, transfer them to a wire rack to cool completely before cutting into squares.
Nutrition Facts
Understanding the nutritional content of your coconut flour brownies can help you enjoy them responsibly, especially if you’re mindful of dietary goals. Here’s a general breakdown per serving (assuming 16 servings):
- Calories: Approximately 150
- Total Fat: 9g
- Saturated Fat: 5g
- Cholesterol: 50mg
- Sodium: 50mg
These figures may vary slightly based on specific brands and any optional ingredients you choose to include.
How to Serve
Coconut flour brownies are not only deliciously rich and fudgy, but they also lend themselves to a multitude of serving options that can elevate your dessert experience. Here are several enticing ways to serve these delightful treats:
Classic and Simple
For those who appreciate the pure, unadulterated taste of brownies, serving them on their own is a fantastic choice. The natural sweetness and rich chocolate flavor can shine through without any distractions. To enhance the experience, consider dusting the brownies with a light sprinkle of powdered sugar or a touch of sea salt to balance the sweetness. Serve them on a rustic wooden board or a chic dessert plate, and watch as their simple elegance captures the attention of your guests.
With Ice Cream
Transform your brownies into a decadent dessert by pairing them with a scoop of ice cream. Warm brownies served alongside a scoop of vanilla or coconut ice cream create a heavenly combination of textures and temperatures. The warmth of the brownie melts the ice cream slightly, creating a luscious, gooey mixture that’s hard to resist. For an even more indulgent experience, consider drizzling the ice cream with a homemade chocolate sauce or a caramel drizzle. You can also experiment with different ice cream flavors, such as salted caramel, chocolate mint, or even a fruity sorbet, to create unique flavor profiles.
Drizzled with Chocolate
Take your brownies to the next level by drizzling them with melted chocolate. This simple addition adds an extra layer of richness and visual appeal. To achieve this, melt dark, milk, or white chocolate in a microwave or over a double boiler, then use a fork or a piping bag to drizzle it over the cooled brownies. For an added touch, you might sprinkle chopped nuts, shredded coconut, or sea salt on top of the chocolate drizzle before it sets. This not only enhances the flavor but also adds a beautiful contrast of textures and colors.
With Fresh Fruit
For a lighter option that balances the richness of the brownies, consider serving them with fresh fruit. The tartness of fresh berries—such as raspberries, strawberries, or blueberries—provides a delightful contrast to the sweet, fudgy chocolate. You can create a vibrant fruit compote by lightly mashing the berries with a bit of sugar and lemon juice, then spooning it over the brownies. Alternatively, sliced bananas can be paired with brownies for a classic combination reminiscent of a banana split. For a tropical twist, consider adding slices of fresh mango or pineapple alongside the brownies, bringing a refreshing flavor that complements the coconut flour’s natural taste.
Topped with Whipped Cream
Another delightful way to serve coconut flour brownies is to top them with a dollop of whipped cream. Whether you use homemade whipped cream or store-bought, its light and airy texture creates a lovely contrast to the dense brownies. For an added flavor boost, consider infusing the whipped cream with vanilla extract or a splash of coconut cream. To make it visually appealing, you can pipe the whipped cream onto the brownies using a star tip, creating beautiful swirls that make the dessert look even more inviting.
As a Brownie Sundae
For those who enjoy a bit of theatrics with their desserts, create a brownie sundae. Start with a warm coconut flour brownie as the base, then layer it with your choice of ice cream, drizzling it with chocolate sauce or caramel, and finishing with whipped cream and a cherry on top. This playful presentation is perfect for parties or special occasions, allowing each guest to indulge in a customizable treat.
With a Cup of Coffee or Tea
Lastly, consider the beverage pairing when serving coconut flour brownies. A rich cup of coffee or a soothing cup of herbal tea can complement the chocolate flavors beautifully. The warmth and bitterness of coffee enhance the sweetness of the brownies, while a fragrant tea—like chai or Earl Grey—can add a sophisticated touch. Serve the brownies alongside the beverages on a charming tray for a delightful afternoon tea experience or a cozy dessert after dinner.
By exploring these various serving options, you can enhance the enjoyment of coconut flour brownies, turning a simple dessert into a memorable culinary experience. Whether you choose to keep it classic or get creative with toppings and pairings, these brownies are sure to please any palate.
Additional Tips
When it comes to baking brownies, small adjustments can make a significant difference in both flavor and texture. Here are some detailed tips to enhance your brownie-making experience and help you achieve the perfect batch every time.
Storage
Optimal Storage Conditions: To maintain the freshness and flavor of your brownies, it’s crucial to store them properly. Place the brownies in an airtight container at room temperature, where they can stay fresh for up to 3 days. Make sure that the container is well-sealed to prevent air from drying out the brownies, which can lead to a less enjoyable texture.
Refrigeration: If you need to extend their shelf life, refrigerating the brownies is an excellent option. When stored in the fridge, brownies can last up to a week. However, be mindful that refrigeration can sometimes alter the texture, making them a bit denser. To enjoy them at their best, allow them to come to room temperature before serving.
Freezing for Long-Term Storage: For those who want to keep brownies for an even longer period, freezing is the way to go. Wrap individual brownies tightly in plastic wrap or aluminum foil, then place them in a freezer-safe container or a resealable plastic bag, ensuring to remove as much air as possible to prevent freezer burn. Properly stored, brownies can last up to 3 months in the freezer. When you’re ready to enjoy them, simply thaw at room temperature for a few hours or warm them gently in the microwave for a few seconds.
Texture
Achieving Your Desired Texture: Brownies can be tailored to fit your personal preference when it comes to texture. If you enjoy a cakier brownie, adding an extra egg to the batter is a simple yet effective method. The additional egg contributes moisture and structure, resulting in a lighter, airier texture. Conversely, if you prefer fudgier brownies, stick to the original egg count in your recipe.
Experimenting with Ingredients: Besides the number of eggs, consider playing with the ratios of flour and fat (butter or oil) in your recipe. Reducing the flour slightly can lead to a denser brownie, while increasing the fat content can enhance the richness. Additionally, using different types of chocolate—such as dark chocolate or chocolate chips—can also influence the texture and overall flavor profile.
Sweetness
Customizing Sugar Levels: The sweetness of brownies can vary greatly depending on the recipe and your personal taste. If you find traditional recipes too sweet, don’t hesitate to adjust the sugar levels. Start by reducing the sugar by 1/4 cup, tasting the batter as you go. Remember that the sweetness will be more pronounced once the brownies are baked, so make adjustments gradually.
Sugar Alternatives: For those looking to cut down on sugar for dietary reasons or personal preference, there are several sugar alternatives available. Natural sweeteners such as honey, maple syrup, or agave nectar can be used, although they may alter the texture and moisture content. For a zero-calorie option, consider using erythritol, stevia, or monk fruit sweeteners. Keep in mind that these alternatives can vary in sweetness levels, so it’s essential to read the conversion guidelines on the packaging.
Balancing Flavors: When reducing sugar, consider adding a touch of vanilla extract or a pinch of salt to enhance the overall flavor profile of your brownies. These additions can help balance the sweetness and bring out the rich chocolate flavor, ensuring that your brownies are still delicious even with less sugar.
By considering these additional tips on storage, texture, and sweetness, you can elevate your brownie-baking skills and create treats that are uniquely suited to your taste preferences. Whether you enjoy them fudgy or cakey, sweet or subtly flavored, these insights will help you achieve the perfect brownie every time.
FAQs
Q: Can I substitute coconut flour with almond flour?
A: While both are popular gluten-free flours, they have different properties. Almond flour is not a direct substitute for coconut flour. If you prefer almond flour, you’ll need to adjust the recipe, particularly the liquid content.
Q: Are these brownies suitable for a keto diet?
A: You can make these brownies keto-friendly by using a sugar substitute like erythritol and ensuring the chocolate chips are sugar-free.
Q: Can I make these brownies vegan?
A: Yes, replace the eggs with flax eggs (1 tablespoon ground flaxseed mixed with 2.5 tablespoons water per egg), and use a plant-based butter alternative.
Q: Why are my brownies crumbly?
A: Coconut flour absorbs more moisture than regular flour. Ensure you measure it correctly and consider adding an extra egg or a bit more melted butter if the batter seems too dry.
Conclusion
Coconut flour brownies offer a delicious solution for those seeking a gluten-free treat without compromising on flavor or texture. Their rich, fudgy consistency, combined with the distinct taste of coconut, makes them a standout dessert option that everyone can enjoy. Whether you’re gluten-sensitive or simply looking to try something new, these brownies are sure to impress. With simple ingredients, easy preparation, and countless serving options, coconut flour brownies are a fantastic addition to any baking repertoire. So, gather your ingredients and indulge in the delightful world of gluten-free baking!
Print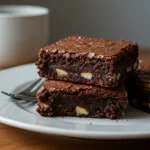
Coconut Flour Brownies
Ingredients
Creating these mouthwatering coconut flour brownies requires a few simple ingredients. Most of these items are likely already in your pantry, making this recipe both convenient and cost-effective. Here’s what you’ll need:
- 1/2 cup coconut flour
- 1/2 cup unsweetened cocoa powder
- 1 cup sugar (or a sugar substitute for a lower-calorie option)
- 1/2 cup unsalted butter, melted
- 4 large eggs
- 1 teaspoon vanilla extract
- 1/4 teaspoon salt
- 1/2 cup chocolate chips (optional, for extra chocolatey goodness)
- 1/4 cup chopped nuts (optional, for added texture)
Instructions
Follow these straightforward steps to create your very own batch of delicious coconut flour brownies. Ensure you have all your ingredients prepped and ready to go before you begin.
- Preheat the Oven: Start by preheating your oven to 350°F (175°C). Line an 8×8 inch baking pan with parchment paper or lightly grease it to prevent sticking.
- Combine Dry Ingredients: In a large mixing bowl, sift together the coconut flour, unsweetened cocoa powder, and salt. This helps to remove any lumps and ensures a smooth brownie batter.
- Melt the Butter: In a separate microwave-safe bowl, melt the unsalted butter. Allow it to cool slightly before proceeding to the next step.
- Mix Wet Ingredients: In another bowl, whisk together the sugar, eggs, vanilla extract, and melted butter until smooth and well combined.
- Incorporate Dry and Wet Mixtures: Gradually add the dry ingredients to the wet mixture, stirring continuously to create a homogeneous batter. Ensure there are no lumps remaining.
- Fold in Extras: If you’re using chocolate chips and/or nuts, gently fold them into the batter until evenly distributed.
- Pour into Pan: Carefully pour the brownie batter into the prepared baking pan, spreading it evenly with a spatula.
- Bake: Place the pan in the preheated oven and bake for 25-30 minutes, or until a toothpick inserted into the center comes out mostly clean with a few moist crumbs.
- Cool and Serve: Once baked, remove the brownies from the oven and allow them to cool in the pan for about 10 minutes. Then, transfer them to a wire rack to cool completely before cutting into squares.
Nutrition
- Serving Size: one normal portion
- Calories: 150
- Sodium: 50mg
- Fat: 9g
- Saturated Fat: 5g
- Cholesterol: 50mg


