It’s Easter time again, and in our house, that means one thing (besides egg hunts and chocolate bunnies, of course!): homemade coconut cream eggs. For years, store-bought Easter candies were the norm, but once I stumbled upon this incredibly easy recipe, everything changed. These aren’t your overly sweet, artificially flavored coconut eggs from the supermarket. These are melt-in-your-mouth, intensely coconutty, decadently creamy treats coated in rich, smooth chocolate. The first time I made them, I was genuinely surprised at how simple they were to put together, and the family devoured them within days! Even my usually picky kids couldn’t get enough. This recipe has become a beloved Easter tradition in our home, and I’m so excited to share it with you so you can create your own unforgettable Easter memories with these delightful homemade candies. Trust me, once you taste these, you’ll never go back to store-bought again! Get ready to impress your family and friends with these easy-to-make, utterly delicious Coconut Cream Eggs – they are the perfect sweet addition to your Easter celebrations.
Ingredients for Easy Coconut Cream Eggs
To create these delightful Easter treats, you’ll only need a handful of simple ingredients. Each ingredient plays a crucial role in achieving the perfect texture and flavor of your coconut cream eggs. Let’s break down what you’ll need:
- Shredded Sweetened Coconut: 5 cups (about one 14-ounce bag) The heart and soul of these candies! We are using sweetened shredded coconut for its natural sweetness and delightful coconut flavor. The fine shreds also contribute to the smooth, melt-in-your-mouth texture of the cream egg filling. It’s important to use sweetened coconut as unsweetened coconut will result in a less sweet and less satisfying candy.
- Powdered Sugar (Confectioners’ Sugar): 4 cups (about 1 lb) This is the key to achieving the right consistency and sweetness in the coconut cream filling. Powdered sugar dissolves seamlessly into the mixture, creating a smooth, non-gritty texture and adds the necessary sweetness to balance the coconut flavor. It also helps bind the ingredients together, giving the eggs their shape.
- Unsalted Butter, Softened: 1/2 cup (1 stick) Butter adds richness, flavor, and helps to bind all the ingredients together. Using unsalted butter allows you to control the overall salt level in the recipe. Softened butter is crucial for easy mixing and ensuring a smooth, creamy texture in the coconut mixture. Make sure your butter is truly softened but not melted, as melted butter can affect the final texture.
- Vanilla Extract: 1 teaspoon A touch of vanilla extract enhances the overall flavor profile, adding a subtle warmth and depth that complements the coconut beautifully. Pure vanilla extract is recommended for the best flavor, but imitation vanilla extract can be used as a substitute if needed.
- Salt: 1/4 teaspoon A pinch of salt might seem counterintuitive in a sweet recipe, but it is essential for balancing the sweetness and enhancing all the other flavors. Salt elevates the coconut and vanilla, making them more pronounced and delicious.
- Semi-Sweet or Dark Chocolate: 12 ounces (about 2 cups chips or chopped bar) For the coating, you’ll need chocolate. Semi-sweet chocolate is a classic choice that provides a balanced sweetness, but dark chocolate offers a richer, less sweet alternative that pairs wonderfully with the sweet coconut filling. You can use chocolate chips, chocolate bars, or melting wafers – just ensure it’s good quality chocolate for the best flavor and smooth melting. Consider using melting wafers or candy melts for easier melting and a glossy finish if you are new to candy making.
- Vegetable Shortening or Coconut Oil (Optional): 1 tablespoon Adding a small amount of vegetable shortening or coconut oil to the melting chocolate helps to thin it out, making it smoother and easier to dip the coconut eggs. It also gives the chocolate a lovely shine and prevents it from becoming too thick or seizing during the melting process. Coconut oil will also subtly enhance the coconut flavor of the candies, creating a cohesive taste experience.
Instructions: Making Your Coconut Cream Eggs
Creating these delightful Coconut Cream Eggs is surprisingly straightforward. Follow these step-by-step instructions to bring this Easter candy magic to life in your own kitchen:
Step 1: Combining the Coconut Cream Filling Ingredients
Begin by taking a large mixing bowl and adding your softened unsalted butter. It’s crucial that the butter is properly softened – you should be able to easily press into it with your finger, but it shouldn’t be melted or oily. If your butter is too cold, it will be difficult to cream smoothly with the other ingredients and could result in a lumpy mixture. If it’s too melted, the final texture of the eggs might be too soft.
Next, add the powdered sugar to the softened butter in the bowl. It’s always a good idea to sift your powdered sugar before adding it to the bowl, especially if it looks lumpy. Sifting will remove any clumps and ensure a smooth, consistent mixture. This step is important for achieving a creamy, lump-free filling.
Now, using an electric mixer (either a hand mixer or a stand mixer fitted with the paddle attachment), cream together the softened butter and powdered sugar until they are light, fluffy, and well combined. This process should take a few minutes. Scrape down the sides of the bowl occasionally with a spatula to ensure everything is evenly mixed. Creaming the butter and sugar together incorporates air into the mixture, which contributes to the light and airy texture of the coconut cream eggs.
Once the butter and powdered sugar are creamed together, add the shredded sweetened coconut, vanilla extract, and salt to the bowl. Make sure to distribute the coconut evenly over the butter-sugar mixture. The vanilla extract should be measured accurately for the best flavor balance. The pinch of salt is essential for enhancing the sweetness and overall flavor profile of the candy.
Step 2: Mixing and Chilling the Coconut Mixture
Using your electric mixer on low speed, gently mix all the ingredients together until they are just combined. Be careful not to overmix at this stage. Overmixing can make the coconut mixture tough. You are looking for a mixture that is moist and holds together when pressed. The mixture should resemble damp sand.
If the mixture seems too dry and crumbly, you can add a teaspoon of melted butter or a tiny splash of milk to help bind it together. However, be careful not to add too much liquid, as this can make the mixture too wet and difficult to shape. If the mixture seems too wet, you can add a little more powdered sugar or shredded coconut to absorb excess moisture.
Once the coconut mixture is combined, cover the bowl tightly with plastic wrap. Ensure the plastic wrap is pressed directly onto the surface of the coconut mixture to prevent it from drying out or forming a skin during chilling.
Now, place the bowl in the refrigerator to chill for at least 30 minutes, or even up to an hour. Chilling is a critical step in this recipe. Chilling firms up the butter and coconut mixture, making it much easier to handle and shape into egg shapes. If you skip the chilling step, the mixture will be too soft and sticky to work with effectively.
Step 3: Shaping the Coconut Cream Eggs
After the coconut mixture has chilled sufficiently, remove it from the refrigerator. Line a baking sheet with parchment paper or wax paper. This will prevent the coconut eggs from sticking to the baking sheet and make for easy removal later.
Take a tablespoon of the chilled coconut mixture and roll it between your palms to form an egg shape. You can make them any size you prefer, but a tablespoon-sized portion will create a nice, standard-sized coconut cream egg. If you want to be precise, you can use a kitchen scale to weigh each portion to ensure they are uniform in size.
Place the shaped coconut egg onto the prepared baking sheet. Repeat this process with the remaining coconut mixture, spacing the eggs out evenly on the baking sheet. If you find the mixture is becoming too soft to handle as you are shaping the eggs, you can return the bowl to the refrigerator for another 10-15 minutes to firm up again.
Once all the coconut eggs are shaped, place the baking sheet with the eggs back into the refrigerator to chill for another 30 minutes. This second chilling step is important for further firming up the eggs before dipping them in chocolate. Cold coconut eggs will be easier to dip and will help the chocolate set faster.
Step 4: Melting the Chocolate for Coating
While the coconut eggs are chilling for the second time, prepare the chocolate coating. There are several methods for melting chocolate, but the most common and reliable for candy making is using a double boiler or a microwave.
Using a Double Boiler: Fill a saucepan with about an inch or two of water and bring it to a gentle simmer over medium heat. Place a heatproof bowl (glass or stainless steel) on top of the saucepan, ensuring the bottom of the bowl does not touch the water. Add the chocolate (and optional vegetable shortening or coconut oil, if using) to the bowl. Stir the chocolate frequently as it melts, ensuring it melts evenly and doesn’t overheat. Once the chocolate is completely melted and smooth, remove the bowl from the heat.
Using a Microwave: Place the chocolate (and optional vegetable shortening or coconut oil, if using) in a microwave-safe bowl. Microwave in 30-second intervals, stirring well after each interval. Continue microwaving and stirring until the chocolate is almost completely melted. At this point, stir continuously until the residual heat melts the remaining chocolate and it is smooth. Be very careful not to overheat the chocolate in the microwave, as it can burn easily.
If you are using vegetable shortening or coconut oil, add it to the chocolate at the beginning of the melting process. These additions will help to thin the chocolate and make it smoother for dipping. Once the chocolate is melted, keep it warm while you dip the coconut eggs. If the chocolate starts to thicken as you are working, you can gently reheat it in the double boiler or microwave for a few seconds, stirring frequently.
Step 5: Dipping and Decorating the Coconut Cream Eggs
Remove the baking sheet with the chilled coconut eggs from the refrigerator. Working one at a time, carefully dip each coconut egg into the melted chocolate, ensuring it is completely coated. You can use a fork or dipping tools to help submerge and lift the eggs from the chocolate. Allow any excess chocolate to drip back into the bowl.
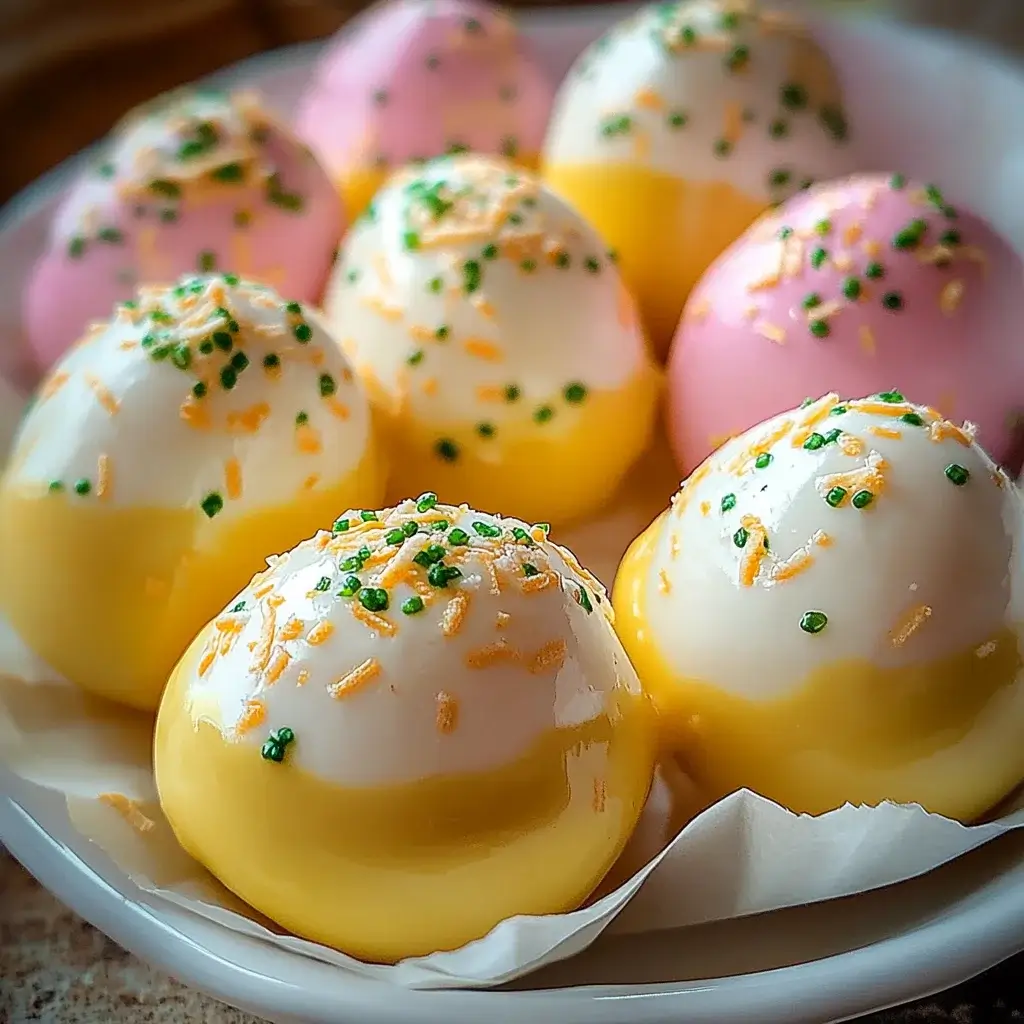
Place the chocolate-coated coconut egg back onto the parchment-lined baking sheet. If you want to add sprinkles or other decorations, do so immediately after dipping, while the chocolate is still wet. Easter sprinkles, colored sugar, shredded coconut, or a drizzle of white chocolate are all great options for decorating your coconut cream eggs.
Repeat the dipping and decorating process with all the remaining coconut eggs. Once all the eggs are dipped and decorated, place the baking sheet back in the refrigerator to allow the chocolate to set completely. This will usually take about 30-60 minutes, depending on the temperature of your refrigerator and the thickness of the chocolate coating.
Step 6: Storing and Serving Your Coconut Cream Eggs
Once the chocolate is fully set and hardened, your homemade Coconut Cream Eggs are ready to enjoy! Carefully peel them off the parchment paper and arrange them on a serving platter or store them in an airtight container.
For best results, store your Coconut Cream Eggs in the refrigerator in an airtight container. They will keep well in the refrigerator for up to a week. You can also freeze them for longer storage, up to a month. To freeze, place the eggs in a single layer on a baking sheet and freeze until solid. Then, transfer them to an airtight freezer-safe container or bag. Thaw frozen coconut cream eggs in the refrigerator overnight before serving.
When serving, you can arrange them on a pretty Easter platter, place them in Easter baskets, or simply enjoy them as a delicious homemade treat. They are perfect for Easter gatherings, as gifts, or just for indulging in a sweet spring treat.
Nutrition Facts (per serving, approximately)
- Serving Size: 1 Coconut Cream Egg
- Servings Per Recipe: Approximately 24-30 (depending on size)
- Calories: 150-200 kcal
- Fat: 10-15g
Please note: Nutrition facts are estimates and can vary based on specific ingredient brands and portion sizes. This is an indulgent treat and should be enjoyed in moderation as part of a balanced diet.
Preparation Time
- Prep Time: 30 minutes (mixing, shaping)
- Chill Time: 1-2 hours (total chilling time)
- Cook Time: 15 minutes (melting chocolate, dipping)
- Total Time: Approximately 2-3 hours (including chilling)
This recipe is relatively quick to prepare, especially considering the delicious homemade candy you get to enjoy at the end! Most of the time is spent chilling, which is hands-off time, allowing you to do other things while the eggs firm up.
How to Serve Coconut Cream Eggs
These Coconut Cream Eggs are versatile and can be served in a variety of delightful ways, making them perfect for Easter celebrations and beyond:
- Easter Dessert Platter: Create a beautiful Easter dessert platter featuring these Coconut Cream Eggs alongside other Easter treats like mini cupcakes, pastel macarons, and fruit skewers.
- Easter Basket Addition: Nestle these homemade candies into Easter baskets for a special and personal touch. They are a much more thoughtful and delicious alternative to store-bought candies.
- Party Favors: Wrap individual or small groups of Coconut Cream Eggs in cellophane bags tied with ribbons and give them out as party favors at Easter gatherings or spring-themed parties.
- Dessert with Coffee or Tea: Serve a Coconut Cream Egg alongside a cup of coffee or tea for a sweet afternoon treat or after-dinner dessert. The creamy coconut and rich chocolate pair wonderfully with warm beverages.
- Gift for Friends and Family: Package a batch of these homemade candies in a decorative box or tin and gift them to friends, family, or neighbors as a thoughtful and delicious Easter present.
- Edible Centerpiece: Arrange Coconut Cream Eggs in a decorative bowl or on a tiered stand as an edible centerpiece for your Easter table. It’s both beautiful and delicious!
- Ice Cream Topping: Crumble a Coconut Cream Egg over vanilla ice cream or coconut sorbet for an extra layer of coconut flavor and a delightful textural contrast.
- Simple Sweet Snack: Enjoy them straight from the refrigerator as a simple and satisfying sweet snack whenever you crave a little indulgence.
Additional Tips for Perfect Coconut Cream Eggs
To ensure your Coconut Cream Eggs turn out perfectly every time, here are some helpful tips and tricks:
- Use Good Quality Chocolate: The flavor of the chocolate coating is a significant part of the final candy. Invest in good quality semi-sweet or dark chocolate for the best taste. Chocolate chips, bars, or melting wafers all work well.
- Don’t Overheat the Chocolate: When melting chocolate, patience is key. Melt it gently and slowly to prevent it from burning or seizing. If using a microwave, use short intervals and stir frequently.
- Ensure Butter is Softened, Not Melted: Properly softened butter is crucial for a smooth coconut cream filling. If the butter is melted, the mixture may be too soft and greasy. Let butter soften at room temperature for about an hour before starting.
- Chill Thoroughly: Don’t skip or shorten the chilling steps. Chilling the coconut mixture and the shaped eggs is essential for making them easy to handle and dip in chocolate. Proper chilling ensures the eggs hold their shape and the chocolate sets quickly and smoothly.
- Work in Batches: If you are making a large batch, work in smaller batches to keep the coconut mixture and melted chocolate at the right temperature and consistency.
- Use Dipping Tools: Candy dipping tools (like forks, spoons, or specialized dipping tools) can make the chocolate dipping process much easier and cleaner. They help you submerge and lift the eggs smoothly and remove excess chocolate.
- Decorate Immediately After Dipping: If you plan to add sprinkles or other decorations, do so immediately after dipping each egg in chocolate while the chocolate is still wet. This will ensure the decorations adhere properly.
- Store Properly: Store Coconut Cream Eggs in an airtight container in the refrigerator to maintain their freshness and texture. This also prevents the chocolate from melting if your kitchen is warm.
Frequently Asked Questions (FAQ) About Coconut Cream Eggs
Q1: Can I use unsweetened coconut instead of sweetened coconut?
A: While you can use unsweetened coconut, the final result will be significantly less sweet. Sweetened coconut is recommended for the classic Coconut Cream Egg flavor. If using unsweetened, you may need to adjust the amount of powdered sugar to achieve the desired sweetness. However, the texture might also be slightly drier.
Q2: Can I use white chocolate or milk chocolate for the coating?
A: Yes, you can definitely use white chocolate or milk chocolate instead of semi-sweet or dark chocolate. White chocolate will create a very sweet and creamy egg, while milk chocolate will be sweeter and milder than semi-sweet. Choose your chocolate based on your personal preference.
Q3: How do I prevent the chocolate from cracking after it sets?
A: To minimize chocolate cracking, avoid drastic temperature changes. Let the melted chocolate cool slightly before dipping the cold coconut eggs. Ensure the eggs are thoroughly chilled. Also, adding a small amount of vegetable shortening or coconut oil to the melting chocolate can help make it more pliable and less prone to cracking.
Q4: Can I make these coconut cream eggs ahead of time?
A: Absolutely! Coconut Cream Eggs are perfect for making ahead of time. They can be stored in the refrigerator for up to a week or frozen for up to a month. This makes them a great make-ahead treat for Easter or any special occasion.
Q5: My coconut mixture is too dry. What can I do?
A: If your coconut mixture is too dry and crumbly, try adding a teaspoon of melted butter or a very small splash of milk to moisten it. Mix gently until it just comes together. Be careful not to add too much liquid, as this can make the mixture too wet.
Q6: My coconut mixture is too wet and sticky. How can I fix it?
A: If your coconut mixture is too wet and sticky, you can add a little more powdered sugar or shredded coconut to absorb some of the excess moisture. Add a tablespoon at a time and mix until you reach the desired consistency.
Q7: Can I add food coloring to the coconut filling?
A: Yes, you can add a few drops of gel food coloring to the coconut mixture to create pastel-colored coconut cream eggs for Easter. Add the food coloring after the butter and powdered sugar are creamed together, and mix until evenly distributed.
Q8: What’s the best way to melt chocolate chips smoothly?
A: The best way to melt chocolate chips smoothly is to use a double boiler or microwave in short intervals. For the microwave, heat in 30-second intervals, stirring well after each interval. Continue until almost melted, then stir until completely smooth. Adding a tiny bit of vegetable shortening or coconut oil can also help make chocolate chips melt more smoothly and prevent them from becoming grainy.

Easy Coconut Cream Eggs Easter Candy
Ingredients
To create these delightful Easter treats, you’ll only need a handful of simple ingredients. Each ingredient plays a crucial role in achieving the perfect texture and flavor of your coconut cream eggs. Let’s break down what you’ll need:
- Shredded Sweetened Coconut: The heart and soul of these candies! We are using sweetened shredded coconut for its natural sweetness and delightful coconut flavor. The fine shreds also contribute to the smooth, melt-in-your-mouth texture of the cream egg filling. It’s important to use sweetened coconut as unsweetened coconut will result in a less sweet and less satisfying candy.
- Powdered Sugar (Confectioners’ Sugar): This is the key to achieving the right consistency and sweetness in the coconut cream filling. Powdered sugar dissolves seamlessly into the mixture, creating a smooth, non-gritty texture and adds the necessary sweetness to balance the coconut flavor. It also helps bind the ingredients together, giving the eggs their shape.
- Unsalted Butter, Softened: Butter adds richness, flavor, and helps to bind all the ingredients together. Using unsalted butter allows you to control the overall salt level in the recipe. Softened butter is crucial for easy mixing and ensuring a smooth, creamy texture in the coconut mixture. Make sure your butter is truly softened but not melted, as melted butter can affect the final texture.
- Vanilla Extract: A touch of vanilla extract enhances the overall flavor profile, adding a subtle warmth and depth that complements the coconut beautifully. Pure vanilla extract is recommended for the best flavor, but imitation vanilla extract can be used as a substitute if needed.
- Salt: A pinch of salt might seem counterintuitive in a sweet recipe, but it is essential for balancing the sweetness and enhancing all the other flavors. Salt elevates the coconut and vanilla, making them more pronounced and delicious.
- Semi-Sweet or Dark Chocolate: For the coating, you’ll need chocolate. Semi-sweet chocolate is a classic choice that provides a balanced sweetness, but dark chocolate offers a richer, less sweet alternative that pairs wonderfully with the sweet coconut filling. You can use chocolate chips, chocolate bars, or melting wafers – just ensure it’s good quality chocolate for the best flavor and smooth melting. Consider using melting wafers or candy melts for easier melting and a glossy finish if you are new to candy making.
- Vegetable Shortening or Coconut Oil (Optional): Adding a small amount of vegetable shortening or coconut oil to the melting chocolate helps to thin it out, making it smoother and easier to dip the coconut eggs. It also gives the chocolate a lovely shine and prevents it from becoming too thick or seizing during the melting process. Coconut oil will also subtly enhance the coconut flavor of the candies, creating a cohesive taste experience.
Instructions
Creating these delightful Coconut Cream Eggs is surprisingly straightforward. Follow these step-by-step instructions to bring this Easter candy magic to life in your own kitchen:
Step 1: Combining the Coconut Cream Filling Ingredients
Begin by taking a large mixing bowl and adding your softened unsalted butter. It’s crucial that the butter is properly softened – you should be able to easily press into it with your finger, but it shouldn’t be melted or oily. If your butter is too cold, it will be difficult to cream smoothly with the other ingredients and could result in a lumpy mixture. If it’s too melted, the final texture of the eggs might be too soft.
Next, add the powdered sugar to the softened butter in the bowl. It’s always a good idea to sift your powdered sugar before adding it to the bowl, especially if it looks lumpy. Sifting will remove any clumps and ensure a smooth, consistent mixture. This step is important for achieving a creamy, lump-free filling.
Now, using an electric mixer (either a hand mixer or a stand mixer fitted with the paddle attachment), cream together the softened butter and powdered sugar until they are light, fluffy, and well combined. This process should take a few minutes. Scrape down the sides of the bowl occasionally with a spatula to ensure everything is evenly mixed. Creaming the butter and sugar together incorporates air into the mixture, which contributes to the light and airy texture of the coconut cream eggs.
Once the butter and powdered sugar are creamed together, add the shredded sweetened coconut, vanilla extract, and salt to the bowl. Make sure to distribute the coconut evenly over the butter-sugar mixture. The vanilla extract should be measured accurately for the best flavor balance. The pinch of salt is essential for enhancing the sweetness and overall flavor profile of the candy.
Step 2: Mixing and Chilling the Coconut Mixture
Using your electric mixer on low speed, gently mix all the ingredients together until they are just combined. Be careful not to overmix at this stage. Overmixing can make the coconut mixture tough. You are looking for a mixture that is moist and holds together when pressed. The mixture should resemble damp sand.
If the mixture seems too dry and crumbly, you can add a teaspoon of melted butter or a tiny splash of milk to help bind it together. However, be careful not to add too much liquid, as this can make the mixture too wet and difficult to shape. If the mixture seems too wet, you can add a little more powdered sugar or shredded coconut to absorb excess moisture.
Once the coconut mixture is combined, cover the bowl tightly with plastic wrap. Ensure the plastic wrap is pressed directly onto the surface of the coconut mixture to prevent it from drying out or forming a skin during chilling.
Now, place the bowl in the refrigerator to chill for at least 30 minutes, or even up to an hour. Chilling is a critical step in this recipe. Chilling firms up the butter and coconut mixture, making it much easier to handle and shape into egg shapes. If you skip the chilling step, the mixture will be too soft and sticky to work with effectively.
Step 3: Shaping the Coconut Cream Eggs
After the coconut mixture has chilled sufficiently, remove it from the refrigerator. Line a baking sheet with parchment paper or wax paper. This will prevent the coconut eggs from sticking to the baking sheet and make for easy removal later.
Take a tablespoon of the chilled coconut mixture and roll it between your palms to form an egg shape. You can make them any size you prefer, but a tablespoon-sized portion will create a nice, standard-sized coconut cream egg. If you want to be precise, you can use a kitchen scale to weigh each portion to ensure they are uniform in size.
Place the shaped coconut egg onto the prepared baking sheet. Repeat this process with the remaining coconut mixture, spacing the eggs out evenly on the baking sheet. If you find the mixture is becoming too soft to handle as you are shaping the eggs, you can return the bowl to the refrigerator for another 10-15 minutes to firm up again.
Once all the coconut eggs are shaped, place the baking sheet with the eggs back into the refrigerator to chill for another 30 minutes. This second chilling step is important for further firming up the eggs before dipping them in chocolate. Cold coconut eggs will be easier to dip and will help the chocolate set faster.
Step 4: Melting the Chocolate for Coating
While the coconut eggs are chilling for the second time, prepare the chocolate coating. There are several methods for melting chocolate, but the most common and reliable for candy making is using a double boiler or a microwave.
Using a Double Boiler: Fill a saucepan with about an inch or two of water and bring it to a gentle simmer over medium heat. Place a heatproof bowl (glass or stainless steel) on top of the saucepan, ensuring the bottom of the bowl does not touch the water. Add the chocolate (and optional vegetable shortening or coconut oil, if using) to the bowl. Stir the chocolate frequently as it melts, ensuring it melts evenly and doesn’t overheat. Once the chocolate is completely melted and smooth, remove the bowl from the heat.
Using a Microwave: Place the chocolate (and optional vegetable shortening or coconut oil, if using) in a microwave-safe bowl. Microwave in 30-second intervals, stirring well after each interval. Continue microwaving and stirring until the chocolate is almost completely melted. At this point, stir continuously until the residual heat melts the remaining chocolate and it is smooth. Be very careful not to overheat the chocolate in the microwave, as it can burn easily.
If you are using vegetable shortening or coconut oil, add it to the chocolate at the beginning of the melting process. These additions will help to thin the chocolate and make it smoother for dipping. Once the chocolate is melted, keep it warm while you dip the coconut eggs. If the chocolate starts to thicken as you are working, you can gently reheat it in the double boiler or microwave for a few seconds, stirring frequently.
Step 5: Dipping and Decorating the Coconut Cream Eggs
Remove the baking sheet with the chilled coconut eggs from the refrigerator. Working one at a time, carefully dip each coconut egg into the melted chocolate, ensuring it is completely coated. You can use a fork or dipping tools to help submerge and lift the eggs from the chocolate. Allow any excess chocolate to drip back into the bowl.
Place the chocolate-coated coconut egg back onto the parchment-lined baking sheet. If you want to add sprinkles or other decorations, do so immediately after dipping, while the chocolate is still wet. Easter sprinkles, colored sugar, shredded coconut, or a drizzle of white chocolate are all great options for decorating your coconut cream eggs.
Repeat the dipping and decorating process with all the remaining coconut eggs. Once all the eggs are dipped and decorated, place the baking sheet back in the refrigerator to allow the chocolate to set completely. This will usually take about 30-60 minutes, depending on the temperature of your refrigerator and the thickness of the chocolate coating.
Step 6: Storing and Serving Your Coconut Cream Eggs
Once the chocolate is fully set and hardened, your homemade Coconut Cream Eggs are ready to enjoy! Carefully peel them off the parchment paper and arrange them on a serving platter or store them in an airtight container.
For best results, store your Coconut Cream Eggs in the refrigerator in an airtight container. They will keep well in the refrigerator for up to a week. You can also freeze them for longer storage, up to a month. To freeze, place the eggs in a single layer on a baking sheet and freeze until solid. Then, transfer them to an airtight freezer-safe container or bag. Thaw frozen coconut cream eggs in the refrigerator overnight before serving.
When serving, you can arrange them on a pretty Easter platter, place them in Easter baskets, or simply enjoy them as a delicious homemade treat. They are perfect for Easter gatherings, as gifts, or just for indulging in a sweet spring treat.
Nutrition
- Serving Size: one normal portion
- Calories: 200
- Fat: 15g