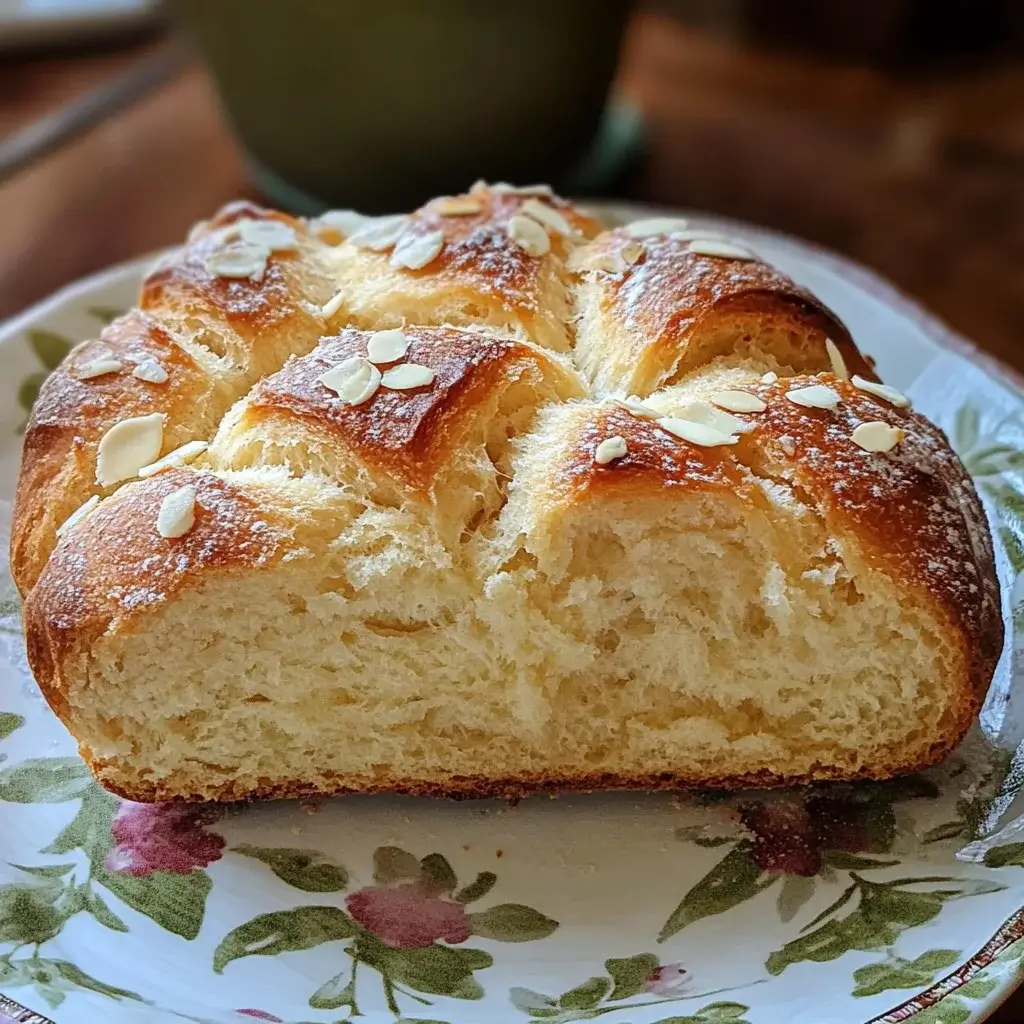
My family absolutely adores Easter morning, and for us, it’s just not complete without a beautiful, fragrant loaf of Easter bread gracing our table. This year, I decided to try a no-knead version, and let me tell you, it was a game-changer! The aroma that filled the kitchen was heavenly, and the resulting bread was incredibly fluffy, tender, and just the right amount of sweet. Even my pickiest eater couldn’t get enough. The best part? It was so incredibly easy to make! If you’re looking for a stress-free way to bake a stunning and delicious centerpiece for your Easter celebrations, look no further. This Fluffy No-Knead Easter Bread is guaranteed to become a new family tradition.
Ingredients for Fluffy No-Knead Easter Bread
- 3 ½ cups All-Purpose Flour: The foundation of our bread, providing structure and chewiness. You’ll need a good quality all-purpose flour for the best results.
- 1 ½ teaspoons Instant Yeast: The magic ingredient that makes this bread rise without kneading! Instant yeast is quick-acting and reliable.
- ⅓ cup Granulated Sugar: Adds sweetness and also feeds the yeast, helping the bread rise and develop flavor.
- 1 teaspoon Salt: Essential for flavor balance, salt enhances the sweetness and controls the yeast activity.
- 1 cup Warm Milk (approx. 105-115°F / 40-46°C): Provides moisture, richness, and helps activate the yeast. Make sure it’s warm to the touch, but not hot, to avoid killing the yeast.
- 2 large Eggs: Contribute to the bread’s richness, tenderness, and golden color. Use large eggs for consistency.
- ¼ cup (4 tablespoons / 57g) Unsalted Butter, Melted: Adds flavor, moisture, and helps create a soft and tender crumb. Melt and cool slightly before adding to the dough.
- 1 teaspoon Vanilla Extract: Enhances the overall flavor profile, adding a touch of warmth and sweetness.
- Zest of 1 lemon Lemon Zest (Optional): Adds a bright, citrusy note that is traditional in many Easter breads and complements the sweetness beautifully.
- ¾ cup Raisins or Dried Currants (Optional): For a classic Easter bread touch, add some plump raisins or dried currants. Soak them in warm water or rum for extra plumpness and flavor.
- Colored Sprinkles or Candied Fruit (for decoration, optional): To make your Easter bread extra festive, you can decorate it with colorful sprinkles or candied fruit after baking.
- Egg Wash (1 large egg yolk + 1 tablespoon milk): Brushed on before baking to create a glossy, golden-brown crust.
Instructions for Fluffy No-Knead Easter Bread
- Combine Dry Ingredients: In a large mixing bowl, whisk together the all-purpose flour, instant yeast, granulated sugar, and salt. Make sure these ingredients are well combined to ensure even distribution.
- Incorporate Wet Ingredients: In a separate bowl or measuring cup, whisk together the warm milk, eggs, melted and slightly cooled butter, and vanilla extract (and lemon zest, if using). Ensure the butter isn’t too hot, or it might cook the eggs.
- Mix Wet and Dry: Pour the wet ingredients into the bowl with the dry ingredients. Using a spatula or wooden spoon, stir everything together until just combined. The dough will be quite sticky and shaggy, which is perfectly normal for a no-knead dough. Do not overmix.
- Add Raisins/Currants (Optional): If you are using raisins or dried currants, gently fold them into the dough until they are evenly distributed.
- First Rise (Bulk Fermentation): Cover the bowl tightly with plastic wrap or a damp kitchen towel. Let the dough rise in a warm place for 1 to 1.5 hours, or until it has roughly doubled in size. The rising time will depend on the warmth of your kitchen. A slightly warm spot will encourage faster rising.
- Shape the Dough: Gently punch down the dough (this is just a quick deflate, not vigorous kneading). Turn the dough out onto a lightly floured surface. It will still be sticky, so use floured hands. Shape the dough into a round or oval loaf. You can also divide the dough into smaller portions to make individual buns or a braided loaf if desired. For a round loaf, simply tuck the edges under to create a smooth top.
- Second Rise (Proofing): Place the shaped loaf on a baking sheet lined with parchment paper. Cover loosely with plastic wrap or a damp kitchen towel. Let it rise again in a warm place for another 45 minutes to 1 hour, or until it has noticeably puffed up and is almost doubled in size again. This second rise, called proofing, is crucial for a light and airy texture.
- Preheat Oven and Prepare Egg Wash: While the dough is proofing, preheat your oven to 375°F (190°C). Prepare the egg wash by whisking together the egg yolk and milk in a small bowl.
- Egg Wash and Decorate (Optional): Gently brush the top of the risen loaf with the egg wash. If desired, sprinkle with colored sprinkles or arrange candied fruit on top for decoration. Be gentle so you don’t deflate the dough.
- Bake: Bake in the preheated oven for 30-40 minutes, or until the bread is golden brown and sounds hollow when tapped on the bottom. The baking time may vary depending on the size and shape of your loaf and your oven. If the top starts to brown too quickly, you can loosely tent it with foil.
- Cool: Once baked, remove the bread from the oven and let it cool on the baking sheet for a few minutes before transferring it to a wire rack to cool completely. Cooling completely before slicing is important to prevent a gummy texture and to allow the internal structure to set.
Nutrition Facts (per serving)
(Note: Nutritional values are approximate and can vary based on specific ingredients and serving size.)
- Servings: 12
- Calories per serving: 250-300 kcal
- Total Fat: 8-10g
- Saturated Fat: 4-5g
Preparation Time
This Fluffy No-Knead Easter Bread is wonderfully simple to prepare, even though it requires some rising time. The active preparation time is approximately 20-25 minutes. The total time, including rising and baking, is around 3-3.5 hours. The beauty of no-knead bread is that most of this time is hands-off, allowing you to do other things while the dough works its magic!
- Active Prep Time: 20-25 minutes (mixing ingredients, shaping)
- First Rise (Bulk Fermentation): 1-1.5 hours
- Second Rise (Proofing): 45 minutes – 1 hour
- Baking Time: 30-40 minutes
How to Serve Fluffy No-Knead Easter Bread
This versatile and delicious Easter bread can be enjoyed in many ways. Here are some serving suggestions:
- Easter Brunch Centerpiece: Make it the star of your Easter brunch table. Its beautiful appearance and delightful aroma will impress your guests.
- Breakfast Treat: Slice and enjoy it warm with a pat of butter or a drizzle of honey for a special breakfast.
- Dessert with Coffee or Tea: Serve it as a sweet treat after your Easter meal, paired with a cup of coffee, tea, or hot chocolate.
- With Jams and Spreads: Offer it alongside a selection of your favorite jams, jellies, or fruit preserves for a delightful snack or light meal.
- French Toast or Bread Pudding: If you have any leftovers (though unlikely!), use them to make incredibly flavorful French toast or bread pudding.
- Gift Giving: Bake an extra loaf to give as a thoughtful and homemade Easter gift to friends, family, or neighbors.
- Alongside Savory Dishes: While sweet, this bread can also complement savory dishes like roasted ham, quiche, or spring salads.
- Simply on its own: Sometimes, the best way to enjoy this bread is simply sliced and enjoyed on its own, appreciating its soft texture and delicate flavor.
Additional Tips for Perfect Fluffy No-Knead Easter Bread
- Use Warm (Not Hot) Milk: The milk should be warm to the touch, around 100-110°F (38-43°C). This temperature is ideal for activating the yeast without killing it. If the milk is too hot, it can inhibit the yeast and prevent proper rising.
- Don’t Overmix the Dough: Mix the wet and dry ingredients just until combined. Overmixing can develop the gluten too much in a no-knead dough, resulting in a tougher bread. A shaggy, slightly sticky dough is what you’re aiming for.
- Warm Place for Rising is Key: Find a warm spot in your kitchen for the dough to rise. A slightly warm oven (turned off!), a sunny windowsill (avoid direct hot sun though), or even the top of your refrigerator can work well. Consistent warmth promotes good yeast activity.
- Patience is a Virtue (for Rising): Allow the dough to rise fully during both the first and second rise. Rushing the rising process can lead to a dense and less fluffy bread. Trust the process and let the yeast do its work.
- Handle Dough Gently When Shaping: No-knead dough is delicate. When shaping, handle it gently to avoid deflating it too much. Use floured hands to make it easier to work with the sticky dough.
- Don’t Skip the Egg Wash: The egg wash is crucial for achieving that beautiful golden-brown, glossy crust. It also adds a slight richness and helps with browning.
- Bake Until Golden Brown and Hollow Sounding: Bake the bread until it’s a deep golden brown color and sounds hollow when you tap the bottom. A thermometer inserted into the center should read around 200-210°F (93-99°C). This ensures it’s fully baked through.
- Cool Completely Before Slicing: Resist the temptation to slice into the bread while it’s still hot! Cooling allows the internal structure of the bread to set, preventing a gummy texture and making it easier to slice. Let it cool completely on a wire rack for the best results.
Frequently Asked Questions (FAQ) about Fluffy No-Knead Easter Bread
Q1: Can I use active dry yeast instead of instant yeast?
A: Yes, you can. If using active dry yeast, you’ll need to proof it first. Dissolve the active dry yeast in the warm milk along with a teaspoon of sugar. Let it sit for 5-10 minutes until foamy before adding it to the dry ingredients. The rising time may also be slightly longer.
Q2: Can I make this bread ahead of time?
A: Yes, you can prepare the dough the day before. After the first rise, punch down the dough, shape it, and place it in a greased loaf pan or on a baking sheet. Cover it tightly and refrigerate overnight. In the morning, take it out of the refrigerator and let it come to room temperature and proof for about 1-1.5 hours before baking as directed.
Q3: Can I freeze Easter bread?
A: Yes, baked Easter bread freezes well. Let it cool completely, then wrap it tightly in plastic wrap and then foil, or place it in a freezer-safe bag. Freeze for up to 2-3 months. Thaw overnight at room temperature or in the refrigerator. You can warm it up in a low oven (300°F/150°C) for about 10-15 minutes to refresh it.
Q4: What if my dough doesn’t rise?
A: Several factors can affect rising. Make sure your yeast is fresh and not expired. Ensure your milk is warm, not hot. A cold kitchen can also slow down rising. Find a warmer spot. If you’re sure your yeast is good and the temperature is right, give it more time to rise. Sometimes no-knead dough can be slower to rise.
Q5: Can I add other flavorings or spices?
A: Absolutely! Feel free to experiment. Orange zest, cardamom, anise seeds, or a pinch of nutmeg would all be lovely additions to Easter bread. You can also add different dried fruits like cranberries or apricots.
Q6: Can I make this bread without eggs?
A: Eggs contribute to the richness and texture of the bread. While you can try egg substitutes like flax eggs or applesauce, the texture may be slightly different and potentially less fluffy. For best results, eggs are recommended.
Q7: My bread is browning too quickly on top. What should I do?
A: If the top of your bread is browning too quickly before the inside is fully baked, loosely tent the loaf with aluminum foil. This will shield the top from direct heat and allow the inside to continue baking without burning the crust.
Q8: Can I make individual Easter bread rolls from this recipe?
A: Yes, you can easily make rolls! After the first rise, divide the dough into smaller portions (about 8-12 rolls). Shape them into rounds and place them on a baking sheet, leaving some space between them. Proof and bake as directed, but reduce the baking time to about 15-20 minutes, or until golden brown.
This Fluffy No-Knead Easter Bread is a delightful way to celebrate the holiday with a homemade treat. Its simplicity and deliciousness make it a perfect recipe for bakers of all skill levels. Enjoy the process and the wonderful aroma filling your kitchen as you bake this Easter delight!
Print
Fluffy No-Knead Easter Bread
Ingredients
- All-Purpose Flour: The foundation of our bread, providing structure and chewiness. You’ll need a good quality all-purpose flour for the best results.
- Instant Yeast: The magic ingredient that makes this bread rise without kneading! Instant yeast is quick-acting and reliable.
- Granulated Sugar: Adds sweetness and also feeds the yeast, helping the bread rise and develop flavor.
- Salt: Essential for flavor balance, salt enhances the sweetness and controls the yeast activity.
- Warm Milk: Provides moisture, richness, and helps activate the yeast. Make sure it’s warm to the touch, but not hot, to avoid killing the yeast.
- Eggs: Contribute to the bread’s richness, tenderness, and golden color. Use large eggs for consistency.
- Unsalted Butter, Melted: Adds flavor, moisture, and helps create a soft and tender crumb. Melt and cool slightly before adding to the dough.
- Vanilla Extract: Enhances the overall flavor profile, adding a touch of warmth and sweetness.
- Lemon Zest (Optional): Adds a bright, citrusy note that is traditional in many Easter breads and complements the sweetness beautifully.
- Raisins or Dried Currants (Optional): For a classic Easter bread touch, add some plump raisins or dried currants. Soak them in warm water or rum for extra plumpness and flavor.
- Colored Sprinkles or Candied Fruit (for decoration, optional): To make your Easter bread extra festive, you can decorate it with colorful sprinkles or candied fruit after baking.
- Egg Wash (1 egg yolk + 1 tablespoon milk): Brushed on before baking to create a glossy, golden-brown crust.
Instructions
- Combine Dry Ingredients: In a large mixing bowl, whisk together the all-purpose flour, instant yeast, granulated sugar, and salt. Make sure these ingredients are well combined to ensure even distribution.
- Incorporate Wet Ingredients: In a separate bowl or measuring cup, whisk together the warm milk, eggs, melted and slightly cooled butter, and vanilla extract (and lemon zest, if using). Ensure the butter isn’t too hot, or it might cook the eggs.
- Mix Wet and Dry: Pour the wet ingredients into the bowl with the dry ingredients. Using a spatula or wooden spoon, stir everything together until just combined. The dough will be quite sticky and shaggy, which is perfectly normal for a no-knead dough. Do not overmix.
- Add Raisins/Currants (Optional): If you are using raisins or dried currants, gently fold them into the dough until they are evenly distributed.
- First Rise (Bulk Fermentation): Cover the bowl tightly with plastic wrap or a damp kitchen towel. Let the dough rise in a warm place for 1 to 1.5 hours, or until it has roughly doubled in size. The rising time will depend on the warmth of your kitchen. A slightly warm spot will encourage faster rising.
- Shape the Dough: Gently punch down the dough (this is just a quick deflate, not vigorous kneading). Turn the dough out onto a lightly floured surface. It will still be sticky, so use floured hands. Shape the dough into a round or oval loaf. You can also divide the dough into smaller portions to make individual buns or a braided loaf if desired. For a round loaf, simply tuck the edges under to create a smooth top.
- Second Rise (Proofing): Place the shaped loaf on a baking sheet lined with parchment paper. Cover loosely with plastic wrap or a damp kitchen towel. Let it rise again in a warm place for another 45 minutes to 1 hour, or until it has noticeably puffed up and is almost doubled in size again. This second rise, called proofing, is crucial for a light and airy texture.
- Preheat Oven and Prepare Egg Wash: While the dough is proofing, preheat your oven to 375°F (190°C). Prepare the egg wash by whisking together the egg yolk and milk in a small bowl.
- Egg Wash and Decorate (Optional): Gently brush the top of the risen loaf with the egg wash. If desired, sprinkle with colored sprinkles or arrange candied fruit on top for decoration. Be gentle so you don’t deflate the dough.
- Bake: Bake in the preheated oven for 30-40 minutes, or until the bread is golden brown and sounds hollow when tapped on the bottom. The baking time may vary depending on the size and shape of your loaf and your oven. If the top starts to brown too quickly, you can loosely tent it with foil.
- Cool: Once baked, remove the bread from the oven and let it cool on the baking sheet for a few minutes before transferring it to a wire rack to cool completely. Cooling completely before slicing is important to prevent a gummy texture and to allow the internal structure to set.
Nutrition
- Serving Size: one normal portion
- Calories: 300
- Fat: 10g
- Saturated Fat: 5g


