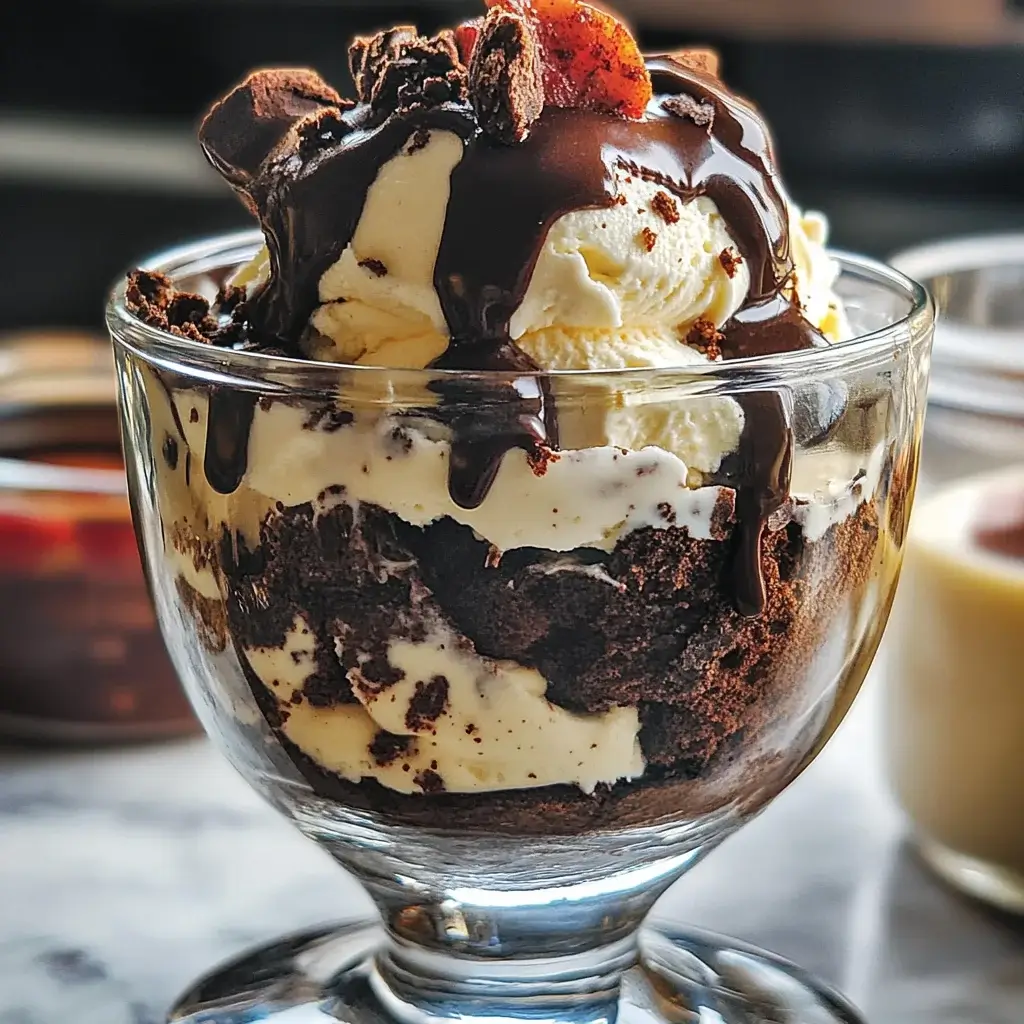
There are desserts, and then there are desserts. You know the kind – the ones that silence a room, elicit contented sighs, and become legendary in your family’s culinary history. For us, that legendary dessert is unequivocally the Fudge Brownie Ice Cream Sundae. I still remember the first time I decided to combine my go-to fudgy brownie recipe with homemade (well, mostly homemade!) sundae elements. It was a rainy Saturday, the kids were restless, and I needed a guaranteed win. What emerged from the kitchen wasn’t just a dessert; it was an event. The rich, decadent brownie, still slightly warm, formed the perfect foundation. The shock of cold, creamy vanilla ice cream slowly melting into its nooks and crannies, the river of deep, dark, glossy fudge sauce cascading down the sides, the fluffy cloud of whipped cream, and that quintessential cherry on top – it was pure, unadulterated joy. Seeing my family’s eyes light up, the way my usually chatty husband just focused intently on each spoonful, confirmed it: this wasn’t just a recipe, it was a core memory in the making. Since then, it’s become our celebratory staple, our “bad day” cure, and our ultimate indulgent treat. It’s more than just ingredients; it’s the warmth, the chill, the textures, and the sheer chocolatey bliss that makes this Fudge Brownie Ice Cream Sundae recipe a true showstopper, and I’m thrilled to share exactly how you can recreate this magic in your own kitchen. Prepare for applause.
Ingredients
Here’s what you’ll need to gather to create this masterpiece. We’ve broken it down into components for clarity. Using high-quality ingredients, especially for the chocolate components, will significantly elevate the final result.
For the Ultimate Fudge Brownies (Makes approx. 9 generous squares):
- 1 cup (2 sticks or 226g) Unsalted Butter: Provides richness, moisture, and that melt-in-your-mouth texture. Using unsalted allows you to control the salt level precisely.
- 1 cup (200g) Granulated Sugar: Sweetens the brownies and contributes to their structure and tender crumb.
- 1 cup (210g) Packed Light Brown Sugar: Adds moisture, chewiness, and a subtle molasses flavor complexity compared to using only white sugar.
- 4 Large Eggs: Act as binders, provide richness, and help leaven the brownies slightly. Ensure they are at room temperature for better incorporation.
- 1 teaspoon Pure Vanilla Extract: Enhances the chocolate flavor and adds aromatic depth. Use pure extract for the best taste.
- 1 cup (120g) All-Purpose Flour: Provides structure. Be careful not to overmeasure; spoon it into the measuring cup and level it off.
- ½ cup (45g) Unsweetened Dutch-process Cocoa Powder: Offers a deep, rich chocolate flavor and dark color. Sifting is recommended to remove lumps.
- ½ teaspoon Baking Powder: Gives the brownies a slight lift, preventing them from being overly dense.
- ½ teaspoon Salt: Balances the sweetness and enhances the overall flavor profile, especially the chocolate.
- 1 cup (170g) Semi-Sweet Chocolate Chips or Chunks: Folded into the batter, these create pockets of melted chocolate goodness throughout the brownie. Quality matters here!
For the Rich Hot Fudge Sauce (Makes approx. 1.5 cups):
- ⅔ cup (160ml) Heavy Cream: Forms the luxurious base of the sauce, providing richness and smooth texture.
- ½ cup (113g) Unsalted Butter: Adds more richness and helps create a glossy finish.
- ¼ cup (55g) Packed Light Brown Sugar: Contributes sweetness and depth.
- ¼ cup (60ml) Light Corn Syrup: Prevents the sugar from crystallizing, ensuring a smooth, non-gritty sauce.
- ¼ cup (22g) Unsweetened Dutch-process Cocoa Powder: Provides the intense chocolate flavor foundation.
- Pinch of Salt: Enhances the chocolate flavor and balances sweetness.
- 1 teaspoon Pure Vanilla Extract: Stirred in at the end for optimal flavor.
- 4 ounces (113g) Good Quality Bittersweet or Semi-Sweet Chocolate (chopped): Melted into the sauce at the end for extra richness and deep chocolate flavor. Choose chocolate with at least 60% cacao for best results.
For Sundae Assembly (Per Serving, adjust to preference):
- 1 Large Square (or 2 smaller squares) Warm Fudge Brownie: The star foundation.
- 2-3 Scoops High-Quality Vanilla Bean Ice Cream: The classic pairing, offering a cool, creamy contrast. Feel free to substitute with your favorite flavor!
- Generous Drizzle of Warm Hot Fudge Sauce: The essential element that ties it all together.
- Dollop of Sweetened Whipped Cream (Homemade or Store-Bought): Adds lightness and a creamy topping.
- Maraschino Cherry: The iconic, cheerful finishing touch.
- Optional Toppings: Chopped toasted nuts (walnuts, pecans, peanuts), chocolate sprinkles, rainbow sprinkles, chocolate shavings, caramel sauce, fresh berries, mini marshmallows, crushed cookies.
Instructions
Follow these steps carefully for dessert perfection. While it involves a few components, each step is straightforward. The key is patience, especially when cooling the brownies.
Part 1: Making the Ultimate Fudge Brownies
- Preheat and Prepare: Preheat your oven to 350°F (175°C). Grease and flour a 9×9 inch square baking pan, or line it with parchment paper, leaving an overhang on two sides (this makes lifting the brownies out much easier). Set aside.
- Melt Butter and Sugars: In a medium saucepan over low heat, melt the unsalted butter completely. Remove from heat and stir in the granulated sugar and packed light brown sugar until well combined. The mixture might look grainy at this stage; that’s okay. Let it cool slightly for a few minutes – you don’t want to scramble the eggs.
- Incorporate Eggs and Vanilla: Whisk the large eggs into the slightly cooled butter-sugar mixture one at a time, ensuring each egg is fully incorporated before adding the next. Whisk vigorously for about a minute until the mixture becomes lighter in color and slightly fluffy. Stir in the pure vanilla extract.
- Combine Dry Ingredients: In a separate medium bowl, whisk together the all-purpose flour, Dutch-process cocoa powder, baking powder, and salt. Sifting the cocoa powder is highly recommended to prevent lumps.
- Combine Wet and Dry: Gradually add the dry ingredient mixture to the wet ingredient mixture. Use a rubber spatula to fold the ingredients together just until no dry streaks remain. Be very careful not to overmix! Overmixing develops gluten and leads to tough, cakey brownies instead of fudgy ones.
- Fold in Chocolate Chips: Gently fold in the semi-sweet chocolate chips or chunks.
- Pour and Spread: Pour the brownie batter into the prepared baking pan. Use the spatula to spread it evenly into the corners.
- Bake: Place the pan in the preheated oven. Bake for 25-35 minutes. The exact time depends on your oven. Start checking around the 25-minute mark. For fudgy brownies, a wooden skewer or toothpick inserted into the center should come out with moist crumbs attached, but not wet batter. If it comes out clean, they might be slightly overbaked (more cakey). The edges should look set and slightly pulled away from the sides of the pan.
- Cool Completely: This step is crucial! Remove the pan from the oven and place it on a wire rack. Let the brownies cool completely in the pan, ideally for at least 1-2 hours, or even longer. Cooling allows them to set properly, develop their fudgy texture, and makes them much easier to cut cleanly. Trying to cut them while warm will result in a gooey mess (though a delicious one!).
- Cut the Brownies: Once completely cooled, use the parchment paper overhangs to lift the brownie slab out of the pan onto a cutting board. Cut into desired sizes (9 large squares are standard for sundaes).
Part 2: Making the Rich Hot Fudge Sauce
- Combine Initial Ingredients: In a medium saucepan, combine the heavy cream, unsalted butter, light brown sugar, light corn syrup, Dutch-process cocoa powder, and pinch of salt.
- Heat Gently: Place the saucepan over medium-low heat. Whisk constantly as the butter melts and the mixture heats up. Bring it to a gentle simmer, still whisking.
- Simmer: Once simmering, reduce the heat to low and let it cook gently for 5-8 minutes, stirring frequently to prevent scorching on the bottom. The sauce will thicken slightly. Don’t let it boil rapidly.
- Remove from Heat & Add Chocolate: Remove the saucepan from the heat. Add the chopped bittersweet or semi-sweet chocolate. Let it sit for a minute or two to soften, then whisk until the chocolate is completely melted and the sauce is smooth and glossy.
- Stir in Vanilla: Stir in the pure vanilla extract.
- Serve or Store: The sauce is best served warm. If making ahead, let it cool, then store it in an airtight container (like a glass jar) in the refrigerator for up to 2 weeks. Reheat gently over low heat or in the microwave (in short bursts, stirring in between) before serving. If it’s too thick upon reheating, whisk in a teaspoon or two of milk or cream until it reaches the desired consistency.
Part 3: Assembling the Fudge Brownie Ice Cream Sundaes
- Prepare the Brownie: Take one (or two!) cooled brownie squares. For the ultimate experience, gently warm the brownie for about 10-15 seconds in the microwave or a few minutes in a toaster oven. You want it slightly warm, not hot, to contrast beautifully with the cold ice cream without melting it instantly.
- Place in Serving Dish: Place the warm brownie square(s) in the bottom of a suitable serving bowl, sundae glass, or even a small skillet for a rustic look.
- Add Ice Cream: Top the brownie with 2-3 generous scoops of your chosen ice cream (vanilla bean is classic). Arrange them artfully or just pile them on!
- Drizzle the Fudge Sauce: Generously drizzle the warm hot fudge sauce over the ice cream and brownie, letting it drip down the sides. Be liberal here – it’s called Fudge Brownie Ice Cream Sundae for a reason!
- Top it Off: Add a generous dollop of whipped cream on top of the fudge sauce.
- The Cherry: Crown your creation with a bright red maraschino cherry.
- Optional Garnishes: Sprinkle with any additional desired toppings like chopped nuts, sprinkles, or chocolate shavings.
- Serve Immediately: Present your masterpiece immediately and watch the delight unfold!
Nutrition Facts
- Servings: This recipe yields approximately 9 brownies and 1.5 cups of fudge sauce, enough to assemble around 6-9 generous sundaes, depending on portion sizes.
- Calories per Serving (Approximate): Expect a decadent treat! One sundae (made with one large brownie square, 2 scoops standard vanilla ice cream, fudge sauce, whipped cream, and cherry) contains approximately 750-950 calories. This is an estimate and varies greatly based on ice cream choice, portion sizes, and optional toppings.
- Fat: A significant contributor to the richness and flavor, primarily from butter, heavy cream, chocolate, and ice cream. Provides satiety and mouthfeel.
- Saturated Fat: A component of the total fat, largely derived from dairy products (butter, cream, ice cream) and cocoa butter in the chocolate.
- Carbohydrates: Primarily sourced from sugars (granulated, brown, corn syrup, lactose in dairy) and flour. Provides the body with quick energy.
- Sugar: A major component contributing to the sweetness and overall indulgence, coming from added sugars, chocolate, and ice cream.
- Protein: Present in smaller amounts from eggs, dairy, flour, and nuts (if used as a topping).
Disclaimer: These nutritional facts are estimates. Actual values vary based on specific ingredients used, portion sizes, and optional additions.
Preparation Time
- Active Preparation: Approximately 35-45 minutes. This includes mixing the brownie batter (15-20 min), making the fudge sauce (10-15 min), and assembling the sundaes (5-10 min).
- Baking Time: 25-35 minutes for the brownies.
- Cooling Time: Minimum 1-2 hours for the brownies (essential for texture and cutting). The fudge sauce needs minimal cooling before serving warm but will need cooling time if storing.
- Total Time (Including Cooling): Approximately 2 hours 30 minutes to 3 hours 20 minutes. While the hands-on time isn’t excessive, the crucial brownie cooling period significantly extends the total duration from start to finish. Plan accordingly!
How to Serve
Serving this Fudge Brownie Ice Cream Sundae is all about celebrating indulgence. Here are some ideas:
- The Classic:
- Serve in traditional tall, fluted sundae glasses for a nostalgic soda fountain feel.
- Layer components: Warm brownie at the bottom, scoops of ice cream, generous hot fudge, whipped cream mound, cherry on top.
- Bowl Style:
- Use wide, shallow bowls for easier eating and to showcase the melting interaction between ice cream and brownie.
- Allows for more surface area for toppings.
- Skillet Sundae (For Sharing):
- Place several warm brownie squares in a small cast-iron skillet.
- Top generously with ice cream scoops right down the middle.
- Drench with hot fudge sauce.
- Add multiple dollops of whipped cream and cherries.
- Serve with multiple spoons for a fun, shareable dessert experience.
- Deconstructed/Sundae Bar:
- Perfect for parties or gatherings.
- Set out a platter of cut brownie squares (warm them slightly just before serving).
- Offer several ice cream flavors (Vanilla, Chocolate, Strawberry, Coffee, Salted Caramel).
- Keep the Hot Fudge Sauce warm in a small slow cooker or fondue pot.
- Provide bowls of various toppings:
- Whipped Cream
- Cherries
- Chopped Nuts (Walnuts, Pecans, Peanuts, Almonds)
- Sprinkles (Chocolate & Rainbow)
- Mini Chocolate Chips or Chocolate Shavings
- Caramel Sauce
- Crushed Cookies (like Oreos)
- Fresh Berries (Raspberries, Strawberries)
- Mini Marshmallows
- Let guests build their own ultimate Fudge Brownie Ice Cream Sundae creation.
- Gourmet Touch:
- Use high-quality artisanal ice cream.
- Make your own whipped cream (heavy cream, powdered sugar, vanilla extract).
- Add a sprinkle of flaky sea salt on top to enhance the chocolate and balance sweetness.
- Garnish with a fresh mint sprig alongside the cherry.
Additional Tips
Maximize your sundae success with these expert tips:
- Achieve Perfect Brownie Texture: For ultra-fudgy brownies, err on the side of underbaking slightly (toothpick should have moist crumbs). For slightly firmer, more cake-like brownies, bake until the toothpick comes out with fewer, drier crumbs. Avoid baking until completely clean, as they continue cooking slightly as they cool.
- Quality Chocolate is Non-Negotiable: Both the cocoa powder and the chocolate chips/chunks for the brownies, and especially the chopped chocolate for the fudge sauce, significantly impact the final flavor. Use brands you enjoy eating on their own. Dutch-process cocoa provides a smoother, richer flavor than natural cocoa here.
- Room Temperature Eggs: Using room temperature eggs allows them to incorporate more fully into the batter, creating a more emulsified and stable mixture, leading to a better brownie texture. You can warm cold eggs quickly by placing them in a bowl of warm (not hot) water for 5-10 minutes.
- The “Do Not Overmix” Mantra: Seriously, heed this warning for the brownies. Mix the dry ingredients into the wet just until combined. Overmixing develops the gluten in the flour, resulting in tough, rubbery brownies instead of tender, fudgy ones. Fold gently!
- Patience During Cooling: Resist the urge to cut the brownies while warm! Cooling completely allows the structure to set, resulting in that dense, fudgy texture and clean cuts. Rushing this step is the most common mistake. Consider baking the brownies the day before.
- Make-Ahead Magic: Both the brownies and the hot fudge sauce are excellent candidates for making ahead. Store cooled brownies in an airtight container at room temperature for up to 3 days. Store cooled fudge sauce in an airtight container in the refrigerator for up to 2 weeks. Reheat brownies briefly and sauce gently before assembling.
- Fudge Sauce Consistency Control: If your refrigerated fudge sauce is too thick even after warming, whisk in a teaspoon or two of milk, cream, or even hot water until it reaches your desired pouring consistency. If you want it thicker initially, simmer it a minute or two longer (carefully, to avoid burning).
- Customize Your Brownies: Feel free to add extra mix-ins to the brownie batter along with the chocolate chips. About ¾ cup of chopped walnuts or pecans, extra chocolate chunks, or even swirls of peanut butter or caramel can be folded in just before baking for added complexity.
FAQ Section
Q1: Can I use a boxed brownie mix instead of making them from scratch?
A1: Yes, you absolutely can use a boxed brownie mix as a shortcut. Prepare the mix according to package directions, preferably choosing a “fudgy” style mix. While homemade brownies offer superior flavor and texture, a good quality mix will still yield a delicious sundae base. You can even enhance a mix by using melted butter instead of oil, adding an extra egg yolk, or stirring in good quality chocolate chips.
Q2: What’s the absolute best ice cream flavor for this sundae?
A2: Classic high-quality Vanilla Bean ice cream is arguably the perfect foil, allowing the rich chocolate flavors of the brownie and fudge sauce to shine. However, “best” is subjective! Chocolate, Coffee, Salted Caramel, Mint Chocolate Chip, or even Strawberry ice cream can create delicious variations. Choose a flavor you love that complements chocolate well.
Q3: How should I store leftover sundae components?
A3: Store components separately for best results. Keep leftover brownies (cooled completely) in an airtight container at room temperature for up to 3 days or freeze for longer storage. Store leftover hot fudge sauce in an airtight container (like a glass jar) in the refrigerator for up to 2 weeks. Keep leftover ice cream tightly covered in the freezer. Do not attempt to store an assembled sundae.
Q4: Can I make this recipe gluten-free?
A4: Yes, you can adapt this recipe to be gluten-free. For the brownies, substitute the all-purpose flour with a good quality measure-for-measure gluten-free flour blend (one containing xanthan gum is recommended). Ensure your baking powder and cocoa powder are certified gluten-free. All other components (sauce, ice cream, toppings) should be checked for gluten-containing ingredients, but are often naturally gluten-free.
Q5: Is it possible to make a dairy-free or vegan version?
A5: Yes, with substitutions. For dairy-free brownies, use a quality plant-based butter substitute and ensure your chocolate chips are dairy-free. For vegan brownies, also replace the eggs with a vegan egg replacer like flax eggs (1 tbsp ground flaxseed + 3 tbsp water per egg, let sit 5 min). For the dairy-free/vegan fudge sauce, use plant-based butter, full-fat coconut cream or a dairy-free heavy cream alternative instead of heavy cream, and dairy-free chocolate. Serve with your favorite dairy-free/vegan ice cream and coconut whipped cream.
Q6: My brownies came out dry and cakey. What did I do wrong?
A6: This usually happens due to one of three reasons: Overbaking: Even a few extra minutes can dry them out. Use the toothpick test (moist crumbs) and check early. Overmixing: Mixing too much after adding the flour develops gluten, leading to a tougher, cakier texture. Fold gently just until combined. Incorrect Flour Measurement: Scooping flour directly from the bag packs it down, resulting in too much flour. Spoon flour into the measuring cup and level it off.
Q7: My hot fudge sauce seized or became grainy. How can I fix it?
A7: Seizing (becoming thick and dull) usually happens if liquid gets into melting chocolate, or if it’s overheated. Graininess in the sauce often comes from crystallized sugar. Gentle, low heat and constant whisking are key. Using corn syrup helps prevent crystallization. If it’s slightly seized or too thick, try whisking in a tablespoon of warm heavy cream off the heat until smooth. If it’s truly grainy from sugar, gently reheating with a tiny bit more liquid might help, but it can be difficult to fix completely.
Q8: Can I add nuts or other mix-ins directly into the brownie batter?
A8: Absolutely! Adding about ¾ cup to 1 cup of chopped toasted nuts (walnuts and pecans are classic choices), extra chocolate chips/chunks, peanut butter chips, or even dried cherries can add wonderful texture and flavor dimensions. Gently fold them in at the very end, along with the chocolate chips, being careful not to overmix the batter.
Fudge Brownie Ice Cream Sundae
Ingredients
Here’s what you’ll need to gather to create this masterpiece. We’ve broken it down into components for clarity. Using high-quality ingredients, especially for the chocolate components, will significantly elevate the final result.
For the Ultimate Fudge Brownies (Makes approx. 9 generous squares):
- 1 cup (2 sticks or 226g) Unsalted Butter: Provides richness, moisture, and that melt-in-your-mouth texture. Using unsalted allows you to control the salt level precisely.
- 1 cup (200g) Granulated Sugar: Sweetens the brownies and contributes to their structure and tender crumb.
- 1 cup (210g) Packed Light Brown Sugar: Adds moisture, chewiness, and a subtle molasses flavor complexity compared to using only white sugar.
- 4 Large Eggs: Act as binders, provide richness, and help leaven the brownies slightly. Ensure they are at room temperature for better incorporation.
- 1 teaspoon Pure Vanilla Extract: Enhances the chocolate flavor and adds aromatic depth. Use pure extract for the best taste.
- 1 cup (120g) All-Purpose Flour: Provides structure. Be careful not to overmeasure; spoon it into the measuring cup and level it off.
- ½ cup (45g) Unsweetened Dutch-process Cocoa Powder: Offers a deep, rich chocolate flavor and dark color. Sifting is recommended to remove lumps.
- ½ teaspoon Baking Powder: Gives the brownies a slight lift, preventing them from being overly dense.
- ½ teaspoon Salt: Balances the sweetness and enhances the overall flavor profile, especially the chocolate.
- 1 cup (170g) Semi-Sweet Chocolate Chips or Chunks: Folded into the batter, these create pockets of melted chocolate goodness throughout the brownie. Quality matters here!
For the Rich Hot Fudge Sauce (Makes approx. 1.5 cups):
- ⅔ cup (160ml) Heavy Cream: Forms the luxurious base of the sauce, providing richness and smooth texture.
- ½ cup (113g) Unsalted Butter: Adds more richness and helps create a glossy finish.
- ¼ cup (55g) Packed Light Brown Sugar: Contributes sweetness and depth.
- ¼ cup (60ml) Light Corn Syrup: Prevents the sugar from crystallizing, ensuring a smooth, non-gritty sauce.
- ¼ cup (22g) Unsweetened Dutch-process Cocoa Powder: Provides the intense chocolate flavor foundation.
- Pinch of Salt: Enhances the chocolate flavor and balances sweetness.
- 1 teaspoon Pure Vanilla Extract: Stirred in at the end for optimal flavor.
- 4 ounces (113g) Good Quality Bittersweet or Semi-Sweet Chocolate (chopped): Melted into the sauce at the end for extra richness and deep chocolate flavor. Choose chocolate with at least 60% cacao for best results.
For Sundae Assembly (Per Serving, adjust to preference):
- 1 Large Square (or 2 smaller squares) Warm Fudge Brownie: The star foundation.
- 2–3 Scoops High-Quality Vanilla Bean Ice Cream: The classic pairing, offering a cool, creamy contrast. Feel free to substitute with your favorite flavor!
- Generous Drizzle of Warm Hot Fudge Sauce: The essential element that ties it all together.
- Dollop of Sweetened Whipped Cream (Homemade or Store-Bought): Adds lightness and a creamy topping.
- Maraschino Cherry: The iconic, cheerful finishing touch.
- Optional Toppings: Chopped toasted nuts (walnuts, pecans, peanuts), chocolate sprinkles, rainbow sprinkles, chocolate shavings, caramel sauce, fresh berries, mini marshmallows, crushed cookies.
Instructions
Follow these steps carefully for dessert perfection. While it involves a few components, each step is straightforward. The key is patience, especially when cooling the brownies.
Part 1: Making the Ultimate Fudge Brownies
- Preheat and Prepare: Preheat your oven to 350°F (175°C). Grease and flour a 9×9 inch square baking pan, or line it with parchment paper, leaving an overhang on two sides (this makes lifting the brownies out much easier). Set aside.
- Melt Butter and Sugars: In a medium saucepan over low heat, melt the unsalted butter completely. Remove from heat and stir in the granulated sugar and packed light brown sugar until well combined. The mixture might look grainy at this stage; that’s okay. Let it cool slightly for a few minutes – you don’t want to scramble the eggs.
- Incorporate Eggs and Vanilla: Whisk the large eggs into the slightly cooled butter-sugar mixture one at a time, ensuring each egg is fully incorporated before adding the next. Whisk vigorously for about a minute until the mixture becomes lighter in color and slightly fluffy. Stir in the pure vanilla extract.
- Combine Dry Ingredients: In a separate medium bowl, whisk together the all-purpose flour, Dutch-process cocoa powder, baking powder, and salt. Sifting the cocoa powder is highly recommended to prevent lumps.
- Combine Wet and Dry: Gradually add the dry ingredient mixture to the wet ingredient mixture. Use a rubber spatula to fold the ingredients together just until no dry streaks remain. Be very careful not to overmix! Overmixing develops gluten and leads to tough, cakey brownies instead of fudgy ones.
- Fold in Chocolate Chips: Gently fold in the semi-sweet chocolate chips or chunks.
- Pour and Spread: Pour the brownie batter into the prepared baking pan. Use the spatula to spread it evenly into the corners.
- Bake: Place the pan in the preheated oven. Bake for 25-35 minutes. The exact time depends on your oven. Start checking around the 25-minute mark. For fudgy brownies, a wooden skewer or toothpick inserted into the center should come out with moist crumbs attached, but not wet batter. If it comes out clean, they might be slightly overbaked (more cakey). The edges should look set and slightly pulled away from the sides of the pan.
- Cool Completely: This step is crucial! Remove the pan from the oven and place it on a wire rack. Let the brownies cool completely in the pan, ideally for at least 1-2 hours, or even longer. Cooling allows them to set properly, develop their fudgy texture, and makes them much easier to cut cleanly. Trying to cut them while warm will result in a gooey mess (though a delicious one!).
- Cut the Brownies: Once completely cooled, use the parchment paper overhangs to lift the brownie slab out of the pan onto a cutting board. Cut into desired sizes (9 large squares are standard for sundaes).
Part 2: Making the Rich Hot Fudge Sauce
- Combine Initial Ingredients: In a medium saucepan, combine the heavy cream, unsalted butter, light brown sugar, light corn syrup, Dutch-process cocoa powder, and pinch of salt.
- Heat Gently: Place the saucepan over medium-low heat. Whisk constantly as the butter melts and the mixture heats up. Bring it to a gentle simmer, still whisking.
- Simmer: Once simmering, reduce the heat to low and let it cook gently for 5-8 minutes, stirring frequently to prevent scorching on the bottom. The sauce will thicken slightly. Don’t let it boil rapidly.
- Remove from Heat & Add Chocolate: Remove the saucepan from the heat. Add the chopped bittersweet or semi-sweet chocolate. Let it sit for a minute or two to soften, then whisk until the chocolate is completely melted and the sauce is smooth and glossy.
- Stir in Vanilla: Stir in the pure vanilla extract.
- Serve or Store: The sauce is best served warm. If making ahead, let it cool, then store it in an airtight container (like a glass jar) in the refrigerator for up to 2 weeks. Reheat gently over low heat or in the microwave (in short bursts, stirring in between) before serving. If it’s too thick upon reheating, whisk in a teaspoon or two of milk or cream until it reaches the desired consistency.
Part 3: Assembling the Fudge Brownie Ice Cream Sundaes
- Prepare the Brownie: Take one (or two!) cooled brownie squares. For the ultimate experience, gently warm the brownie for about 10-15 seconds in the microwave or a few minutes in a toaster oven. You want it slightly warm, not hot, to contrast beautifully with the cold ice cream without melting it instantly.
- Place in Serving Dish: Place the warm brownie square(s) in the bottom of a suitable serving bowl, sundae glass, or even a small skillet for a rustic look.
- Add Ice Cream: Top the brownie with 2-3 generous scoops of your chosen ice cream (vanilla bean is classic). Arrange them artfully or just pile them on!
- Drizzle the Fudge Sauce: Generously drizzle the warm hot fudge sauce over the ice cream and brownie, letting it drip down the sides. Be liberal here – it’s called Fudge Brownie Ice Cream Sundae for a reason!
- Top it Off: Add a generous dollop of whipped cream on top of the fudge sauce.
- The Cherry: Crown your creation with a bright red maraschino cherry.
- Optional Garnishes: Sprinkle with any additional desired toppings like chopped nuts, sprinkles, or chocolate shavings.
- Serve Immediately: Present your masterpiece immediately and watch the delight unfold!
Nutrition
- Serving Size: one normal portion
- Calories: 950