Garlic Parmesan Roasted Chickpeas have become a staple in our household, and for good reason! Honestly, I stumbled upon this recipe during one of my frantic searches for healthy yet satisfying snacks that would actually excite my family – especially my perpetually hungry teenagers. Let me tell you, these little crunchy bites were an absolute game-changer. From the moment the aroma of garlic and parmesan started wafting from the oven, everyone was intrigued. And the taste? Oh my goodness, the taste! Imagine the satisfying crunch of a roasted nut combined with the savory, cheesy, and garlicky flavors you crave. They vanished within minutes of coming out of the oven, leaving everyone begging for more. Since then, Garlic Parmesan Roasted Chickpeas have become a regular snack, appetizer, and even a crunchy topping for salads and soups in our home. They are incredibly easy to make, require minimal ingredients, and are packed with protein and fiber, making them a snack we can all feel good about indulging in. If you’re looking for a healthy, flavorful, and incredibly addictive snack, you absolutely have to try this recipe. Prepare to be amazed by how simple and delicious these little golden nuggets are!
Ingredients for Garlic Parmesan Roasted Chickpeas
- Chickpeas (also known as Garbanzo Beans): 2 cans (15 ounces each), drained and rinsed. The base of our snack, providing protein and fiber, and roasting beautifully to a crispy texture.
- Olive Oil: 2 tablespoons. Essential for coating the chickpeas, helping them crisp up in the oven and adding a touch of healthy fat.
- Garlic Powder: 2 teaspoons. A key flavor component, delivering that signature garlic punch that complements the parmesan perfectly.
- Onion Powder: 1 teaspoon. Adds depth of flavor and a subtle savory note that enhances the overall taste profile.
- Dried Oregano: 1 teaspoon. Provides a herbaceous and slightly earthy undertone, balancing the richness of the parmesan and garlic.
- Salt: 1/2 teaspoon (or to taste). Enhances all the flavors and is crucial for seasoning the chickpeas properly.
- Black Pepper: 1/4 teaspoon (or to taste). Adds a touch of spice and complexity, complementing the other seasonings.
- Grated Parmesan Cheese: 1/4 cup. The star of the show! Parmesan cheese brings a salty, nutty, and umami-rich flavor that creates a delightful cheesy coating on the roasted chickpeas.
- Fresh Parsley (optional): 1 tablespoon, chopped. For garnish and a fresh, vibrant finish.
Instructions for Making Garlic Parmesan Roasted Chickpeas
- Preheat Your Oven and Prepare the Chickpeas: Begin by preheating your oven to 400°F (200°C). While the oven is heating up, focus on preparing your chickpeas. Open the cans of chickpeas and drain them thoroughly in a colander. Rinsing the chickpeas under cold water is a crucial step, as it helps to remove any excess starch or liquid from the canning process. This rinsing step is important because it aids in achieving maximum crispiness when roasting. After rinsing, it’s absolutely essential to dry the chickpeas as much as possible. Excess moisture is the enemy of crispy roasted chickpeas!
- Dry the Chickpeas Thoroughly: This step is non-negotiable for achieving that perfect crispy texture we’re aiming for. Spread the rinsed and drained chickpeas out on a clean kitchen towel or several layers of paper towels. Gently pat them dry with another towel or paper towel layer. You want to remove as much surface moisture as you can. Another excellent method for drying chickpeas is to gently roll them between two clean kitchen towels. This helps to loosen the skins slightly and encourages even drying. Some people even suggest removing the chickpea skins entirely for extra crispiness, but this is optional and can be a bit time-consuming. For this recipe, thorough drying is usually sufficient.
- Toss with Olive Oil and Spices: In a medium-sized bowl, place the thoroughly dried chickpeas. Drizzle 2 tablespoons of olive oil over the chickpeas. Using a spoon or your hands, toss the chickpeas to ensure they are evenly coated with the olive oil. This oil coating is vital as it helps the spices adhere to the chickpeas and promotes even roasting and crisping in the oven. Now, add the garlic powder, onion powder, dried oregano, salt, and black pepper to the bowl. Again, toss everything together until the chickpeas are uniformly coated with the spice mixture. Make sure every chickpea is seasoned for maximum flavor in every bite. The aroma at this stage will already be enticing!
- Roast the Chickpeas to Crispy Perfection: Spread the seasoned chickpeas in a single layer on a baking sheet. It’s important to arrange them in a single layer to ensure they roast evenly and become crispy. Overcrowding the baking sheet will lead to steaming rather than roasting, resulting in softer, less crispy chickpeas. If necessary, use two baking sheets to avoid overcrowding. Place the baking sheet(s) in the preheated oven and roast for 20-30 minutes. The roasting time can vary depending on your oven and desired level of crispiness. It’s crucial to check on the chickpeas periodically throughout the roasting process.
- Shake and Continue Roasting (Optional): About halfway through the roasting time, around 15 minutes in, remove the baking sheet from the oven and give it a good shake. This helps to ensure even cooking and crisping on all sides of the chickpeas. You can also gently stir them with a spatula if needed. Return the baking sheet to the oven and continue roasting for the remaining time, or until the chickpeas are golden brown and crispy to your liking. Keep an eye on them, especially in the last few minutes, as they can go from perfectly roasted to slightly burnt quickly.
- Add Parmesan Cheese and Final Roast (Optional): Once the chickpeas are roasted to your desired crispness, remove the baking sheet from the oven once more. Now, sprinkle the grated parmesan cheese evenly over the hot roasted chickpeas. The heat from the chickpeas will help the parmesan cheese to melt slightly and adhere to them beautifully. For an extra cheesy and slightly browned parmesan crust, you can return the baking sheet to the oven for another 2-3 minutes. Keep a close watch during this final roasting step to prevent the parmesan from burning. If you prefer a less melted parmesan, you can simply sprinkle it on after removing the chickpeas from the oven and letting them cool slightly.
- Cool and Garnish: Allow the Garlic Parmesan Roasted Chickpeas to cool on the baking sheet for a few minutes. They will crisp up even further as they cool. Resist the urge to eat them all immediately (though it might be difficult!). Once slightly cooled, transfer the roasted chickpeas to a serving bowl. If desired, garnish with freshly chopped parsley for a pop of color and fresh flavor. Serve immediately while they are still warm and crispy for the best taste and texture. However, they are also delicious at room temperature and can be stored in an airtight container for a day or two (though they are best enjoyed fresh for maximum crispiness). Enjoy your incredibly flavorful and healthy Garlic Parmesan Roasted Chickpeas!
Nutrition Facts for Garlic Parmesan Roasted Chickpeas
(Per serving, assuming 6 servings per recipe. Nutritional values are approximate and can vary based on specific ingredients used.)
- Serving Size: Approximately 1/2 cup
- Calories: 150-180 kcal
- Protein: 6-8 grams
Preparation Time for Garlic Parmesan Roasted Chickpeas
Total Preparation Time: Approximately 35-45 minutes (including prep and cook time).
This recipe for Garlic Parmesan Roasted Chickpeas is incredibly quick and easy to prepare. The active preparation time, which includes draining, rinsing, drying, and seasoning the chickpeas, is minimal, usually taking around 10-15 minutes. The majority of the time is hands-off roasting time in the oven, approximately 25-30 minutes. This makes it a perfect snack to whip up when you need something healthy and delicious without spending hours in the kitchen. It’s a fantastic option for a last-minute appetizer or a quick and satisfying snack to curb hunger pangs between meals.
How to Serve Garlic Parmesan Roasted Chickpeas
Garlic Parmesan Roasted Chickpeas are incredibly versatile and can be enjoyed in a multitude of ways. Their savory, crunchy texture makes them a fantastic addition to various dishes and occasions. Here are some delicious ways to serve them:
- As a Healthy Snack: This is perhaps the most popular way to enjoy them! Serve them in a bowl as a simple, healthy, and satisfying snack. They are perfect for mid-afternoon cravings, movie nights, or anytime you need a crunchy, flavorful bite.
- As a Party Appetizer: Elevate your appetizer game by serving these roasted chickpeas at your next gathering. They are a crowd-pleaser, offering a healthier and more interesting alternative to traditional chips or crackers. Arrange them in a stylish bowl and watch them disappear!
- As a Salad Topping: Add a delightful crunch and protein boost to your salads. Sprinkle them over green salads, Caesar salads, or grain bowls for added texture and flavor. They pair especially well with salads that include creamy dressings or tangy vinaigrettes.
- As a Soup Garnish: Instead of croutons, use Garlic Parmesan Roasted Chickpeas to garnish your favorite soups. They add a satisfying crunch and savory flavor contrast to creamy or blended soups like tomato soup, butternut squash soup, or lentil soup.
- In Grain Bowls and Buddha Bowls: Incorporate them into your grain bowls or Buddha bowls for extra protein, fiber, and crunch. They complement a variety of grains, roasted vegetables, and sauces, adding a delicious textural element.
- With Dips: Serve them alongside your favorite dips like hummus, tzatziki, ranch dressing, or even a spicy aioli. Their robust flavor and crispy texture make them excellent for scooping up dips.
- In Wraps and Pita Pockets: Add a layer of crunch and flavor to your wraps and pita pockets by including Garlic Parmesan Roasted Chickpeas. They work well in vegetarian wraps, falafel pitas, or even chicken or beef wraps, providing a delightful textural contrast.
- As a Side Dish: Serve them as a flavorful side dish alongside grilled chicken, fish, or vegetarian entrees. They are a simple yet satisfying accompaniment that adds both flavor and nutritional value to your meal.
Additional Tips for Perfect Garlic Parmesan Roasted Chickpeas
To ensure your Garlic Parmesan Roasted Chickpeas are absolutely perfect every time, here are some additional tips and tricks to keep in mind:
- Start with Thoroughly Dried Chickpeas: This cannot be stressed enough! The drier your chickpeas are before roasting, the crispier they will become. Take the time to pat them dry really well with kitchen towels or paper towels. You can even let them air dry for a bit after patting them down if you have extra time.
- Don’t Overcrowd the Baking Sheet: Ensure the chickpeas are spread in a single layer on the baking sheet. Overcrowding will cause them to steam instead of roast, resulting in soggy chickpeas. If necessary, use two baking sheets or roast in batches to ensure even crisping.
- Use Good Quality Parmesan Cheese: Freshly grated parmesan cheese from a block will melt and taste much better than pre-shredded parmesan, which often contains cellulose and may not melt as nicely. For the best flavor and texture, opt for freshly grated Parmesan Reggiano if possible.
- Adjust Seasonings to Your Taste: The recipe provides a guideline for seasonings, but feel free to adjust them to your personal preferences. If you like more garlic flavor, add extra garlic powder. If you prefer a spicier kick, add a pinch of red pepper flakes. Experiment with different herbs and spices to create your own signature flavor combinations. Smoked paprika, cumin, or chili powder can also be delicious additions.
- Roast at the Right Temperature: 400°F (200°C) is generally a good temperature for roasting chickpeas to crispiness without burning them too quickly. However, oven temperatures can vary. Keep an eye on the chickpeas and adjust the roasting time as needed. If they are browning too quickly, you can lower the oven temperature slightly.
- Shake the Baking Sheet Halfway Through: Shaking or stirring the chickpeas halfway through the roasting process ensures they cook and crisp evenly on all sides. This also prevents them from sticking to the baking sheet.
- Roast to Your Desired Crispness: Roasting time can vary depending on your oven and how crispy you like your chickpeas. Start checking them around 20 minutes and continue roasting until they reach your preferred level of crispiness, up to 30 minutes or slightly longer. They will continue to crisp up a bit as they cool.
- Store Properly for Best Crispness (If Necessary): While Garlic Parmesan Roasted Chickpeas are best enjoyed fresh and crispy, you can store leftovers in an airtight container at room temperature for up to a day or two. However, they may lose some of their crispness over time. To revive them slightly, you can briefly reheat them in a low oven (around 300°F or 150°C) for a few minutes, but be careful not to over-bake them.
Frequently Asked Questions (FAQ) about Garlic Parmesan Roasted Chickpeas
Q1: Can I use dried chickpeas instead of canned chickpeas for this recipe?
A1: Yes, you can definitely use dried chickpeas. However, it requires more preparation time. You will need to soak the dried chickpeas overnight (or use the quick soak method) and then cook them until they are tender before roasting. Make sure to drain and dry them thoroughly after cooking, just as you would with canned chickpeas, before proceeding with the roasting instructions. Canned chickpeas are a convenient shortcut for a quicker preparation.
Q2: Can I make these roasted chickpeas ahead of time?
A2: While Garlic Parmesan Roasted Chickpeas are best enjoyed fresh and crispy, you can prepare them a few hours in advance. Allow them to cool completely after roasting and store them in an airtight container at room temperature. They will retain most of their crispness for a few hours. For maximum crispness, it’s recommended to roast them closer to serving time. If they lose a bit of crispness upon standing, you can briefly reheat them in a low oven to crisp them up again, as mentioned in the tips section.
Q3: Are Garlic Parmesan Roasted Chickpeas vegetarian and vegan?
A3: Garlic Parmesan Roasted Chickpeas as described in this recipe are vegetarian due to the inclusion of parmesan cheese, which is a dairy product. To make them vegan, you would need to substitute the parmesan cheese with a vegan parmesan cheese alternative or nutritional yeast. Nutritional yeast provides a cheesy, umami flavor that can mimic some of the characteristics of parmesan. Ensure that any vegan parmesan alternative you use is suitable for roasting and will provide the desired flavor and texture.
Q4: Can I use different types of cheese besides parmesan?
A4: While parmesan cheese is classic and works exceptionally well in this recipe, you can experiment with other hard, grating cheeses. Pecorino Romano, Asiago, or Grana Padano could be interesting alternatives, each offering a slightly different flavor profile. Keep in mind that softer cheeses or cheeses that melt too easily might not work as well for coating roasted chickpeas and achieving the desired crispy texture.
Q5: My roasted chickpeas are not crispy, what did I do wrong?
A5: The most common reason for chickpeas not becoming crispy is insufficient drying. Ensure you thoroughly rinse and dry the chickpeas before tossing them with oil and spices. Overcrowding the baking sheet can also prevent crisping, as mentioned earlier. Make sure they are in a single layer. Finally, roasting time can vary. You might need to roast them for a longer duration to achieve your desired level of crispness. Oven temperature variations can also play a role, so monitor them closely and adjust roasting time as needed.
Q6: Can I add other vegetables to roast with the chickpeas?
A6: While this recipe focuses solely on roasted chickpeas, you can certainly roast other vegetables alongside them. Consider adding diced vegetables that roast at a similar rate, such as bell peppers, onions, zucchini, or broccoli florets. Toss the vegetables with olive oil and seasonings similar to the chickpeas, and spread them alongside the chickpeas on the baking sheet (making sure not to overcrowd). Keep in mind that vegetables might release moisture during roasting, so you may need to roast for a slightly longer time to ensure both chickpeas and vegetables are nicely roasted and slightly crispy.
Q7: How long do Garlic Parmesan Roasted Chickpeas last?
A7: Garlic Parmesan Roasted Chickpeas are best consumed within 1-2 days for optimal crispness. Store them in an airtight container at room temperature. While they are technically safe to eat for a few more days if stored properly, they will gradually lose their crispness and may become slightly chewy. Reheating them in a low oven can help revive some of the crispness, but they are truly at their best when enjoyed fresh.
Q8: Can I make a larger batch of this recipe?
A8: Yes, this recipe can be easily scaled up to make a larger batch. Simply double, triple, or even quadruple the ingredients as needed to serve a larger crowd or for meal prepping. When making a larger batch, be sure to use multiple baking sheets to avoid overcrowding and ensure even roasting. You may also need to roast in batches if your oven space is limited. Adjust roasting time as needed, keeping an eye on the chickpeas to prevent burning, especially if you increase the quantity significantly.
Print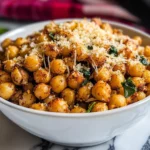
Garlic Parmesan Roasted Chickpeas
Ingredients
- Chickpeas (also known as Garbanzo Beans): 2 cans (15 ounces each), drained and rinsed. The base of our snack, providing protein and fiber, and roasting beautifully to a crispy texture.
- Olive Oil: 2 tablespoons. Essential for coating the chickpeas, helping them crisp up in the oven and adding a touch of healthy fat.
- Garlic Powder: 2 teaspoons. A key flavor component, delivering that signature garlic punch that complements the parmesan perfectly.
- Onion Powder: 1 teaspoon. Adds depth of flavor and a subtle savory note that enhances the overall taste profile.
- Dried Oregano: 1 teaspoon. Provides a herbaceous and slightly earthy undertone, balancing the richness of the parmesan and garlic.
- Salt: 1/2 teaspoon (or to taste). Enhances all the flavors and is crucial for seasoning the chickpeas properly.
- Black Pepper: 1/4 teaspoon (or to taste). Adds a touch of spice and complexity, complementing the other seasonings.
- Grated Parmesan Cheese: 1/4 cup. The star of the show! Parmesan cheese brings a salty, nutty, and umami-rich flavor that creates a delightful cheesy coating on the roasted chickpeas.
- Fresh Parsley (optional): 1 tablespoon, chopped. For garnish and a fresh, vibrant finish.
Instructions
- Preheat Your Oven and Prepare the Chickpeas: Begin by preheating your oven to 400°F (200°C). While the oven is heating up, focus on preparing your chickpeas. Open the cans of chickpeas and drain them thoroughly in a colander. Rinsing the chickpeas under cold water is a crucial step, as it helps to remove any excess starch or liquid from the canning process. This rinsing step is important because it aids in achieving maximum crispiness when roasting. After rinsing, it’s absolutely essential to dry the chickpeas as much as possible. Excess moisture is the enemy of crispy roasted chickpeas!
- Dry the Chickpeas Thoroughly: This step is non-negotiable for achieving that perfect crispy texture we’re aiming for. Spread the rinsed and drained chickpeas out on a clean kitchen towel or several layers of paper towels. Gently pat them dry with another towel or paper towel layer. You want to remove as much surface moisture as you can. Another excellent method for drying chickpeas is to gently roll them between two clean kitchen towels. This helps to loosen the skins slightly and encourages even drying. Some people even suggest removing the chickpea skins entirely for extra crispiness, but this is optional and can be a bit time-consuming. For this recipe, thorough drying is usually sufficient.
- Toss with Olive Oil and Spices: In a medium-sized bowl, place the thoroughly dried chickpeas. Drizzle 2 tablespoons of olive oil over the chickpeas. Using a spoon or your hands, toss the chickpeas to ensure they are evenly coated with the olive oil. This oil coating is vital as it helps the spices adhere to the chickpeas and promotes even roasting and crisping in the oven. Now, add the garlic powder, onion powder, dried oregano, salt, and black pepper to the bowl. Again, toss everything together until the chickpeas are uniformly coated with the spice mixture. Make sure every chickpea is seasoned for maximum flavor in every bite. The aroma at this stage will already be enticing!
- Roast the Chickpeas to Crispy Perfection: Spread the seasoned chickpeas in a single layer on a baking sheet. It’s important to arrange them in a single layer to ensure they roast evenly and become crispy. Overcrowding the baking sheet will lead to steaming rather than roasting, resulting in softer, less crispy chickpeas. If necessary, use two baking sheets to avoid overcrowding. Place the baking sheet(s) in the preheated oven and roast for 20-30 minutes. The roasting time can vary depending on your oven and desired level of crispiness. It’s crucial to check on the chickpeas periodically throughout the roasting process.
- Shake and Continue Roasting (Optional): About halfway through the roasting time, around 15 minutes in, remove the baking sheet from the oven and give it a good shake. This helps to ensure even cooking and crisping on all sides of the chickpeas. You can also gently stir them with a spatula if needed. Return the baking sheet to the oven and continue roasting for the remaining time, or until the chickpeas are golden brown and crispy to your liking. Keep an eye on them, especially in the last few minutes, as they can go from perfectly roasted to slightly burnt quickly.
- Add Parmesan Cheese and Final Roast (Optional): Once the chickpeas are roasted to your desired crispness, remove the baking sheet from the oven once more. Now, sprinkle the grated parmesan cheese evenly over the hot roasted chickpeas. The heat from the chickpeas will help the parmesan cheese to melt slightly and adhere to them beautifully. For an extra cheesy and slightly browned parmesan crust, you can return the baking sheet to the oven for another 2-3 minutes. Keep a close watch during this final roasting step to prevent the parmesan from burning. If you prefer a less melted parmesan, you can simply sprinkle it on after removing the chickpeas from the oven and letting them cool slightly.
- Cool and Garnish: Allow the Garlic Parmesan Roasted Chickpeas to cool on the baking sheet for a few minutes. They will crisp up even further as they cool. Resist the urge to eat them all immediately (though it might be difficult!). Once slightly cooled, transfer the roasted chickpeas to a serving bowl. If desired, garnish with freshly chopped parsley for a pop of color and fresh flavor. Serve immediately while they are still warm and crispy for the best taste and texture. However, they are also delicious at room temperature and can be stored in an airtight container for a day or two (though they are best enjoyed fresh for maximum crispiness). Enjoy your incredibly flavorful and healthy Garlic Parmesan Roasted Chickpeas!
Nutrition
- Serving Size: one normal portion
- Calories: 180
- Protein: 8 grams