My family and I are huge fans of Mediterranean cuisine, and appetizers are a staple in our home, especially during gatherings. Recently, I stumbled upon this Greek Hummus Platter recipe, and let me tell you, it was an instant hit! The creamy hummus is unbelievably smooth and flavorful, and pairing it with the fresh crunch of cucumbers, the burst of sweet cherry tomatoes, the salty tang of olives, and crispy pita chips is simply divine. It’s become our go-to appetizer for everything from casual weeknight dinners to weekend barbecues. Even my picky eaters devour it! This platter is not only incredibly delicious and healthy but also so easy to assemble, making it a stress-free option when you’re entertaining. Let me share with you how to make this crowd-pleasing Greek Hummus Platter that will undoubtedly become a favorite in your household too.
Why This Greek Hummus Platter Recipe is a Must-Try
This Greek Hummus Platter is more than just a simple appetizer; it’s a vibrant celebration of Mediterranean flavors and textures. It’s incredibly versatile, healthy, and absolutely delicious, making it a winning choice for any occasion. Here’s why you’ll love this recipe:
- Unbelievably Creamy Hummus: This recipe focuses on achieving the perfect creamy hummus. We’ll delve into the secrets to making hummus that’s smooth, rich, and bursting with flavor, far superior to store-bought versions.
- Fresh and Flavorful Ingredients: The platter showcases the best of fresh Mediterranean produce. Crisp cucumbers, juicy cherry tomatoes, and briny olives provide a delightful contrast to the creamy hummus.
- Easy to Make: Despite its impressive presentation and taste, this platter is surprisingly easy to prepare. The hummus comes together quickly, and assembling the platter is a breeze.
- Healthy and Nutritious: Hummus is packed with plant-based protein and fiber, while the vegetables offer essential vitamins and minerals. This platter is a healthy and satisfying snack or appetizer option.
- Perfect for Entertaining: Whether you’re hosting a casual get-together or a more formal gathering, this Greek Hummus Platter is always a crowd-pleaser. It’s visually appealing, delicious, and caters to various dietary preferences.
- Customizable: You can easily adapt this recipe to your liking. Add different vegetables, herbs, spices, or toppings to customize the platter and make it your own.
- Versatile Serving Options: Enjoy it as an appetizer, a light lunch, a healthy snack, or even as part of a larger Mediterranean feast.
The Star of the Show: Creamy Homemade Hummus
While the platter components are important, the heart and soul of this recipe is undoubtedly the creamy homemade hummus. Forget the grainy, bland hummus you might have tried before. This recipe will guide you to create hummus that is incredibly smooth, rich, and bursting with flavor. The key to truly exceptional hummus lies in a few simple yet crucial techniques:
- Quality Ingredients: Start with the best ingredients you can find. Use dried chickpeas (and cook them yourself for optimal texture), good quality tahini (sesame seed paste), fresh lemon juice, and extra virgin olive oil.
- Proper Chickpea Preparation: Cooking dried chickpeas from scratch and peeling them while they are still warm is a game-changer for achieving ultra-smooth hummus. While canned chickpeas can be used for convenience, the texture and flavor will be noticeably different.
- High-Powered Blender or Food Processor: A powerful blender or food processor is essential for achieving that signature creamy texture. Process the ingredients for a longer duration than you might think is necessary to break down the chickpeas completely.
- Ice Water for Smoothness: Adding ice water, a tablespoon at a time, while blending, helps to lighten the hummus and create an incredibly smooth and airy texture.
- Flavor Building: Don’t be shy with the garlic, lemon juice, and tahini. These ingredients are crucial for that authentic hummus flavor. Taste and adjust seasonings as you go.
Gather Your Mediterranean Goodness: Ingredients for the Greek Hummus Platter
To create this delightful Greek Hummus Platter, you’ll need a handful of fresh, flavorful ingredients. Here’s a breakdown of what you’ll need for both the creamy hummus and the platter itself:
For the Creamy Hummus:
- 1 cup Dried Chickpeas: Using dried chickpeas is highly recommended for the best texture and flavor. If using canned, opt for 2 (15-ounce) cans, drained and rinsed.
- 1 teaspoon Baking Soda: This is used in two steps: first, to soak the chickpeas and then to cook them. Baking soda helps to break down the chickpea skins, resulting in smoother hummus.
- ½ cup Tahini: Use good quality tahini – it should be smooth and pourable. Stir well before measuring as the oil tends to separate.
- ¼ cup Fresh Lemon Juice: Freshly squeezed lemon juice is essential for the bright, tangy flavor of hummus.
- 2-3 Cloves Garlic: Adjust the amount of garlic to your preference. For a milder flavor, use 2 cloves; for a bolder garlic taste, use 3 or even 4.
- ½ teaspoon Salt: Start with ½ teaspoon and adjust to taste.
- ¼ cup Ice Water: This will help to achieve a super creamy texture. You may need to add a little more, tablespoon by tablespoon, to reach your desired consistency.
- 2 tablespoons Extra Virgin Olive Oil: For drizzling on top of the hummus and platter.
- Optional Garnishes for Hummus: Paprika, chopped parsley, pine nuts, sumac.
For the Greek Platter:
- 1 Cucumber: Choose a firm cucumber, English cucumbers are a great option as they have fewer seeds.
- 1 pint Cherry Tomatoes: Look for ripe and flavorful cherry tomatoes.
- 1 cup Kalamata Olives: Pitted Kalamata olives are classic for a Greek platter. You can also use a mix of different olives if you prefer.
- 1 bag Pita Chips: Use your favorite pita chips, either store-bought or homemade. You can also use whole pita bread, cut into wedges and lightly toasted or grilled.
- Optional Additions to the Platter:
- Feta Cheese: Crumbled feta cheese adds a salty and tangy element.
- Pepperoncini Peppers: These mild pickled peppers offer a slight kick.
- Red Onion: Thinly sliced red onion adds a sharp bite.
- Bell Peppers: Sliced bell peppers (red, yellow, orange) provide sweetness and crunch.
- Carrots: Baby carrots or sliced carrots add sweetness and color.
- Fresh Herbs: Sprigs of fresh oregano, mint, or parsley for garnish.
- Olive Oil for Drizzling: A final drizzle of good quality olive oil over the platter enhances the flavors.
- Lemon Wedges: For extra zest.
Step-by-Step Guide: Making Your Greek Hummus Platter
Creating this Greek Hummus Platter is straightforward and enjoyable. Here’s a detailed step-by-step guide to help you make it perfectly every time:
Part 1: Crafting the Perfect Creamy Hummus
- Soak the Chickpeas: Rinse the dried chickpeas in a colander. Place them in a large bowl and cover with plenty of water (at least 8 cups) and 1 teaspoon of baking soda. Soak for at least 8 hours or preferably overnight. This soaking process softens the chickpeas and helps them cook more evenly, contributing to creamier hummus.
- Cook the Chickpeas: Drain and rinse the soaked chickpeas thoroughly. Place them in a large pot and cover with fresh water (about 6-8 cups). Bring to a boil over high heat. Skim off any foam that rises to the surface. Reduce heat to low, add another ½ teaspoon of baking soda to the pot, and simmer for 45-60 minutes, or until the chickpeas are very tender and easily mashed with a fork. The baking soda helps to further break down the skins and create a smoother texture.
- Peel the Chickpeas (Optional but Recommended): Drain the cooked chickpeas, reserving about ½ cup of the cooking liquid. While the chickpeas are still warm (be careful not to burn yourself), gently pinch each chickpea between your fingers to remove the skin. This step is optional but highly recommended for the creamiest hummus. It can be a bit time-consuming, but the difference in texture is significant. If you are short on time, you can skip this step, but the hummus may be slightly less smooth.
- Blend the Hummus: In a high-powered blender or food processor, combine the peeled (or unpeeled) chickpeas, tahini, lemon juice, garlic, and salt. Process until very smooth, scraping down the sides of the bowl as needed.
- Add Ice Water for Creaminess: With the blender or food processor running, slowly drizzle in ice water, 1 tablespoon at a time, until you reach your desired creamy consistency. You may not need to use all the ice water, or you may need slightly more depending on the chickpeas and tahini.
- Adjust Seasoning: Taste the hummus and adjust seasoning as needed. You may want to add more lemon juice for tanginess, salt for flavor, or garlic for a bolder taste.
- Rest and Serve: Transfer the hummus to a serving bowl. Drizzle with extra virgin olive oil and sprinkle with your desired garnishes, such as paprika, chopped parsley, or pine nuts. Let the hummus rest for at least 15-20 minutes before serving to allow the flavors to meld together. This also helps the hummus to thicken slightly.
Part 2: Assembling the Greek Platter
- Prepare the Vegetables: Wash and dry the cucumber and cherry tomatoes.
- Cucumber: Cut the cucumber into sticks, rounds, or half-moons, depending on your preference. You can peel the cucumber partially or fully if you prefer, but leaving some skin on adds color and nutrients.
- Cherry Tomatoes: Leave cherry tomatoes whole or halve them for easier dipping.
- Prepare the Olives: Drain the Kalamata olives (if using olives packed in brine or oil).
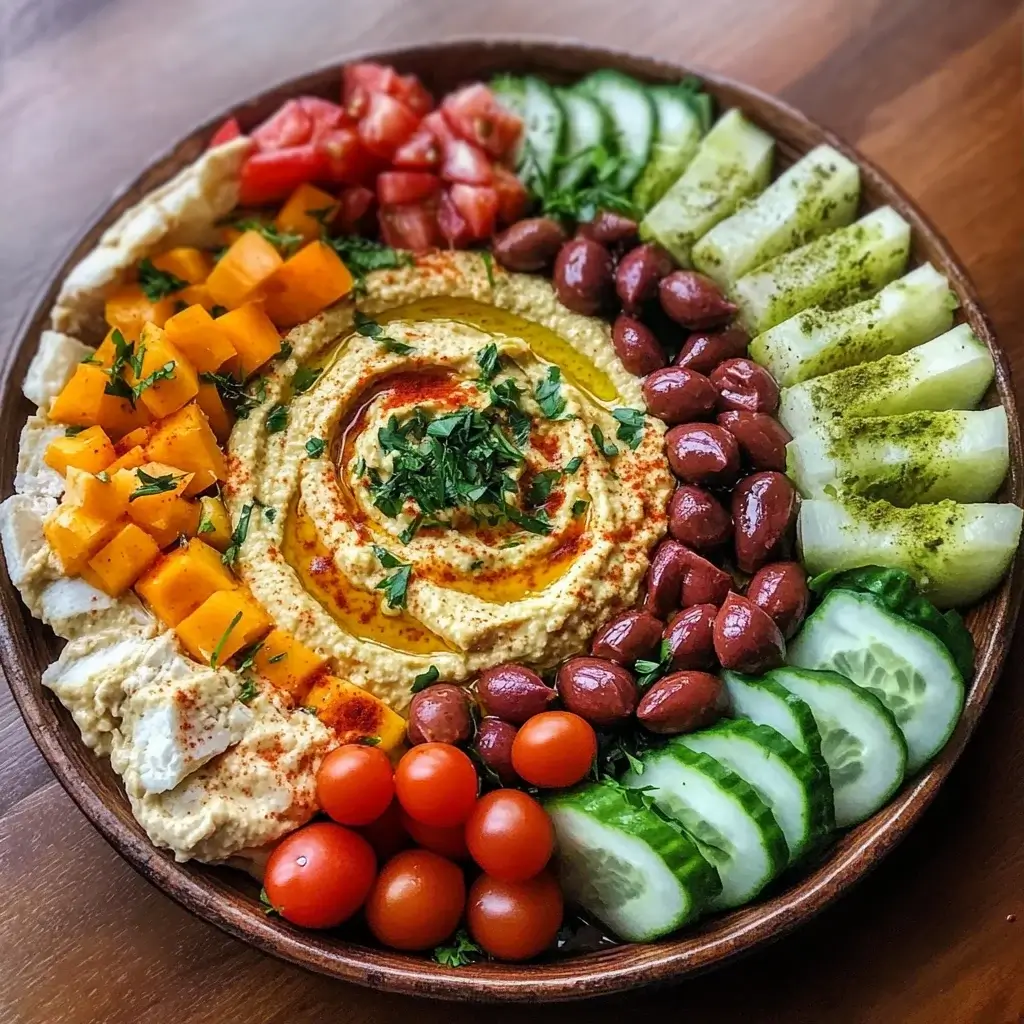
- Arrange the Platter: Choose a large platter or serving board.
- Hummus Centerpiece: Place the bowl of creamy hummus in the center of the platter.
- Vegetable Arrangement: Arrange the cucumber sticks, cherry tomatoes, and Kalamata olives around the hummus bowl in an attractive and organized manner. You can create sections for each ingredient or arrange them in a more free-form style.
- Pita Chips: Place the pita chips around the vegetables or in a separate basket or bowl alongside the platter.
- Garnish and Serve: Drizzle the vegetables and hummus lightly with extra virgin olive oil. Garnish the platter with fresh herbs like oregano, mint, or parsley, if desired. Serve immediately and enjoy!
Nutritional Powerhouse: Greek Hummus Platter Nutrition Facts
This Greek Hummus Platter is not only delicious but also packed with nutrients. Here’s a general overview of the nutritional information. Please note that these are estimations and can vary based on specific ingredients and serving sizes.
- Servings: Approximately 8-10 servings (as an appetizer)
- Calories per Serving (estimated): 250-350 calories (depending on serving size and amount of pita chips consumed)
Approximate Nutrition per Serving (Estimated):
- Protein: 8-12 grams
- Fat: 15-20 grams (mostly healthy fats from olive oil and tahini)
- Saturated Fat: 2-3 grams
Key Nutrients and Benefits:
- Plant-Based Protein: Hummus is a good source of plant-based protein from chickpeas and tahini, essential for muscle building and satiety.
- Healthy Fats: Olive oil and tahini provide healthy monounsaturated and polyunsaturated fats, beneficial for heart health.
- High in Fiber: Chickpeas and vegetables are rich in dietary fiber, promoting digestive health, regulating blood sugar levels, and contributing to feelings of fullness.
- Vitamins and Minerals: The platter is a good source of vitamins and minerals, including vitamin C (from tomatoes), vitamin K (from cucumbers), folate, iron, magnesium, and potassium.
- Antioxidants: Olive oil, tomatoes, and olives are rich in antioxidants, which help protect the body against cell damage.
This Greek Hummus Platter is a healthy and balanced snack or appetizer option, providing a good mix of protein, healthy fats, fiber, and essential nutrients. It’s a much healthier alternative to many processed snacks and dips.
Preparation Timeline: Get Ready to Dip!
Here’s a breakdown of the estimated preparation time for this Greek Hummus Platter:
- Chickpea Soaking Time: 8 hours (or overnight)
- Chickpea Cooking Time: 45-60 minutes
- Hummus Preparation Time: 20-30 minutes (including peeling chickpeas, if doing so)
- Platter Assembly Time: 15-20 minutes
Total Active Preparation Time: Approximately 1 hour – 1 hour and 30 minutes (excluding soaking time)
Tips for Time Management:
- Soak Chickpeas in Advance: Start soaking the chickpeas the night before you plan to make the platter.
- Cook Chickpeas Ahead: Cook the chickpeas earlier in the day or even a day ahead. They can be stored in the refrigerator in their cooking liquid for up to 2 days.
- Make Hummus in Advance: Hummus can be made up to 3-4 days in advance and stored in an airtight container in the refrigerator. The flavors may even develop further overnight.
- Prep Vegetables Ahead: Wash and cut the cucumbers and cherry tomatoes a few hours before assembling the platter and store them in airtight containers in the refrigerator.
- Assemble Just Before Serving: For the freshest presentation, assemble the platter shortly before you plan to serve it.
How to Serve Your Greek Hummus Platter: Endless Possibilities
This Greek Hummus Platter is incredibly versatile and can be served in numerous ways. Here are some ideas to elevate your serving experience:
- As an Appetizer: This is the most common and perfect way to serve it. It’s ideal for parties, gatherings, or as a starter before a meal.
- As a Light Lunch: Enjoy it as a healthy and satisfying light lunch. Pair it with a side salad or some whole-wheat pita bread for a more substantial meal.
- As a Snack: Keep a platter ready in the refrigerator for a healthy and delicious snack throughout the week. It’s a great alternative to chips and dips.
- Part of a Mezze Platter: Incorporate it into a larger Mezze platter with other Mediterranean dips like baba ghanoush, tzatziki, and dolmades, along with cheeses, olives, and grilled vegetables.
- With Different Dippers: Get creative with dippers beyond pita chips.
- Vegetables: Carrot sticks, celery sticks, bell pepper strips, radish slices, snap peas, broccoli florets, cauliflower florets.
- Breads: Whole wheat pita bread, naan bread, baguette slices, breadsticks, crackers.
- Tortilla Chips: For a different textural contrast.
- Warm Pita Bread: Lightly warm pita bread on a grill or in a skillet for a soft and warm dipper.
- Individual Servings: For a more elegant presentation at a dinner party, create individual hummus platters for each guest.
- Buffet Style: Set up a buffet-style platter with all the components and let guests assemble their own plates.
- Take it to a Potluck: This platter is easy to transport and always a hit at potlucks and picnics.
Pro Tips for Hummus Platter Perfection: 5 Expert Insights
To ensure your Greek Hummus Platter is a resounding success, here are five expert tips to keep in mind:
- Don’t Skimp on Tahini: Good quality tahini is crucial for authentic hummus flavor. Look for tahini that is made from 100% sesame seeds and has a smooth, pourable consistency. Stir it well before measuring as the oil tends to separate.
- Peel Those Chickpeas (If You Can): While optional, peeling the chickpeas really does make a noticeable difference in the texture of the hummus. If you have the time, it’s worth the extra effort for ultra-creamy results.
- Taste and Adjust Seasoning: Hummus is all about balance. Taste and adjust the seasoning as you go. Don’t be afraid to add more lemon juice for brightness, salt for flavor, or garlic for a bolder taste.
- Warm Chickpeas for Smoother Hummus: Blending the chickpeas while they are still slightly warm (after cooking and peeling) helps to achieve a smoother texture.
- Freshness is Key for Platter Components: Use the freshest vegetables and pita chips you can find for the best flavor and texture. Crisp cucumbers, ripe tomatoes, and good quality olives will elevate the entire platter experience.
Frequently Asked Questions (FAQ) About Greek Hummus Platter
Here are some common questions people ask about making and serving Greek Hummus Platter:
Q1: Can I use canned chickpeas instead of dried chickpeas?
A: Yes, you can use canned chickpeas for convenience. Use 2 (15-ounce) cans, drained and rinsed thoroughly. However, keep in mind that hummus made with canned chickpeas will have a slightly less creamy texture and a slightly different flavor compared to hummus made with dried chickpeas cooked from scratch. If using canned chickpeas, you may not need to cook them for as long.
Q2: Can I make hummus ahead of time?
A: Absolutely! Hummus can be made up to 3-4 days in advance and stored in an airtight container in the refrigerator. In fact, the flavors often meld together and improve overnight. When ready to serve, you may need to stir in a tablespoon or two of water to restore its creamy consistency if it has thickened.
Q3: What are some variations I can make to the hummus?
A: There are endless ways to customize your hummus! Here are a few ideas:
- Roasted Red Pepper Hummus: Add roasted red peppers to the blender for a smoky and sweet flavor.
- Spicy Hummus: Add a pinch of cayenne pepper or a roasted jalapeno pepper for heat.
- Herb Hummus: Blend in fresh herbs like parsley, cilantro, or dill for a fresh and vibrant flavor.
- Sun-Dried Tomato Hummus: Add sun-dried tomatoes (oil-packed, drained) for a Mediterranean twist.
- Garlic Roasted Hummus: Roast the garlic cloves before adding them to the hummus for a milder, sweeter garlic flavor.
Q4: Can I freeze hummus?
A: Yes, hummus can be frozen, although the texture might change slightly upon thawing. To freeze hummus, place it in an airtight container, leaving some headspace as it may expand. Freeze for up to 2-3 months. Thaw in the refrigerator overnight. You may need to stir in a tablespoon or two of olive oil or water to restore its creamy consistency after thawing.
Q5: What if I don’t have pita chips? What else can I serve with the platter?
A: If you don’t have pita chips, there are plenty of other delicious options to serve with your Greek Hummus Platter:
- Vegetables: Carrot sticks, celery sticks, cucumber sticks, bell pepper strips, broccoli florets, cauliflower florets.
- Breads: Whole wheat pita bread (cut into wedges), naan bread, baguette slices, breadsticks, crackers.
- Tortilla Chips: For a different textural contrast.
- Warm Pita Bread: Lightly warm pita bread on a grill or skillet.
Conclusion: Embrace the Deliciousness of the Greek Hummus Platter
This Greek Hummus Platter recipe is a testament to the beauty of simple, fresh ingredients and the magic of Mediterranean flavors. It’s easy to make, incredibly healthy, and always a crowd-pleaser. Whether you’re looking for a delicious appetizer, a light lunch, or a healthy snack, this platter is a perfect choice. So gather your ingredients, follow these simple steps, and prepare to enjoy the creamy, flavorful, and utterly satisfying experience of a homemade Greek Hummus Platter. Your family and friends will thank you! Enjoy dipping!
Print
Greek Hummus Platter Recipe
Ingredients
To create this delightful Greek Hummus Platter, you’ll need a handful of fresh, flavorful ingredients. Here’s a breakdown of what you’ll need for both the creamy hummus and the platter itself:
For the Creamy Hummus:
- 1 cup Dried Chickpeas: Using dried chickpeas is highly recommended for the best texture and flavor. If using canned, opt for 2 (15-ounce) cans, drained and rinsed.
- 1 teaspoon Baking Soda: This is used in two steps: first, to soak the chickpeas and then to cook them. Baking soda helps to break down the chickpea skins, resulting in smoother hummus.
- ½ cup Tahini: Use good quality tahini – it should be smooth and pourable. Stir well before measuring as the oil tends to separate.
- ¼ cup Fresh Lemon Juice: Freshly squeezed lemon juice is essential for the bright, tangy flavor of hummus.
- 2–3 Cloves Garlic: Adjust the amount of garlic to your preference. For a milder flavor, use 2 cloves; for a bolder garlic taste, use 3 or even 4.
- ½ teaspoon Salt: Start with ½ teaspoon and adjust to taste.
- ¼ cup Ice Water: This will help to achieve a super creamy texture. You may need to add a little more, tablespoon by tablespoon, to reach your desired consistency.
- 2 tablespoons Extra Virgin Olive Oil: For drizzling on top of the hummus and platter.
- Optional Garnishes for Hummus: Paprika, chopped parsley, pine nuts, sumac.
For the Greek Platter:
- 1 Cucumber: Choose a firm cucumber, English cucumbers are a great option as they have fewer seeds.
- 1 pint Cherry Tomatoes: Look for ripe and flavorful cherry tomatoes.
- 1 cup Kalamata Olives: Pitted Kalamata olives are classic for a Greek platter. You can also use a mix of different olives if you prefer.
- 1 bag Pita Chips: Use your favorite pita chips, either store-bought or homemade. You can also use whole pita bread, cut into wedges and lightly toasted or grilled.
- Optional Additions to the Platter:
- Feta Cheese: Crumbled feta cheese adds a salty and tangy element.
- Pepperoncini Peppers: These mild pickled peppers offer a slight kick.
- Red Onion: Thinly sliced red onion adds a sharp bite.
- Bell Peppers: Sliced bell peppers (red, yellow, orange) provide sweetness and crunch.
- Carrots: Baby carrots or sliced carrots add sweetness and color.
- Fresh Herbs: Sprigs of fresh oregano, mint, or parsley for garnish.
- Olive Oil for Drizzling: A final drizzle of good quality olive oil over the platter enhances the flavors.
- Lemon Wedges: For extra zest.
Instructions
Creating this Greek Hummus Platter is straightforward and enjoyable. Here’s a detailed step-by-step guide to help you make it perfectly every time:
Part 1: Crafting the Perfect Creamy Hummus
- Soak the Chickpeas: Rinse the dried chickpeas in a colander. Place them in a large bowl and cover with plenty of water (at least 8 cups) and 1 teaspoon of baking soda. Soak for at least 8 hours or preferably overnight. This soaking process softens the chickpeas and helps them cook more evenly, contributing to creamier hummus.
- Cook the Chickpeas: Drain and rinse the soaked chickpeas thoroughly. Place them in a large pot and cover with fresh water (about 6-8 cups). Bring to a boil over high heat. Skim off any foam that rises to the surface. Reduce heat to low, add another ½ teaspoon of baking soda to the pot, and simmer for 45-60 minutes, or until the chickpeas are very tender and easily mashed with a fork. The baking soda helps to further break down the skins and create a smoother texture.
- Peel the Chickpeas (Optional but Recommended): Drain the cooked chickpeas, reserving about ½ cup of the cooking liquid. While the chickpeas are still warm (be careful not to burn yourself), gently pinch each chickpea between your fingers to remove the skin. This step is optional but highly recommended for the creamiest hummus. It can be a bit time-consuming, but the difference in texture is significant. If you are short on time, you can skip this step, but the hummus may be slightly less smooth.
- Blend the Hummus: In a high-powered blender or food processor, combine the peeled (or unpeeled) chickpeas, tahini, lemon juice, garlic, and salt. Process until very smooth, scraping down the sides of the bowl as needed.
- Add Ice Water for Creaminess: With the blender or food processor running, slowly drizzle in ice water, 1 tablespoon at a time, until you reach your desired creamy consistency. You may not need to use all the ice water, or you may need slightly more depending on the chickpeas and tahini.
- Adjust Seasoning: Taste the hummus and adjust seasoning as needed. You may want to add more lemon juice for tanginess, salt for flavor, or garlic for a bolder taste.
- Rest and Serve: Transfer the hummus to a serving bowl. Drizzle with extra virgin olive oil and sprinkle with your desired garnishes, such as paprika, chopped parsley, or pine nuts. Let the hummus rest for at least 15-20 minutes before serving to allow the flavors to meld together. This also helps the hummus to thicken slightly.
Part 2: Assembling the Greek Platter
- Prepare the Vegetables: Wash and dry the cucumber and cherry tomatoes.
- Cucumber: Cut the cucumber into sticks, rounds, or half-moons, depending on your preference. You can peel the cucumber partially or fully if you prefer, but leaving some skin on adds color and nutrients.
- Cherry Tomatoes: Leave cherry tomatoes whole or halve them for easier dipping.
- Prepare the Olives: Drain the Kalamata olives (if using olives packed in brine or oil).
- Arrange the Platter: Choose a large platter or serving board.
- Hummus Centerpiece: Place the bowl of creamy hummus in the center of the platter.
- Vegetable Arrangement: Arrange the cucumber sticks, cherry tomatoes, and Kalamata olives around the hummus bowl in an attractive and organized manner. You can create sections for each ingredient or arrange them in a more free-form style.
- Pita Chips: Place the pita chips around the vegetables or in a separate basket or bowl alongside the platter.
- Garnish and Serve: Drizzle the vegetables and hummus lightly with extra virgin olive oil. Garnish the platter with fresh herbs like oregano, mint, or parsley, if desired. Serve immediately and enjoy!
Nutrition
- Serving Size: one normal portion
- Calories: 350
- Fat: 20 grams
- Saturated Fat: 3 grams
- Protein: 12 grams