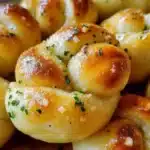
Homemade garlic knots. Just the name conjures up images of warm, fluffy bread, dripping with garlicky, buttery goodness. In our home, these aren’t just a side dish; they’re an event. Every time I make a batch, the aroma alone is enough to draw everyone into the kitchen, noses twitching with anticipation. From the moment they emerge from the oven, golden brown and glistening, to the satisfying sighs as everyone takes their first bite, these garlic knots are pure comfort food magic. They disappear in minutes, leaving behind happy faces and requests for “more, please!”. Honestly, if you’re looking for a recipe that’s guaranteed to be a crowd-pleaser, whether it’s for a family dinner, a potluck, or just a cozy night in, look no further. These homemade garlic knots are ridiculously easy to make, unbelievably delicious, and will fill your kitchen with the most irresistible, welcoming scent. Trust me, once you try them, you’ll be making them again and again.
Ingredients
- Active Dry Yeast: (2 ¼ teaspoons) – The magic ingredient that makes the dough rise and gives the knots their light and airy texture.
- Warm Water: (1 ¼ cups, lukewarm – about 105-115°F) – Essential for activating the yeast and starting the dough-making process.
- Granulated Sugar: (1 teaspoon) – A little sugar feeds the yeast and helps it activate, also adding a touch of sweetness to the dough.
- Olive Oil: (2 tablespoons, plus more for greasing) – Adds richness and flavor to the dough, and helps keep it moist and pliable. Also used for greasing the bowl and baking sheet.
- Salt: (1 teaspoon) – Enhances the flavor of the dough and controls the yeast activity, crucial for balanced taste.
- All-Purpose Flour: (3 ½ – 4 cups, plus more for dusting) – The base of the dough, providing structure and chewiness to the garlic knots. Start with 3 ½ cups and add more as needed to get the right dough consistency.
- Unsalted Butter: (½ cup, 1 stick, melted) – The foundation of the irresistible garlic butter, providing richness and flavor.
- Garlic: (6-8 cloves, minced) – The star of the show! Freshly minced garlic is key for that robust, pungent garlic flavor. Adjust amount to your preference.
- Fresh Parsley: (¼ cup, chopped) – Adds a fresh, herbaceous note and a pop of color to the garlic butter and knots.
- Dried Italian Seasoning: (1 teaspoon) – A blend of herbs that complements the garlic and butter, adding depth of flavor.
- Grated Parmesan Cheese: (¼ cup, optional, plus more for serving) – Adds a salty, savory, and nutty flavor to the garlic butter and knots. Optional but highly recommended for extra flavor.
Instructions
- Activate the Yeast: In a large bowl, or the bowl of a stand mixer, combine the warm water and granulated sugar. Sprinkle the active dry yeast over the top and let it sit for 5-10 minutes. You’ll know the yeast is active when it becomes foamy and bubbly on the surface. This step is crucial to ensure your dough will rise properly. If the yeast doesn’t foam, it may be old or inactive, and you’ll need to start with fresh yeast.
- Combine Wet and Dry Ingredients: Once the yeast is activated, add the olive oil and salt to the bowl. Stir to combine. Gradually add the all-purpose flour, starting with 3 ½ cups. If using a stand mixer, use the dough hook and mix on low speed. If mixing by hand, use a wooden spoon or your hands to combine the ingredients.
- Knead the Dough: Continue adding flour, ¼ cup at a time, until the dough comes together and is slightly sticky but not overly wet. If using a stand mixer, knead on medium-low speed for 6-8 minutes, or until the dough is smooth and elastic. If kneading by hand, turn the dough out onto a lightly floured surface and knead for 8-10 minutes, until smooth and elastic. The dough should be soft and pliable. Proper kneading develops the gluten, which gives the garlic knots their chewy texture.
- First Rise (Proofing): Lightly grease a large bowl with olive oil. Place the dough in the bowl and turn it to coat with oil. Cover the bowl with plastic wrap or a clean kitchen towel. Let the dough rise in a warm place for about 1-1.5 hours, or until doubled in size. The warmer the environment, the faster the dough will rise. A warm oven (turned off!), a sunny spot, or even just a warm kitchen counter can work. This first rise allows the yeast to work its magic and create air pockets in the dough.
- Prepare the Garlic Butter: While the dough is rising, prepare the garlic butter. In a small saucepan or microwave-safe bowl, melt the unsalted butter. Add the minced garlic, chopped fresh parsley, dried Italian seasoning, and optional grated Parmesan cheese. Stir to combine and set aside. Letting the garlic infuse into the melted butter while the dough rises intensifies the garlic flavor.
- Shape the Garlic Knots: Once the dough has doubled in size, gently punch it down to release the air. Turn the dough out onto a lightly floured surface. Divide the dough into about 24-30 equal pieces. Roll each piece of dough into a rope about 6-8 inches long. To form a knot, tie the rope into a simple knot, tucking the ends underneath. You can also twist two ropes together for a different knot shape. Don’t worry about perfection; rustic knots are part of the charm!
- Second Rise (Proofing): Place the shaped garlic knots on a parchment-lined baking sheet, leaving some space between each knot. Cover loosely with plastic wrap or a clean kitchen towel. Let them rise again in a warm place for another 20-30 minutes. This second rise helps the knots become even lighter and fluffier.
- Preheat Oven and Bake: Preheat your oven to 400°F (200°C). Once the second rise is complete, bake the garlic knots for 12-15 minutes, or until they are golden brown and cooked through. Keep an eye on them towards the end of baking to prevent burning, as oven temperatures can vary.
- Brush with Garlic Butter: As soon as the garlic knots come out of the oven, generously brush them all over with the prepared garlic butter. Make sure to get into all the crevices and knots to ensure maximum flavor. The heat from the knots will help the butter melt and soak in.
- Serve and Enjoy: For extra flavor and visual appeal, you can sprinkle the garlic knots with additional grated Parmesan cheese and fresh parsley before serving. Serve them warm and enjoy immediately! They are best enjoyed fresh out of the oven, when they are at their fluffiest and most flavorful.
Nutrition Facts
(Estimated per serving, assuming 24 servings per batch. Nutritional values are approximate and may vary based on specific ingredients and portion sizes.)
- Serving Size: 1 Garlic Knot
- Calories: Approximately 180-220 kcal
- Fat: 8-12g
- Saturated Fat: 4-6g
Disclaimer: Nutritional information is an estimate and should be considered a general guideline. For precise nutritional values, it is recommended to use a nutrition calculator with specific ingredient brands and measurements.
Preparation Time
- Prep Time: 30 minutes (includes yeast activation, dough mixing, and garlic butter preparation)
- Rise Time (First Proof): 1- 1.5 hours
- Rise Time (Second Proof): 20-30 minutes
- Cook Time: 12-15 minutes
- Total Time: Approximately 2 – 2.5 hours (including rise times)
Description: While the active preparation time for these garlic knots is relatively short, the majority of the time is spent waiting for the dough to rise. This hands-off time allows you to do other things while the yeast works its magic. The actual hands-on work is quite simple and straightforward, making this recipe perfect for both beginner and experienced bakers. Plan ahead to allow sufficient time for the dough to proof properly for the best results.
How to Serve
Garlic knots are incredibly versatile and can be served in a variety of ways. Here are some delicious serving suggestions:
- As an Appetizer:
- Serve them warm on a platter as a delightful appetizer for parties or gatherings.
- Pair them with a dipping sauce like marinara sauce, ranch dressing, or a creamy garlic dip for added flavor.
- Arrange them around a bowl of olives, roasted red peppers, and artichoke hearts for an Italian-inspired antipasto platter.
- As a Side Dish:
- Accompany your favorite Italian dishes like pasta, lasagna, spaghetti and meatballs, or baked ziti.
- Serve them alongside soups and stews for dipping and soaking up the flavorful broth.
- Pair them with salads to add a warm and comforting element to a lighter meal.
- They are perfect with pizza night, offering a delicious garlicky bread option to complement your pizza.
- For Casual Meals:
- Enjoy them as a snack on their own, especially when you’re craving something savory and comforting.
- Serve them with grilled chicken, burgers, or sandwiches to elevate a simple meal.
- Pack them in lunchboxes for a tasty and satisfying treat (they are still delicious at room temperature, though best warm).
- For Special Occasions:
- Make them for holidays, potlucks, or game day gatherings as a crowd-pleasing side or appetizer.
- They are always a hit at picnics and barbecues, offering a flavorful alternative to plain rolls.
Additional Tips for Perfect Homemade Garlic Knots
- Use Fresh Yeast: Ensure your active dry yeast is fresh for the best rise. If you’re unsure, test it by adding a teaspoon to warm water with a pinch of sugar. If it doesn’t foam within 10 minutes, it’s likely inactive.
- Warm Water Temperature is Key: The water should be lukewarm, around 105-115°F (40-46°C). Water that’s too hot can kill the yeast, while water that’s too cold won’t activate it properly. Use a thermometer for accuracy if you’re unsure.
- Don’t Over-Flour the Dough: Add flour gradually until the dough is just slightly sticky. Over-flouring can result in dry, tough garlic knots. A slightly sticky dough will yield softer, fluffier knots.
- Knead Properly: Kneading develops gluten, which is essential for the texture of the garlic knots. Knead for the recommended time until the dough is smooth and elastic. This will give them their signature chewiness.
- Warm Place for Proofing: Find a warm spot for the dough to rise. A slightly warm oven (turned off) with the oven light on, a sunny windowsill, or a warm kitchen counter can all work well. A consistent warm temperature promotes optimal yeast activity.
- Don’t Overbake: Bake the garlic knots until they are golden brown, but be careful not to overbake them, as they can become dry. Start checking for doneness around the 12-minute mark.
- Generous Garlic Butter: Don’t be shy with the garlic butter! Generously brush the knots as soon as they come out of the oven, ensuring every nook and cranny is coated for maximum flavor.
- Fresh Garlic is Best: While garlic powder can be used in a pinch, fresh minced garlic provides the most authentic and robust garlic flavor for these knots. Roasting the garlic cloves before mincing can also add a sweeter, mellow garlic flavor variation.
FAQ About Homemade Garlic Knots
Q1: Can I use instant yeast instead of active dry yeast?
A: Yes, you can substitute instant yeast for active dry yeast. You can use the same amount (2 ¼ teaspoons). With instant yeast, you can skip the initial activation step and add it directly to the dry ingredients. The rise time might be slightly shorter with instant yeast.
Q2: Can I make the dough ahead of time and bake later?
A: Yes, you can prepare the dough ahead of time. After the first rise, punch down the dough, wrap it tightly in plastic wrap, and refrigerate it for up to 24 hours. When you’re ready to bake, let the dough come to room temperature for about 30-60 minutes before shaping and proceeding with the second rise and baking.
Q3: Can I freeze garlic knots?
A: Yes, garlic knots freeze well. Bake them completely, let them cool to room temperature, and then freeze them in an airtight container or freezer bag. To reheat, bake them from frozen at 350°F (175°C) for about 10-15 minutes, or until heated through and warmed. You can also reheat them in the microwave, but they might lose some of their crispness.
Q4: Can I add cheese to the dough?
A: Absolutely! Adding cheese to the dough can enhance the flavor and texture. You can incorporate about ½ cup of shredded cheese like mozzarella, cheddar, or Parmesan into the dough during the kneading process. This will add a cheesy element from the inside out.
Q5: Can I make these garlic knots vegan?
A: Yes, you can easily make these garlic knots vegan. Substitute the unsalted butter in the garlic butter with vegan butter or olive oil. Ensure you are using a vegan Parmesan cheese alternative if you choose to include cheese in the garlic butter. The dough itself is already vegan-friendly when made with olive oil.
Q6: What if my dough is too sticky?
A: If your dough is too sticky and difficult to handle, gradually add a tablespoon of flour at a time, kneading it in until the dough becomes more manageable. Be careful not to add too much flour, as this can make the knots tough. A slightly sticky dough is preferable to a dry dough.
Q7: My garlic knots are not rising, what could be wrong?
A: There could be a few reasons why your garlic knots are not rising:
* Inactive Yeast: Your yeast might be old or inactive. Test your yeast before starting.
* Water Temperature: The water might have been too hot or too cold, affecting yeast activation.
* Cold Environment: The dough needs a warm environment to rise. Ensure you are placing it in a warm place.
* Over-Kneading or Under-Kneading: While less common, improper kneading can sometimes affect rise. Ensure you knead for the recommended time.
Q8: Can I use garlic powder instead of fresh garlic?
A: While fresh garlic is highly recommended for the best flavor, you can use garlic powder in a pinch. If using garlic powder, add about 1-2 teaspoons to the melted butter. However, the flavor will be less robust and nuanced compared to fresh garlic. Roasting the garlic beforehand and then mincing it will provide an even deeper, sweeter garlic flavor if you want to experiment further.
Homemade Garlic Knots
Ingredients
- Active Dry Yeast: (2 ¼ teaspoons) – The magic ingredient that makes the dough rise and gives the knots their light and airy texture.
- Warm Water: (1 ¼ cups, lukewarm – about 105-115°F) – Essential for activating the yeast and starting the dough-making process.
- Granulated Sugar: (1 teaspoon) – A little sugar feeds the yeast and helps it activate, also adding a touch of sweetness to the dough.
- Olive Oil: (2 tablespoons, plus more for greasing) – Adds richness and flavor to the dough, and helps keep it moist and pliable. Also used for greasing the bowl and baking sheet.
- Salt: (1 teaspoon) – Enhances the flavor of the dough and controls the yeast activity, crucial for balanced taste.
- All-Purpose Flour: (3 ½ – 4 cups, plus more for dusting) – The base of the dough, providing structure and chewiness to the garlic knots. Start with 3 ½ cups and add more as needed to get the right dough consistency.
- Unsalted Butter: (½ cup, 1 stick, melted) – The foundation of the irresistible garlic butter, providing richness and flavor.
- Garlic: (6-8 cloves, minced) – The star of the show! Freshly minced garlic is key for that robust, pungent garlic flavor. Adjust amount to your preference.
- Fresh Parsley: (¼ cup, chopped) – Adds a fresh, herbaceous note and a pop of color to the garlic butter and knots.
- Dried Italian Seasoning: (1 teaspoon) – A blend of herbs that complements the garlic and butter, adding depth of flavor.
- Grated Parmesan Cheese: (¼ cup, optional, plus more for serving) – Adds a salty, savory, and nutty flavor to the garlic butter and knots. Optional but highly recommended for extra flavor.
Instructions
- Activate the Yeast: In a large bowl, or the bowl of a stand mixer, combine the warm water and granulated sugar. Sprinkle the active dry yeast over the top and let it sit for 5-10 minutes. You’ll know the yeast is active when it becomes foamy and bubbly on the surface. This step is crucial to ensure your dough will rise properly. If the yeast doesn’t foam, it may be old or inactive, and you’ll need to start with fresh yeast.
- Combine Wet and Dry Ingredients: Once the yeast is activated, add the olive oil and salt to the bowl. Stir to combine. Gradually add the all-purpose flour, starting with 3 ½ cups. If using a stand mixer, use the dough hook and mix on low speed. If mixing by hand, use a wooden spoon or your hands to combine the ingredients.
- Knead the Dough: Continue adding flour, ¼ cup at a time, until the dough comes together and is slightly sticky but not overly wet. If using a stand mixer, knead on medium-low speed for 6-8 minutes, or until the dough is smooth and elastic. If kneading by hand, turn the dough out onto a lightly floured surface and knead for 8-10 minutes, until smooth and elastic. The dough should be soft and pliable. Proper kneading develops the gluten, which gives the garlic knots their chewy texture.
- First Rise (Proofing): Lightly grease a large bowl with olive oil. Place the dough in the bowl and turn it to coat with oil. Cover the bowl with plastic wrap or a clean kitchen towel. Let the dough rise in a warm place for about 1-1.5 hours, or until doubled in size. The warmer the environment, the faster the dough will rise. A warm oven (turned off!), a sunny spot, or even just a warm kitchen counter can work. This first rise allows the yeast to work its magic and create air pockets in the dough.
- Prepare the Garlic Butter: While the dough is rising, prepare the garlic butter. In a small saucepan or microwave-safe bowl, melt the unsalted butter. Add the minced garlic, chopped fresh parsley, dried Italian seasoning, and optional grated Parmesan cheese. Stir to combine and set aside. Letting the garlic infuse into the melted butter while the dough rises intensifies the garlic flavor.
- Shape the Garlic Knots: Once the dough has doubled in size, gently punch it down to release the air. Turn the dough out onto a lightly floured surface. Divide the dough into about 24-30 equal pieces. Roll each piece of dough into a rope about 6-8 inches long. To form a knot, tie the rope into a simple knot, tucking the ends underneath. You can also twist two ropes together for a different knot shape. Don’t worry about perfection; rustic knots are part of the charm!
- Second Rise (Proofing): Place the shaped garlic knots on a parchment-lined baking sheet, leaving some space between each knot. Cover loosely with plastic wrap or a clean kitchen towel. Let them rise again in a warm place for another 20-30 minutes. This second rise helps the knots become even lighter and fluffier.
- Preheat Oven and Bake: Preheat your oven to 400°F (200°C). Once the second rise is complete, bake the garlic knots for 12-15 minutes, or until they are golden brown and cooked through. Keep an eye on them towards the end of baking to prevent burning, as oven temperatures can vary.
- Brush with Garlic Butter: As soon as the garlic knots come out of the oven, generously brush them all over with the prepared garlic butter. Make sure to get into all the crevices and knots to ensure maximum flavor. The heat from the knots will help the butter melt and soak in.
- Serve and Enjoy: For extra flavor and visual appeal, you can sprinkle the garlic knots with additional grated Parmesan cheese and fresh parsley before serving. Serve them warm and enjoy immediately! They are best enjoyed fresh out of the oven, when they are at their fluffiest and most flavorful.
Nutrition
- Serving Size: one normal portion
- Calories: 220
- Fat: 12g
- Saturated Fat: 6g