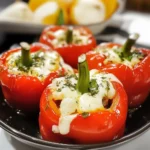
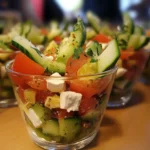
I still remember the first time I made these Layered Greek Salad Cups. It was for a last-minute backyard barbecue, and I was frantically searching for an appetizer that looked impressive but didn’t require me to turn on the oven in the sweltering summer heat. I stumbled upon the idea of turning a classic Greek salad, a family favorite, into a bite-sized, portable treat. Honestly, I was a bit skeptical. Would they be messy? Would they hold up? The result was nothing short of a culinary triumph. As I brought the platter out, a hush fell over the chatty crowd. The vibrant colors—the deep green of the cucumber, the brilliant red of the tomatoes, the stark white of the feta, and the rich purple of the olives—were an instant showstopper. They were a feast for the eyes before they even touched anyone’s lips. The best part was watching my friends and family pick them up, marveling at the clever presentation. There were no forks, no messy plates, just pure, simple enjoyment. The crisp, cool crunch of the cucumber cup followed by the burst of fresh, zesty salad inside was the perfect combination. They were light, healthy, and incredibly refreshing, a perfect counterpoint to the heavier grilled foods. They disappeared in less than ten minutes, and I spent the rest of the afternoon fielding requests for the recipe. Now, these Layered Greek Salad Cups are my signature dish for any gathering, from elegant holiday parties to casual picnics. They are my secret weapon for healthy meal prepping, offering a perfect portion-controlled lunch that feels like a gourmet treat. This recipe is more than just food; it’s a conversation starter, a crowd-pleaser, and a testament to the fact that the most delicious things can also be the most simple and wholesome.
Ingredients
- 3 large English or Seedless Cucumbers: These are the star of the show, acting as the edible vessel for our salad. English cucumbers are ideal due to their thin, tender skin (no peeling required), minimal seeds, and straight shape, which makes for uniform cups.
- 1 cup Cherry or Grape Tomatoes, finely diced: These provide a burst of sweetness and a vibrant red color. Dicing them finely is key to ensuring they fit perfectly within the cucumber cups and mix well with the other ingredients.
- 1 cup Red Onion, finely diced: A crucial element for that classic Greek salad sharpness and bite. Soaking the diced onion in cold water for 10 minutes before use can help mellow its flavor if you prefer a less pungent taste.
- 1 cup Kalamata Olives, pitted and chopped: Their rich, briny, and fruity flavor is indispensable in a Greek salad. Ensure they are pitted, and chop them finely to distribute their intense flavor evenly throughout the filling.
- 1 cup Feta Cheese, crumbled: For the best flavor and texture, purchase a block of feta cheese stored in brine and crumble it yourself. It’s creamier and has a more authentic tangy, salty flavor than pre-crumbled varieties.
- 1/2 cup Fresh Parsley, chopped: Adds a bright, fresh, and slightly peppery note that cuts through the richness of the cheese and olives.
- For the Greek Vinaigrette:
- 1/4 cup Extra Virgin Olive Oil: The base of our dressing. A good quality, cold-pressed olive oil will impart a fruity, peppery flavor that elevates the entire salad.
- 2 tablespoons Red Wine Vinegar: This provides the acidic tang that is characteristic of Greek dressing.
- 1 tablespoon Fresh Lemon Juice: Brightens all the flavors and adds another layer of citrusy freshness.
- 1 teaspoon Dried Oregano: This herb is the soul of Greek cooking. Its aromatic and earthy flavor is essential for an authentic taste.
- 1/2 teaspoon Dijon Mustard: Acts as an emulsifier, helping to bind the oil and vinegar together into a smooth, cohesive dressing.
- Salt and Black Pepper to taste: To season and enhance all the individual components of the salad.
Instructions
Crafting these beautiful and delicious cups is a straightforward process. By breaking it down into three main stages—preparing the vessels, creating the filling, and assembly—you can ensure a smooth and successful culinary experience.
Stage 1: Preparing the Cucumber Cups
- Wash and Dry: Begin by thoroughly washing the English cucumbers under cold running water. Pat them completely dry with a paper towel. Since we are not peeling them, ensuring they are clean is an important first step.
- Trim the Ends: Using a sharp knife, trim off both ends of each cucumber. This creates flat, stable surfaces to work with.
- Cut into Sections: Slice each cucumber crosswise into thick, uniform pieces, about 1.5 to 2 inches tall. This height is perfect for creating a sturdy cup that can hold a generous amount of salad filling. Aim for consistency in height so your finished appetizers look uniform and professional on the platter.
- Hollow the Centers: This is the most crucial step. Place a cucumber section on a cutting board with a flat side down. Using a melon baller or a small 1/2-teaspoon measuring spoon, carefully scoop out the seedy center of each cucumber piece. Be mindful to leave a solid base at the bottom, about 1/4 to 1/2 inch thick. Do not scoop all the way through, or your filling will fall out. The goal is to create a sturdy, hollow cup. Repeat this process for all cucumber sections.
- Drain the Cups: Once all your cucumbers are hollowed out, turn them upside down on a layer of paper towels. Let them sit and drain for about 10-15 minutes. This simple step is vital for preventing a watery base and ensures your final Layered Greek Salad Cups are crisp and not soggy.
Stage 2: Making the Greek Salad Filling and Vinaigrette
- Prepare the Vinaigrette: In a small bowl or a glass jar with a tight-fitting lid, combine the extra virgin olive oil, red wine vinegar, fresh lemon juice, dried oregano, and Dijon mustard. Whisk vigorously or shake the jar until the dressing is well-emulsified and creamy. Season with a pinch of salt and freshly ground black pepper to your liking. Set aside to allow the flavors to meld together.
- Combine the Salad Ingredients: In a medium-sized mixing bowl, add the finely diced cherry tomatoes, finely diced red onion, chopped Kalamata olives, and crumbled feta cheese.
- Dice with Precision: The key to a perfect filling is ensuring all the ingredients are chopped to a similar, fine dice. This not only makes the cups easier to fill but also guarantees a balanced bite with every mouthful, where no single ingredient overpowers the others.
- Dress the Salad: Pour about half of the prepared vinaigrette over the chopped ingredients in the bowl. Gently toss everything together until just combined. You want to coat the ingredients, not drown them. You can add more dressing if needed, but it’s best to start with less to control the moisture level.
- Add Fresh Herbs: Gently fold in the chopped fresh parsley at the very end. This preserves its bright color and fresh flavor.
Stage 3: Assembling the Layered Greek Salad Cups
- Fill the Cups: Arrange your drained, hollowed-out cucumber cups on a clean work surface or your serving platter. Using a small spoon, carefully fill each cucumber cup with the prepared Greek salad mixture. Be generous, but avoid overfilling to the point where it spills over the sides messily. A slight mound on top looks appealing.
- Garnish and Finish: For a beautiful final touch, you can add a small sprinkle of extra crumbled feta, a tiny piece of olive, or a small parsley leaf on top of each filled cup. This adds a professional and polished look.
- Chill Before Serving: For the best flavor and texture, place the assembled Layered Greek Salad Cups in the refrigerator to chill for at least 30 minutes before serving. This allows the flavors to meld further and ensures the cucumber is crisp and the filling is cool and refreshing. Serve cold.
Nutrition Facts
- Servings: This recipe yields approximately 18-24 salad cups.
- Calories per serving (1 cup): Approximately 35-45 calories.
- Low in Calories: Each cup is a light and guilt-free bite, making it a perfect appetizer or snack that won’t derail your health goals.
- Rich in Healthy Fats: The extra virgin olive oil and Kalamata olives provide monounsaturated fats, which are beneficial for heart health and can help reduce inflammation.
- Good Source of Vitamins and Minerals: Cucumbers, tomatoes, and onions are packed with essential nutrients like Vitamin C, Vitamin K, and potassium, contributing to overall wellness.
- Source of Protein: The feta cheese offers a modest amount of protein, which helps in making these little bites surprisingly satisfying and satiating.
- High in Fiber: The combination of fresh vegetables provides dietary fiber, which is crucial for digestive health and maintaining stable blood sugar levels.
Preparation Time
This recipe is designed to be quick and efficient, perfect for busy hosts. The total time is approximately 35 minutes. This can be broken down into 25 minutes of active preparation time (chopping vegetables, hollowing cucumbers, mixing the dressing) and 10 minutes of passive time (letting the cucumber cups drain). Chilling time is additional but requires no active effort.
How to Serve
The beauty of these Layered Greek Salad Cups lies in their versatility. They can be dressed up or down for any occasion. Here are some inspiring ways to serve them:
- As an Elegant Party Appetizer:
- Arrange the cups artfully on a chilled white ceramic or slate platter to make the vibrant colors pop.
- Garnish the platter with fresh sprigs of dill or parsley and a few scattered whole Kalamata olives.
- Serve alongside other bite-sized hors d’oeuvres for a sophisticated appetizer spread at a cocktail party or holiday gathering.
- For a Healthy Meal-Prepped Lunch:
- Prepare the cucumber cups and the salad filling separately and store them in airtight containers in the refrigerator.
- Assemble just before eating for a quick, portion-controlled, and refreshing lunch that is both healthy and satisfying. Pack 4-5 cups for a light yet filling meal.
- At a Summer BBQ or Potluck:
- These are the ultimate outdoor-friendly food. They are served cold, require no reheating, and are easy for guests to handle without plates or cutlery.
- Keep the platter on a bed of ice to ensure they stay crisp and cool, especially on a hot day. They are a welcome, refreshing contrast to heavy, grilled meats.
- As a Light and Refreshing Side Dish:
- Serve 2-3 cups alongside a main course like grilled chicken, salmon, or a hearty lamb souvlaki.
- They provide the fresh, crunchy element of a salad without taking up a lot of space on the plate.
- For a Brunch Spread:
- Add a touch of vibrant green to your brunch table. They pair wonderfully with egg dishes like frittatas or quiches.
- Their light, zesty flavor profile is a perfect way to start a leisurely weekend meal.
Additional Tips
To ensure your Layered Greek Salad Cups are perfect every time, keep these eight expert tips in mind:
- Master the Make-Ahead Strategy: For stress-free party planning, you can prepare the components ahead of time. The salad filling (without the dressing) can be chopped and stored in an airtight container in the fridge for up to 24 hours. The cucumber cups can also be hollowed out, drained, and stored in a separate airtight container. Combine the filling with the dressing and assemble the cups just an hour or two before serving for maximum freshness and crunch.
- Don’t Skimp on Draining: The 10-15 minute draining time for the hollowed-out cucumber cups is non-negotiable. This single step is the most effective way to prevent the dreaded “soggy bottom” and ensures your cucumber base remains crisp and sturdy.
- Salt the Cucumbers for Extra Crunch: For an even crisper cup, after hollowing out the cucumbers, lightly salt the inside of each cup and let them sit upside down on paper towels. The salt will draw out even more excess moisture. Be sure to gently pat the insides dry with a paper towel to remove the salt and excess water before filling.
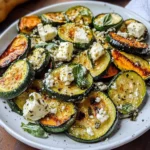
- Embrace Ingredient Variations: Don’t be afraid to customize! You can add finely chopped bell peppers (red or yellow for color), chickpeas for extra protein and fiber, or fresh mint for a different herbaceous note. If you’re not a fan of red onion, milder shallots or green onions are a great substitute.
- The Secret to a Balanced Filling: The texture of your filling is paramount. Aim for a very fine, uniform dice (a brunoise cut) for all your vegetables. This ensures that you get a little bit of everything in each bite and makes the small cups easy to fill and eat neatly. A larger chop can make them awkward and messy.
- Control the Dressing: It’s always better to under-dress than over-dress this salad. An overly wet filling will quickly make the cucumber cups watery and can cause the feta to break down too much. Add the dressing gradually, tossing gently until the ingredients are just coated. You can always serve a little extra dressing on the side for those who want more.
- Chilling is Not Optional: Serving these cups ice-cold is key. The chill enhances the crispness of the cucumber and makes the flavors of the salad filling taste brighter and more refreshing. A 30-minute to 1-hour chill in the fridge after assembling is ideal.
- Don’t Waste the Cucumber Guts!: Don’t throw away the cucumber centers you’ve scooped out! They are perfectly edible. Add them to a smoothie for a hydrating boost, chop them up and mix them into a larger bowl of salad, or blend them with yogurt and mint to create a quick and delicious tzatziki-style dip.
FAQ Section
1. How far in advance can I make Layered Greek Salad Cups?
You can prepare the components up to 24 hours in advance. Keep the chopped vegetable and feta mixture in one airtight container, the hollowed-out cucumber cups in another, and the vinaigrette in a jar. For best results, assemble the cups no more than 2-3 hours before you plan to serve them to maintain the ideal crisp texture.
2. Can I use a different base instead of cucumber?
Absolutely! While cucumbers provide the classic, refreshing crunch, you can get creative. Hollowing out small Roma tomatoes or colorful bell peppers works well. For a completely different take, you can use large, sturdy endive leaves as “boats” to hold the Greek salad filling.
3. Is this recipe gluten-free and keto-friendly?
Yes, this recipe is naturally gluten-free. It is also very keto-friendly, as it is low in carbohydrates and high in healthy fats from the olive oil and feta cheese. It’s a perfect appetizer or snack for those following either dietary lifestyle.
4. My cups turned out watery. What went wrong?
Watery cups are usually caused by one of two things: not draining the hollowed-out cucumber cups sufficiently, or over-dressing the salad filling. Be sure to let the cups sit upside down on a paper towel for at least 10 minutes and add the dressing to the filling sparingly, mixing until just coated.
5. What is the best way to store leftovers?
While these are best enjoyed fresh, you can store leftovers in a single layer in an airtight container in the refrigerator for up to 24 hours. The cucumber will lose some of its crispness over time but will still be delicious. It’s not recommended to freeze them.
6. Can I add a protein like chicken or shrimp to the filling?
Yes, adding another protein is a fantastic way to make these cups more substantial. Finely shredded cooked chicken, finely chopped grilled shrimp, or even canned chickpeas (rinsed and drained well) would be excellent additions. Just ensure they are chopped small enough to match the other ingredients.
7. What kind of feta cheese is best for this recipe?
For the most authentic and robust flavor, always opt for a block of Greek feta cheese sold in brine. This type is creamier, tangier, and less dry than pre-crumbled varieties. The brine keeps it fresh and flavorful, which makes a noticeable difference in the final dish.
8. Do I have to use Kalamata olives?
Kalamata olives are traditional for their unique, rich flavor, but you can substitute them if you prefer. Other good options include Castelvetrano olives for a buttery, mild flavor, or any good-quality black or green olive. Just be sure they are pitted and chopped finely.