It started, as many kitchen epiphanies do, on a frantic weekday morning. The usual chaos – finding matching socks, locating lost homework, packing lunches – left precious little time for a nourishing breakfast. Cereal felt unsatisfying, toast was boring, and anything involving a frying pan was out of the question. Then, I remembered the simple magic of microwave oatmeal. My kids, initially skeptical (“Isn’t that… mushy?”), were won over by the sheer speed and, more importantly, the ability to customize their bowls. Adding a handful of crunchy nuts, a drizzle of maple syrup, and some berries transformed basic oats into a breakfast powerhouse they actually asked for. This Microwave Oatmeal with Nuts quickly became our go-to, a reliable, warm, and satisfying start that fuels our busy days without adding stress to our mornings. It’s proof that healthy and delicious doesn’t have to be complicated or time-consuming. It’s simple, adaptable, and genuinely comforting – everything a great breakfast should be.
Ingredients
Here’s what you’ll need to create this quick and satisfying breakfast staple:
- ½ cup Rolled Oats (Old-Fashioned Oats): These oats provide a pleasant chewy texture that holds up well in the microwave without becoming overly mushy. Avoid steel-cut oats (they won’t cook through) and be mindful that instant oats will cook much faster and result in a softer texture.
- 1 cup Liquid (Water, Milk, or Plant-Based Milk): Water creates a lighter oatmeal, while milk (dairy, almond, soy, oat, etc.) yields a creamier, richer result. The choice depends entirely on your preference and dietary needs. Using a 1:2 ratio of oats to liquid is a standard starting point, adjustable for desired consistency.
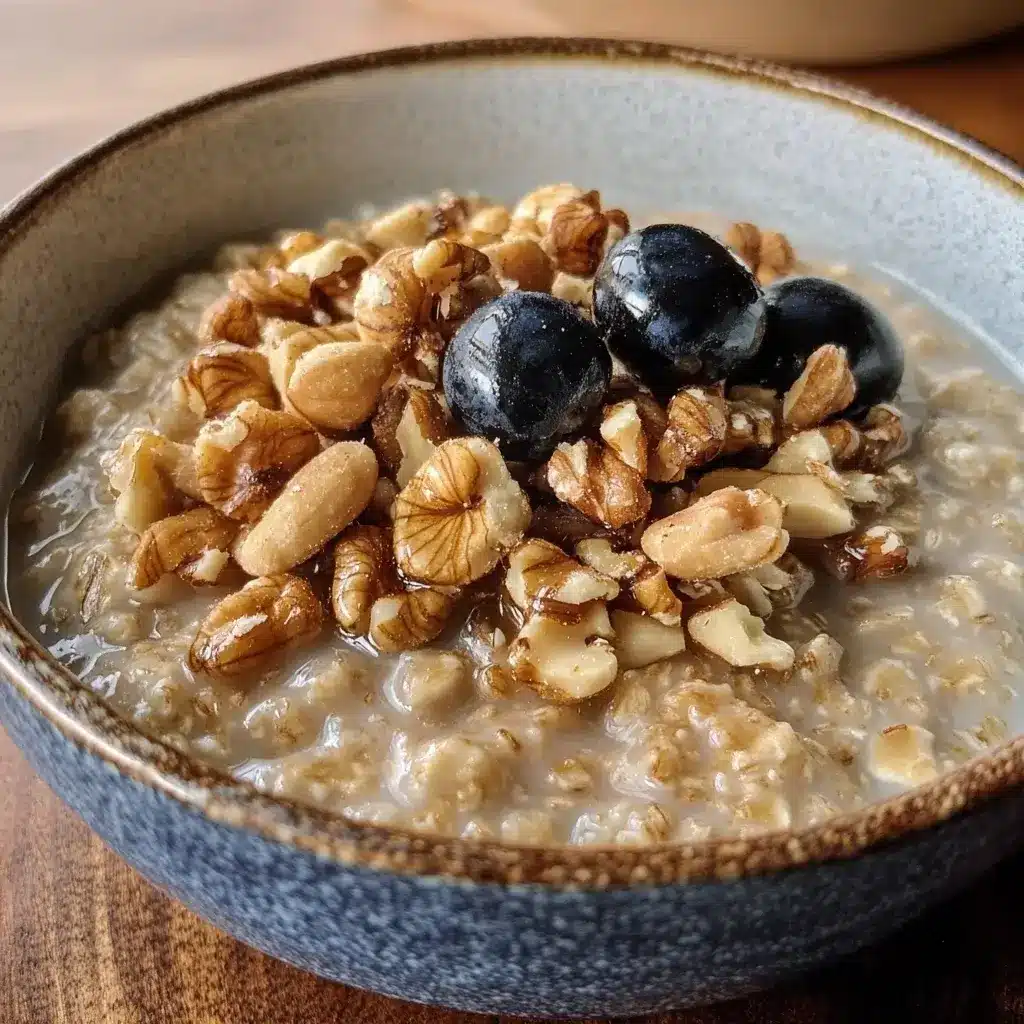
- 1-2 tablespoons Chopped Nuts: This is where the crunch and healthy fats come in! Use your favorite nuts – almonds, walnuts, pecans, pistachios, or a mix. Chopping them ensures they integrate well and provide texture in every bite. Raw or toasted nuts both work wonderfully.
- Pinch of Salt: Don’t skip this! A tiny amount of salt enhances the natural flavors of the oats and balances the sweetness, preventing the oatmeal from tasting flat.
- Optional Sweetener (to taste): Maple syrup, honey, brown sugar, agave nectar, stevia, or even a mashed banana can be used. Add it after cooking for better control over the sweetness level. Start with a small amount (like 1 teaspoon) and adjust.
- Optional Flavor Enhancers: A dash of cinnamon, nutmeg, vanilla extract, or cardamom can elevate the flavor profile significantly. Add these along with the oats and liquid before cooking.
Instructions
Follow these simple steps for perfectly cooked microwave oatmeal every time:
- Choose Your Bowl Wisely: Select a microwave-safe bowl that is significantly larger than you think you need – at least double the volume of your ingredients (e.g., a 4-cup capacity bowl for ½ cup oats and 1 cup liquid). This is crucial to prevent the oatmeal from boiling over and creating a mess in your microwave.
- Combine Core Ingredients: Add the rolled oats, your chosen liquid (water or milk), and the pinch of salt to the large bowl. If using optional flavor enhancers like cinnamon or vanilla extract, add them now. Stir everything together briefly to ensure the oats are fully submerged in the liquid.
- Microwave on High: Place the bowl, uncovered, into the microwave. Cook on HIGH power for 1 minute and 30 seconds (90 seconds). Keep an eye on it, especially the first few times you make it, as microwave power levels vary.
- Stir Thoroughly: Carefully remove the bowl from the microwave (it will be hot!). Give the oatmeal a good stir. This helps redistribute heat and ensures even cooking, preventing hot spots and uncooked patches.
- Continue Cooking: Return the bowl to the microwave and cook on HIGH for another 1 to 2 minutes. The exact time depends on your microwave’s wattage and your desired consistency. Start with 1 minute, check, and add 30-second increments if needed until the oatmeal is thickened and creamy but still has a slight chew. It will continue to thicken slightly as it rests.
- Rest and Thicken: Once cooked to your liking, carefully remove the bowl from the microwave. Let the oatmeal sit for 1-2 minutes. This resting period allows the oats to fully absorb the liquid and the mixture to thicken further into a perfect consistency.
- Stir in Nuts and Sweetener: Now, stir in your chopped nuts. Add your preferred sweetener (if using) to taste. Start with a small amount and adjust as needed.
- Serve Immediately: Transfer the oatmeal to a serving bowl (or eat directly from the cooking bowl!) and add any additional toppings you desire. Enjoy your warm, nutty, and delicious breakfast!
Nutrition Facts
(Approximate values based on ½ cup rolled oats, 1 cup water, 1 tbsp chopped walnuts, pinch of salt. Values will vary based on specific ingredients like milk type, nut type/amount, and sweeteners.)
- Servings: 1
- Calories per serving: Approximately 250-350 kcal (depending heavily on milk choice, nut type/amount, and added sweeteners/toppings)
Here’s a breakdown of key nutritional highlights:
- Complex Carbohydrates & Fiber: Oatmeal is renowned for its complex carbohydrates, providing sustained energy release rather than a quick sugar spike. It’s particularly rich in soluble fiber, specifically beta-glucan, which is linked to heart health (helps lower cholesterol) and promotes feelings of fullness, aiding in weight management and digestive health. A single serving provides a significant portion of your daily recommended fiber intake.
- Plant-Based Protein: Both oats and nuts contribute plant-based protein, essential for muscle repair, immune function, and overall satiety. While not as high in protein as eggs or meat, this combination offers a respectable amount to start your day, especially if made with milk or soy milk and generous nuts.
- Healthy Fats: The nuts added to this oatmeal are a fantastic source of unsaturated fats (monounsaturated and polyunsaturated), including omega-3 fatty acids (especially in walnuts). These fats are crucial for brain health, reducing inflammation, and supporting heart health.
- Vitamins & Minerals: Oats provide important micronutrients like manganese, phosphorus, magnesium, copper, iron, zinc, folate, and B vitamins (especially B1 – thiamine). Nuts further boost the mineral content, adding more magnesium, copper, and sometimes selenium or vitamin E, depending on the type used.
- Sustained Energy: The combination of fiber, protein, healthy fats, and complex carbohydrates makes this breakfast incredibly satisfying and energy-sustaining. It helps prevent mid-morning energy crashes and keeps you focused and fueled until your next meal.
Preparation Time
- Total Time: Approximately 5-7 minutes
- Prep Time: 1-2 minutes (measuring ingredients)
- Cook Time: 3-5 minutes (microwave cooking and resting)
This Microwave Oatmeal with Nuts recipe is the epitome of a quick and efficient breakfast. The actual hands-on time is minimal, primarily involving measuring the oats and liquid and chopping the nuts (which can even be done ahead of time). The microwave does the heavy lifting in just a few short minutes. The brief resting period is essential for the perfect texture but adds little to the overall time commitment. This speed makes it an ideal choice for busy mornings, post-workout refueling, or even a quick and comforting snack any time of day when you need something warm and nourishing without the fuss of stovetop cooking. Its swiftness is a major advantage over traditional oatmeal methods, without significantly sacrificing taste or nutritional value.
How to Serve
Serving microwave oatmeal is all about customization! While delicious on its own with just nuts, adding toppings elevates the experience in terms of flavor, texture, and nutrition. Here are some ideas, grouped by category:
Fruit Power:
- Fresh Berries: Blueberries, raspberries, sliced strawberries, or blackberries add natural sweetness, vibrant color, and antioxidants.
- Sliced Banana: Adds creaminess and natural sweetness. Especially good when slightly mashed into the warm oatmeal.
- Diced Apple or Pear: Adds a refreshing crunch. Consider sautéing them briefly with cinnamon for a warmer, softer texture.
- Stone Fruit: Sliced peaches, plums, or nectarines (when in season) offer juicy sweetness.
- Dried Fruit: Raisins, cranberries, chopped dates, figs, or apricots provide concentrated sweetness and chewiness. Be mindful of added sugars in some dried fruits.
- Frozen Fruit: Can be stirred directly into the hot oatmeal; they’ll thaw quickly and cool the oatmeal slightly. Mango chunks or mixed berries work well.
Texture & Crunch Boosters:
- More Nuts: Add whole or different types of nuts alongside the chopped ones for varied texture. Toasted nuts offer deeper flavor.
- Seeds: Chia seeds, flax seeds (ground or whole), pumpkin seeds (pepitas), or sunflower seeds add extra fiber, healthy fats, and a pleasant crunch. Chia and flax will also thicken the oatmeal further if stirred in.
- Shredded Coconut: Unsweetened shredded or flaked coconut adds a tropical flavor and delicate texture. Toasting it enhances the nuttiness.
- Granola: A sprinkle of your favorite granola adds extra crunch, sweetness, and often complementary flavors like dried fruit or seeds.
Creaminess & Protein Enhancers:
- Nut Butter: A swirl of peanut butter, almond butter, cashew butter, or sunflower seed butter adds creaminess, healthy fats, and protein.
- Greek Yogurt: A dollop of plain or vanilla Greek yogurt adds tanginess, creaminess, and a significant protein boost. Stir it in after cooking.
- Milk or Cream: An extra splash of milk, cream, or plant-based milk after cooking can adjust the consistency and add richness.
- Protein Powder: Stir in a scoop of your favorite protein powder (whey, casein, or plant-based) after cooking for a major protein increase. You might need to add a little extra liquid.
Flavor Accents:
- Spices: Beyond cinnamon, try nutmeg, cardamom, ginger, or a pinch of cloves for warmth. A pumpkin spice blend is great in the fall.
- Extracts: A few drops of vanilla, almond, or even peppermint extract can add depth of flavor.
- Chocolate: A sprinkle of mini chocolate chips (which will melt slightly), cocoa powder, or cacao nibs for a decadent touch.
- Zest: Lemon or orange zest can add a bright, fresh note that contrasts nicely with the oats and nuts.
Presentation:
- Serve in your favorite bowl.
- Arrange toppings artfully rather than just dumping them on top.
- A final drizzle of maple syrup or honey over the toppings looks appealing.
Mix and match these suggestions based on your preferences and what you have on hand! The possibilities are nearly endless.
Additional Tips
Maximize your microwave oatmeal experience with these eight helpful tips:
- Master the Bowl Size: Seriously, don’t underestimate this. Oatmeal expands significantly as it cooks and traps steam. Using a bowl that’s at least twice, preferably three times, the volume of your ingredients is the single best way to prevent messy boil-overs. A deeper bowl is generally better than a wider, shallower one. If you’re unsure, err on the side of too big.
- Liquid Ratio is Key (and Flexible): The standard 1:2 ratio (oats to liquid) is a great starting point, yielding classic oatmeal consistency. However, feel free to adjust! Prefer thicker, denser oatmeal? Reduce the liquid slightly (e.g., ½ cup oats to ¾ – ⅞ cup liquid). Like it thinner and creamier? Add a splash more liquid (e.g., ½ cup oats to 1 ¼ cup liquid). Experiment to find your perfect texture. Remember, milk creates creamier results than water.
- The Mid-Cook Stir is Non-Negotiable: Microwaves heat unevenly. Stirring halfway through cooking (after the initial 90 seconds) is crucial for breaking up clumps, redistributing heat, and ensuring all the oats cook evenly. Without stirring, you risk getting gummy, undercooked patches and potential hot spots that can cause scorching or boil-overs.
- Don’t Skip the Resting Time: That 1-2 minute rest after cooking isn’t just for cooling. It allows the residual heat to finish cooking the oats gently and, most importantly, gives the starches time to fully hydrate and thicken the oatmeal to its final, luscious consistency. Skipping this step can result in slightly runnier oatmeal.
- Nut Strategy Matters: While you can just toss in chopped nuts at the end, consider these variations:
- Toasting: Briefly toasting nuts (in a dry pan or toaster oven) before chopping deepens their flavor significantly.
- Timing: Adding nuts before cooking softens them slightly. Adding them after cooking preserves their maximum crunch. Try both ways to see what you prefer.
- Variety: Don’t stick to just one type! A mix like walnuts and pecans, or almonds and pistachios, adds complexity.
- Sweeten Smartly: Adding sweeteners after cooking gives you better control over the final taste and prevents sugar from potentially scorching at the bottom of the bowl during cooking. Start small, stir, taste, and add more if needed. Using fruit like mashed banana or unsweetened applesauce can provide natural sweetness without added sugar.
- Embrace Endless Customization: This recipe is a blank canvas. Think beyond nuts and sweeteners. Add seeds (chia, flax, pumpkin) for extra nutrition, spices (cinnamon, nutmeg, cardamom) for warmth, extracts (vanilla, almond) for depth, or even a swirl of nut butter for richness and protein right before serving. Experiment with different liquid types (almond milk, oat milk, soy milk) for varied flavors.
- Meal Prep Your Dry Mix: For ultra-fast mornings, pre-portion the dry ingredients. Combine the rolled oats, pinch of salt, any desired spices (like cinnamon), and even chopped nuts (if you don’t mind them slightly softened during cooking) into individual airtight containers or zip-top bags. In the morning, just dump the mix into your large bowl, add the liquid, and microwave as directed. This shaves off precious seconds when time is tight.
FAQ Section
Here are answers to some frequently asked questions about making Microwave Oatmeal with Nuts:
- Q: Can I use instant oats or steel-cut oats instead of rolled oats?
- A: Instant oats can be used, but they cook much faster (often in just 60-90 seconds total) and result in a much softer, sometimes mushier texture because they are pre-cooked and rolled thinner. Reduce liquid slightly and watch cooking time carefully. Steel-cut oats are generally not suitable for this quick microwave method. They are whole oat groats cut into pieces and require significantly longer cooking times (around 20-30 minutes on the stovetop or specialized microwave techniques involving much longer times and more liquid) to become tender. Stick with rolled (old-fashioned) oats for the best texture with this recipe’s timing.
- Q: My oatmeal always boils over! How do I stop it?
- A: Boil-overs are common but preventable! The primary solution is using a much larger bowl than you think you need (at least 2-3 times the volume of ingredients). Other tips include: reducing the microwave power level slightly (e.g., using 70-80% power instead of HIGH), stirring halfway through cooking, and keeping a close eye on it, especially during the last minute of cooking, so you can pause the microwave if it starts rising too high. Don’t cover the bowl, as this traps steam and encourages boil-overs.
- Q: Does it taste better with water or milk?
- A: This is purely personal preference! Using water results in a lighter oatmeal where the oat flavor is more prominent. It’s lower in calories and fat. Using milk (dairy or plant-based like almond, soy, or oat milk) creates a significantly creamier, richer, and more flavorful oatmeal. It also adds extra protein and calcium (depending on the milk). Many people prefer the taste and texture milk provides, but water works perfectly well if that’s your preference or what you have available. Try both to see which you like best!
- Q: Should I add the nuts before or after microwaving?
- A: You can do either, with slightly different results. Adding nuts before microwaving will soften them slightly as they cook with the oats. Some flavor might infuse into the oatmeal. Adding nuts after microwaving preserves their maximum crunch and distinct nutty flavor. Most people prefer adding them after cooking for the textural contrast, but feel free to experiment.
- Q: Is this recipe gluten-free?
- A: Oats themselves are naturally gluten-free. However, they are often processed in facilities that also handle wheat, barley, and rye, leading to cross-contamination risk. If you need the recipe to be strictly gluten-free (e.g., for celiac disease), ensure you purchase certified gluten-free rolled oats. Always check the packaging. The other typical ingredients (water, milk, nuts, salt, pure maple syrup/honey) are generally gluten-free, but always double-check labels if cross-contamination is a concern.
- Q: Can I make this ahead of time and reheat it?
- A: Yes, you can! Cooked oatmeal can be stored in an airtight container in the refrigerator for up to 3-4 days. It will thicken considerably when cold. To reheat, add a splash of water or milk to loosen it up, then microwave for 60-90 seconds, stirring halfway through, until heated through. You may want to add fresh nuts or toppings after reheating for the best texture. Alternatively, pre-portioning the dry ingredients (as mentioned in the tips) is a great way to prep ahead without pre-cooking.
- Q: How can I make this recipe lower in sugar or sugar-free?
- A: Easily! Simply omit the optional sweetener altogether. Rely on the natural sweetness from toppings like fresh berries or sliced banana. Unsweetened applesauce or a sprinkle of cinnamon can also add flavor without sugar. If you desire more sweetness, consider using a sugar substitute like stevia or erythritol, added to taste after cooking. Always choose unsweetened milk alternatives if using plant-based milk.
- Q: Is this recipe kid-friendly? How can I make it appealing to children?
- A: Absolutely! It’s quick, warm, and highly customizable, which kids often enjoy. To make it more appealing:
- Let them choose their toppings (within reason!). Offer berries, sliced banana, maybe a few chocolate chips, or fun sprinkles.
- Use milk for a creamier texture, which is often preferred by kids.
- Finely chop the nuts or use nut butter instead if large nut pieces are a concern (choking hazard for very young children or texture issue).
- Arrange toppings into a smiley face or fun pattern.
- Start with a smaller amount of sweetener and adjust to their liking, prioritizing fruit for sweetness.
- Ensure it’s cooled down sufficiently before serving.
- A: Absolutely! It’s quick, warm, and highly customizable, which kids often enjoy. To make it more appealing:

Microwave Oatmeal with Nuts
Ingredients
Here’s what you’ll need to create this quick and satisfying breakfast staple:
- ½ cup Rolled Oats (Old-Fashioned Oats): These oats provide a pleasant chewy texture that holds up well in the microwave without becoming overly mushy. Avoid steel-cut oats (they won’t cook through) and be mindful that instant oats will cook much faster and result in a softer texture.
- 1 cup Liquid (Water, Milk, or Plant-Based Milk): Water creates a lighter oatmeal, while milk (dairy, almond, soy, oat, etc.) yields a creamier, richer result. The choice depends entirely on your preference and dietary needs. Using a 1:2 ratio of oats to liquid is a standard starting point, adjustable for desired consistency.
- 1–2 tablespoons Chopped Nuts: This is where the crunch and healthy fats come in! Use your favorite nuts – almonds, walnuts, pecans, pistachios, or a mix. Chopping them ensures they integrate well and provide texture in every bite. Raw or toasted nuts both work wonderfully.
- Pinch of Salt: Don’t skip this! A tiny amount of salt enhances the natural flavors of the oats and balances the sweetness, preventing the oatmeal from tasting flat.
- Optional Sweetener (to taste): Maple syrup, honey, brown sugar, agave nectar, stevia, or even a mashed banana can be used. Add it after cooking for better control over the sweetness level. Start with a small amount (like 1 teaspoon) and adjust.
- Optional Flavor Enhancers: A dash of cinnamon, nutmeg, vanilla extract, or cardamom can elevate the flavor profile significantly. Add these along with the oats and liquid before cooking.
Instructions
Follow these simple steps for perfectly cooked microwave oatmeal every time:
- Choose Your Bowl Wisely: Select a microwave-safe bowl that is significantly larger than you think you need – at least double the volume of your ingredients (e.g., a 4-cup capacity bowl for ½ cup oats and 1 cup liquid). This is crucial to prevent the oatmeal from boiling over and creating a mess in your microwave.
- Combine Core Ingredients: Add the rolled oats, your chosen liquid (water or milk), and the pinch of salt to the large bowl. If using optional flavor enhancers like cinnamon or vanilla extract, add them now. Stir everything together briefly to ensure the oats are fully submerged in the liquid.
- Microwave on High: Place the bowl, uncovered, into the microwave. Cook on HIGH power for 1 minute and 30 seconds (90 seconds). Keep an eye on it, especially the first few times you make it, as microwave power levels vary.
- Stir Thoroughly: Carefully remove the bowl from the microwave (it will be hot!). Give the oatmeal a good stir. This helps redistribute heat and ensures even cooking, preventing hot spots and uncooked patches.
- Continue Cooking: Return the bowl to the microwave and cook on HIGH for another 1 to 2 minutes. The exact time depends on your microwave’s wattage and your desired consistency. Start with 1 minute, check, and add 30-second increments if needed until the oatmeal is thickened and creamy but still has a slight chew. It will continue to thicken slightly as it rests.
- Rest and Thicken: Once cooked to your liking, carefully remove the bowl from the microwave. Let the oatmeal sit for 1-2 minutes. This resting period allows the oats to fully absorb the liquid and the mixture to thicken further into a perfect consistency.
- Stir in Nuts and Sweetener: Now, stir in your chopped nuts. Add your preferred sweetener (if using) to taste. Start with a small amount and adjust as needed.
- Serve Immediately: Transfer the oatmeal to a serving bowl (or eat directly from the cooking bowl!) and add any additional toppings you desire. Enjoy your warm, nutty, and delicious breakfast!
Nutrition
- Serving Size: one normal portion
- Calories: 350