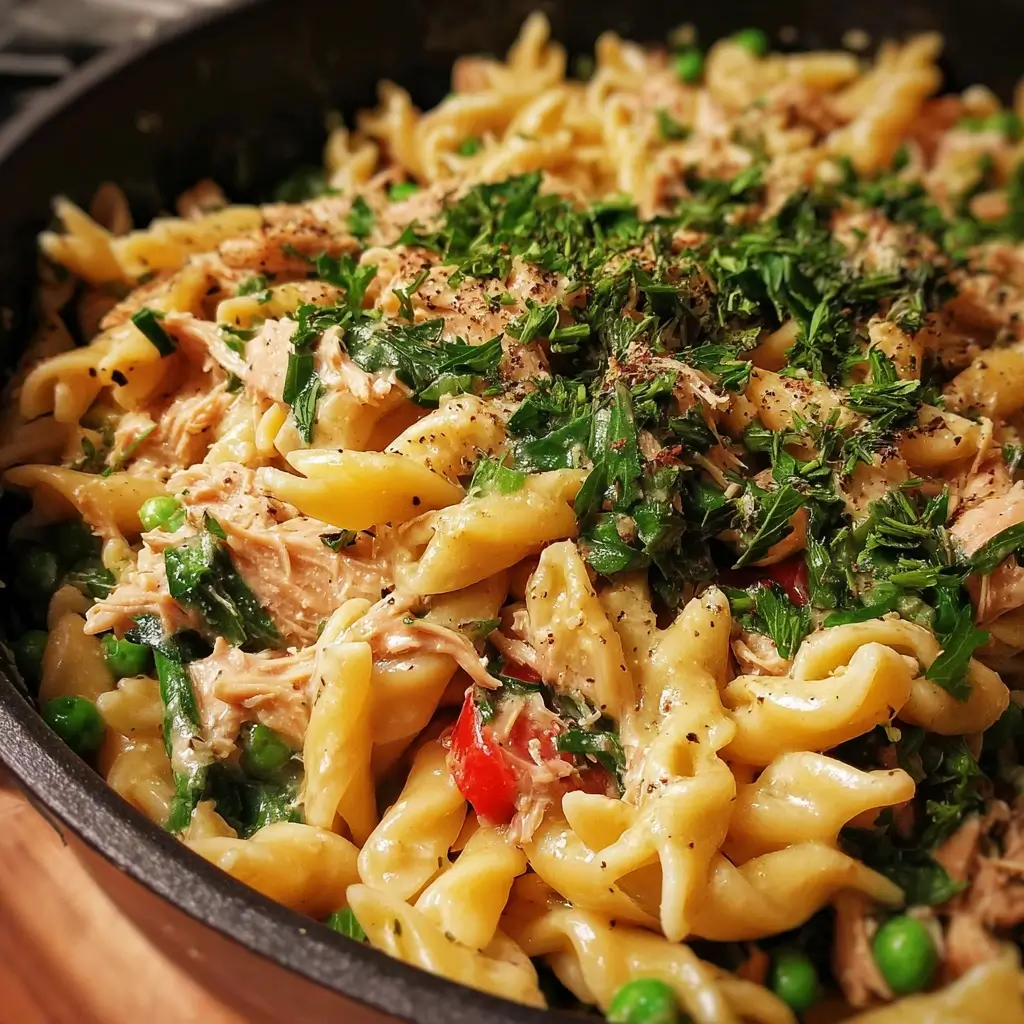
Of all the recipes in my weeknight dinner rotation, this One-Pot Tuna and Veggie Pasta holds a special, almost sacred place. It was born out of a classic “what’s in the pantry?” challenge on a Tuesday evening when energy was low, but the demand for a satisfying and healthy meal was high. I remember staring at a can of tuna, a handful of cherry tomatoes, a lone zucchini, and a box of pasta, and thinking, “There has to be a way to make this work without dirtying every pot and pan I own.” The result was so much more than just a meal; it was a revelation. The first time I served it, my family was skeptical—tuna pasta can be so hit or miss. But as they took their first bites, the skepticism melted away, replaced by murmurs of appreciation. The sauce was creamy without any heavy cream, the vegetables were tender-crisp, and the tuna provided a savory, protein-packed punch. Now, it’s a requested favorite. It’s the meal we turn to when we need comfort, convenience, and nutrition all in one glorious, easy-to-clean pot. It’s a testament to the fact that simple, humble ingredients can come together to create something truly spectacular, proving that a delicious, home-cooked meal doesn’t need to be complicated or time-consuming.
The Ultimate One-Pot Tuna and Veggie Pasta: A Weeknight Hero
This recipe is designed for maximum flavor and minimum cleanup. It’s a complete meal in a single pot, combining protein, carbohydrates, and a generous serving of vegetables. The magic happens as the pasta cooks directly in the sauce, releasing its starches to create a luscious, creamy texture that beautifully coats every single ingredient. Forget juggling multiple pans and timers; this is streamlined cooking at its finest.
Ingredients for Your One-Pot Masterpiece
Here is everything you’ll need to create this delicious and satisfying meal. Using quality ingredients will elevate the final dish, but this recipe is also incredibly forgiving and works beautifully with standard pantry staples.
- Olive Oil: 2 tablespoons, extra virgin. This forms the flavorful base for sautéing our aromatics.
- Yellow Onion: 1 medium, finely diced. Provides a sweet, aromatic foundation for the sauce.
- Garlic: 4 cloves, minced. For that essential, pungent kick that complements the tuna and tomatoes.
- Zucchini: 1 medium, chopped into ½-inch pieces. Adds a wonderful texture and a dose of green goodness.
- Cherry Tomatoes: 1 pint (about 2 cups), halved. These burst during cooking, releasing their sweet juices to form the heart of the sauce.
- Dried Oregano: 1 teaspoon. An essential Mediterranean herb that pairs perfectly with tomatoes and tuna.
- Red Pepper Flakes: ¼ teaspoon (or more, to taste). For a gentle background warmth. Feel free to adjust based on your spice preference.
- Vegetable or Chicken Broth: 4 cups, low-sodium. This is our primary cooking liquid. Using low-sodium broth gives you more control over the final saltiness.
- Short Pasta: 12 ounces (340g), such as penne, fusilli, or rotini. The ridges and twists of these shapes are perfect for catching the creamy sauce.
- Canned Tuna: 2 (5-ounce) cans, packed in olive oil, drained. Using tuna packed in oil provides a richer flavor and more tender texture.
- Frozen Peas: 1 cup. Added at the end for a pop of sweetness and color. No need to thaw them first.
- Baby Spinach: 3 large handfuls (about 3 cups, packed). Wilts down into the sauce, adding nutrients and vibrant color.
- Parmesan Cheese: ½ cup, freshly grated, plus more for serving. The secret ingredient for creaminess and a salty, umami flavor.
- Lemon: 1, juice and zest. The zest brightens the entire dish, and a squeeze of juice at the end cuts through the richness.
- Fresh Parsley: ¼ cup, chopped, for garnish. Adds a final touch of freshness.
- Salt and Black Pepper: To taste. Essential for seasoning every layer of the dish.
Step-by-Step Instructions for Perfect One-Pot Pasta
Follow these instructions carefully to ensure your pasta is cooked perfectly and the sauce achieves the ideal creamy consistency. The key is to trust the process and allow the starches from the pasta to do their work.
- Sauté the Aromatics: Place a large pot or Dutch oven over medium heat. Add the 2 tablespoons of olive oil. Once the oil is shimmering, add the diced yellow onion and a pinch of salt. Cook, stirring occasionally, for 4-5 minutes until the onion has softened and become translucent. Add the minced garlic, dried oregano, and red pepper flakes. Cook for another minute until fragrant, being careful not to burn the garlic. This initial step builds a crucial layer of flavor.
- Cook the Vegetables: Add the chopped zucchini and halved cherry tomatoes to the pot. Stir to combine with the onions and garlic. Cook for about 5-7 minutes, stirring occasionally. The zucchini will begin to soften, and the tomatoes will start to break down and release their juices. This process is the beginning of your tomato-based sauce.
- Add Liquid and Pasta: Pour in the 4 cups of low-sodium broth. Turn the heat up to high and bring the mixture to a rolling boil. Once boiling, add the 12 ounces of uncooked short pasta. Stir everything together well, making sure all the pasta is submerged in the liquid.
- Cook the Pasta: Reduce the heat to a vigorous simmer (medium-high). Cook according to the pasta package directions for al dente, stirring every 2-3 minutes to prevent the pasta from sticking to the bottom of the pot. It’s important to keep the liquid at a strong simmer to ensure the pasta cooks evenly. Most short pastas will take about 10-12 minutes.
- Incorporate the Final Ingredients: About 2 minutes before the pasta is finished cooking, stir in the drained canned tuna, the frozen peas, and the large handfuls of baby spinach. The heat from the pasta and sauce will quickly cook the peas and wilt the spinach. Continue to stir until the spinach has fully wilted into the sauce.
- Create the Creamy Sauce: Turn off the heat. The pasta should be al dente, and there should still be a small amount of starchy liquid at the bottom of the pot—this is liquid gold! Do not drain it. Add the ½ cup of grated Parmesan cheese and the zest and juice of one lemon. Stir vigorously for about 1 minute. The residual heat will melt the cheese, and the starchy pasta water will emulsify with the cheese and broth to create a surprisingly creamy and luscious sauce.
- Season and Serve: Taste the pasta and season generously with salt and freshly ground black pepper as needed. The amount of salt will depend on the saltiness of your broth and tuna. Ladle the hot pasta into bowls, garnish with fresh parsley and an extra sprinkle of Parmesan cheese. Serve immediately and enjoy.
Nutrition Facts
This dish offers a well-rounded nutritional profile, making it a smart choice for a balanced meal.
- Servings: 6 servings
- Calories per serving: Approximately 480 kcal
- Protein (28g): A fantastic source of high-quality protein from the tuna and cheese, crucial for muscle repair, growth, and keeping you feeling full and satisfied.
- Omega-3 Fatty Acids: The tuna provides a significant amount of Omega-3s, which are essential fats that support brain health, reduce inflammation, and promote a healthy cardiovascular system.
- Fiber (7g): With whole vegetables like zucchini, spinach, tomatoes, and peas, this dish is rich in dietary fiber, which aids in digestion and helps maintain stable blood sugar levels.
- Vitamin C: The tomatoes, spinach, and lemon juice contribute a healthy dose of Vitamin C, a powerful antioxidant that supports the immune system and skin health.
- Complex Carbohydrates: The pasta provides sustained energy, making this a great meal to refuel after a long day or before physical activity.
Preparation Time
This recipe is designed for speed and efficiency, perfect for busy weeknights.
- Prep Time: 10-15 minutes (for dicing the onion, mincing garlic, and chopping vegetables).
- Cook Time: 20-25 minutes.
- Total Time: Approximately 35 minutes from start to finish. Having all your ingredients prepped and ready (a concept known as “mise en place”) will make the cooking process seamless and even faster.
How to Serve Your Tuna and Veggie Pasta
While this dish is a fantastic all-in-one meal, you can easily elevate it with the right accompaniments and garnishes.
- Garnishes for a Finishing Touch:
- Extra Parmesan: A generous shaving of high-quality Parmesan or Pecorino Romano cheese adds a final salty, nutty bite.
- Fresh Herbs: Beyond parsley, a sprinkle of fresh basil or dill can introduce a new and delicious flavor profile.
- A Drizzle of Olive Oil: A final drizzle of a high-quality, peppery extra virgin olive oil can enhance the richness and flavor.
- Toasted Breadcrumbs: For a delightful crunch, toast some panko breadcrumbs in a dry skillet until golden brown and sprinkle them over the top just before serving.
- Perfect Side Dishes:
- Crusty Bread: A slice of warm, crusty garlic bread or a simple baguette is essential for sopping up any remaining creamy sauce at the bottom of the bowl.
- Simple Green Salad: A light salad with a simple lemon vinaigrette can provide a crisp, fresh contrast to the rich and savory pasta. Think arugula, cucumber, and a light dressing.
- Roasted Asparagus: If you have an extra 15 minutes, roasting some asparagus spears with a little olive oil and salt makes for an elegant and healthy side.
- Beverage Pairings:
- White Wine: A crisp, dry white wine like a Sauvignon Blanc or Pinot Grigio pairs beautifully, as its acidity cuts through the creaminess of the sauce.
- Light Beer: A simple lager or pilsner is a refreshing and casual choice that won’t overpower the flavors of the dish.
- Non-Alcoholic: A sparkling water with a squeeze of fresh lemon or a glass of unsweetened iced tea are excellent non-alcoholic options.
Additional Tips for a Perfect Pot of Pasta
These eight tips will help you master this recipe and customize it to your liking, ensuring delicious results every time.
- The Secret to Creaminess is Starchy Water: The most important tip is to not drain the pasta. The liquid left in the pot after the pasta has cooked is full of starch. This starchy water is the key ingredient that emulsifies with the Parmesan cheese to create a restaurant-quality creamy sauce without adding any heavy cream or milk. If your sauce looks a little too thin at first, just keep stirring off the heat—it will thicken up.
- Choose the Right Pot: A wide, heavy-bottomed pot or a Dutch oven is ideal. The wide surface area ensures the pasta cooks in a relatively even layer, rather than being piled up, which helps it cook more evenly. A heavy bottom prevents scorching and distributes heat more effectively.
- Don’t Be Afraid to Adjust Liquid: Depending on the brand of pasta, the exact shape, and the intensity of your simmer, you might find you need a little more liquid. Keep some extra warm broth or hot water on standby. If the pan looks dry before the pasta is cooked, add a splash of liquid. Conversely, if it looks too soupy at the end, let it simmer for an extra minute or two with the lid off to reduce.
- Unlock More Flavor by Draining (or Not Draining) the Tuna: For a cleaner, less “fishy” flavor, drain the tuna very well. For a richer, more deeply savory and complex flavor, use tuna packed in high-quality olive oil and add a tablespoon or two of that flavorful oil into the pot along with the tuna. It adds a wonderful depth.
- Veggie Variations are Endless: This recipe is a fantastic base for whatever vegetables you have in your fridge. Consider adding chopped bell peppers with the onions, mushrooms with the zucchini, or a can of drained artichoke hearts along with the tuna. You can also substitute kale for the spinach.
- The Power of an Acidic Finish: Don’t skip the lemon! The final squeeze of fresh lemon juice and zest might seem like a small step, but it’s transformative. The acid cuts through the richness of the cheese and tuna and brightens all the flavors, making the entire dish taste fresher and more vibrant.
- Spice it Up or Down: This recipe is easily adaptable to your family’s spice tolerance. For more heat, increase the red pepper flakes or add a dash of cayenne pepper. For a different flavor profile, try adding a ½ teaspoon of smoked paprika along with the oregano for a smoky depth.
- For Best Results, Grate Your Own Cheese: While pre-shredded Parmesan is convenient, it’s often coated in anti-caking agents like cellulose, which prevent it from melting smoothly into sauces. Grating a block of Parmesan cheese yourself will result in a much creamier, smoother sauce without any grittiness.
Frequently Asked Questions (FAQ)
Here are answers to some common questions you might have about this one-pot tuna and veggie pasta recipe.
1. Can I make this recipe gluten-free?
Absolutely! This recipe works wonderfully with gluten-free pasta. Simply substitute your favorite brand of gluten-free short pasta, like one made from chickpeas, lentils, or brown rice. Keep in mind that gluten-free pastas can sometimes absorb more liquid and may have slightly different cooking times, so follow the package directions and be prepared to add an extra splash of broth if needed.
2. Can I use fresh tuna instead of canned?
Yes, you can use fresh tuna, but it will change the cooking process slightly. You would sear a fresh tuna steak (seasoned with salt and pepper) in the pot first, remove it, and then proceed with the recipe. Once the pasta is cooked, flake the seared tuna and stir it in at the very end, just as you would with the canned version.
3. My sauce is too thin/thick, how do I fix it?
This is an easy fix! If your sauce is too thin, it likely means the pasta didn’t release enough starch or there’s too much liquid. Let it simmer for a few more minutes with the lid off to allow some of the liquid to evaporate and thicken. You can also stir in an extra tablespoon or two of Parmesan cheese. If the sauce is too thick or dry, simply stir in a splash of warm broth or hot water until it reaches your desired consistency.
4. Can I make this recipe dairy-free?
Yes. To make it dairy-free, simply omit the Parmesan cheese. To replicate the creaminess, you can stir in 2-3 tablespoons of nutritional yeast at the end, which will add a cheesy, umami flavor. Alternatively, a spoonful of dairy-free cream cheese or a splash of unsweetened cashew cream can also create a wonderfully creamy texture.
5. How do I store and reheat leftovers?
Store any leftover pasta in an airtight container in the refrigerator for up to 3 days. To reheat, you can use a microwave, but the best method is to gently reheat it in a skillet over medium-low heat. Add a splash of water or broth to loosen up the sauce and bring it back to its original creamy consistency as it warms through.
6. Is this recipe kid-friendly?
This recipe is very popular with kids! The creamy sauce, familiar pasta shapes, and mild flavors are generally a hit. If your children are sensitive to spice, you can omit the red pepper flakes. You can also finely dice the vegetables so they blend into the sauce more, or even use a food processor to pulse the onion and zucchini before cooking.
7. What’s the best type of canned tuna to use?
The quality of your tuna makes a big difference. For the best flavor and texture, look for solid light or albacore tuna packed in olive oil. Tuna packed in oil is generally more moist and flavorful than tuna packed in water. If you only have tuna in water, that’s perfectly fine, but you may want to add an extra drizzle of olive oil to the dish to compensate for the lack of fat.
8. Can I freeze this one-pot pasta?
While you can freeze it, be aware that the texture of the pasta may change upon thawing and reheating, becoming slightly softer or mushier. The sauce may also separate a bit. If you do choose to freeze it, let it cool completely and store it in a freezer-safe container. Thaw it in the refrigerator overnight before reheating gently on the stovetop with a splash of liquid. For best results, it’s a dish best enjoyed fresh.