Summer in our home isn’t just a season; it’s a feeling. It’s the warmth of the sun on your skin, the laughter echoing from the backyard, and most importantly, the explosion of flavors from fresh, seasonal produce. Amongst all the summer delights, one dessert has become an absolute staple: Quick Berry Cream Cups. Honestly, these little cups of joy are nothing short of magical. The first time I whipped them up, it was on a whim, needing a fast yet impressive dessert for an impromptu family barbecue. The reaction was immediate and unanimous – pure delight. My kids, usually picky eaters, devoured them with gusto, their faces smeared with berry juice and cream. My husband, a self-proclaimed dessert connoisseur, declared them “perfectly balanced and utterly irresistible.” Since then, Quick Berry Cream Cups have become our go-to summer treat. They are incredibly easy to make, require minimal ingredients, and are always a crowd-pleaser. Whether you’re hosting a fancy dinner party or simply craving a sweet treat on a hot afternoon, these berry cream cups are guaranteed to bring a smile to your face. Prepare to be amazed by how something so simple can taste so incredibly delicious!
Ingredients for Quick Berry Cream Cups
This recipe is all about fresh, quality ingredients. Here’s what you’ll need to create these delightful berry cream cups:
- Fresh Berries (5 cups): A mix of your favorite berries is key! Think strawberries (hulled and sliced or quartered, depending on size), blueberries, raspberries, and blackberries. Using a variety adds complexity in flavor and visual appeal. Fresh berries are essential for that burst of summer sweetness and vibrant color.
- Heavy Cream (2 cups): The foundation of our creamy delight. Heavy cream, also known as whipping cream, is crucial for achieving that rich, fluffy texture. Make sure it’s cold for optimal whipping.
- Powdered Sugar (1/4 cup): Also known as confectioners’ sugar, powdered sugar dissolves smoothly into the cold cream, providing sweetness without any graininess. Adjust the amount to your sweetness preference.
- Vanilla Extract (1 teaspoon): A touch of vanilla extract enhances the overall flavor profile, adding warmth and depth to the cream. Use pure vanilla extract for the best taste.
- Lemon Zest (1 teaspoon): Finely grated lemon zest adds a bright, citrusy note that cuts through the richness of the cream and complements the berries beautifully. Use only the yellow part of the lemon peel, avoiding the bitter white pith.
- Optional Base (Ladyfingers, Shortbread Cookies, or Angel Food Cake – as needed): For an extra layer of texture and flavor, you can add a base to your cups. Ladyfingers offer a light and airy sponge cake texture, shortbread cookies provide a buttery crunch, and angel food cake brings a delicate sweetness. Choose your favorite or skip it for a lighter dessert.
Instructions: Crafting Your Berry Cream Cups
Making these Quick Berry Cream Cups is incredibly simple and fast. Follow these easy steps for a perfect dessert every time:
- Prepare the Berries: Gently wash and dry all your chosen berries. Hull the strawberries and slice or quarter them depending on their size. If using larger blackberries, you might want to halve or quarter them as well. Combine all the prepared berries in a bowl. Set aside a small handful of the most beautiful berries for garnishing the finished cups later.
- Zest the Lemon: Wash a lemon thoroughly. Using a microplane or fine grater, carefully zest about a teaspoon of lemon zest, ensuring you only grate the yellow part of the peel and avoid the white pith underneath, which can be bitter. Set the lemon zest aside.
- Whip the Cream: In a large, chilled mixing bowl, pour in the cold heavy cream. It’s crucial that both the bowl and the cream are cold for the cream to whip up properly and quickly. Using an electric mixer (hand mixer or stand mixer with the whisk attachment), begin to whip the cream on medium speed.
- Add Sweetness and Flavor: As the cream starts to thicken and form soft peaks (this usually takes a couple of minutes), gradually add the powdered sugar and vanilla extract. Continue to whip the cream on medium-high speed until stiff peaks form. Stiff peaks mean that when you lift the whisk, the peaks of whipped cream stand straight up and don’t collapse. Be careful not to overwhip, as this can turn the cream grainy or buttery.
- Fold in Lemon Zest: Once the cream has reached stiff peaks, gently fold in the prepared lemon zest using a spatula. Folding is a gentle mixing technique that preserves the airiness of the whipped cream. Stir just until the lemon zest is evenly distributed.
- Assemble the Berry Cream Cups: Now it’s time to assemble your delightful cups! You can use individual dessert cups, small glasses, or even mason jars.
- With a Base (Optional): If you’re using a base, place a layer of ladyfingers, crumbled shortbread cookies, or cubed angel food cake at the bottom of each cup. You can lightly soak the ladyfingers or angel food cake with a touch of fruit juice or liqueur for extra moisture and flavor if desired, though it’s not necessary.
- Layer with Berries and Cream: Spoon a generous layer of the mixed fresh berries over the base (or directly into the cup if you’re skipping the base). Then, top the berries with a generous dollop of the freshly whipped lemon-vanilla cream.
- Garnish and Chill: Garnish each cup with a few of the reserved beautiful berries. For an extra touch of elegance, you can add a sprinkle of extra lemon zest, a mint leaf, or a dusting of powdered sugar. Refrigerate the assembled berry cream cups for at least 30 minutes before serving. Chilling allows the flavors to meld together and the cream to set slightly, making them even more refreshing and delicious. They can be chilled for up to 2-3 hours before serving.
- Serve and Enjoy! Serve your chilled Quick Berry Cream Cups and watch the smiles bloom! These are best enjoyed fresh, but can be stored in the refrigerator for up to a day, although the berries might release some juices over time.
Nutrition Facts (per serving)
Please note that these are estimated nutrition facts and can vary based on specific ingredients and serving sizes. This is based on a serving size of approximately one cup of berry cream cup, including a small ladyfinger base.
- Servings: Approximately 6 servings
- Calories per serving: 250-300 kcal
- Total Fat: 20-25g
(Disclaimer: Nutritional information is an estimate and should be considered as a guideline only. For precise nutritional information, use a nutrition calculator with the specific brands and quantities of ingredients used.)
Preparation Time: A Dessert in Minutes
Quick Berry Cream Cups truly live up to their name. The active preparation time for this recipe is incredibly short, making it perfect for busy days or last-minute dessert needs.
- Prep time: 15 minutes
- Chill time: 30 minutes (minimum, optional but recommended)
- Total time: 45 minutes (including chill time)
From start to finish, including chilling, you can have these refreshing and delightful desserts ready in under 45 minutes. The actual hands-on time is even less – just about 15 minutes of active work! This makes it a fantastic option when you need a quick and impressive dessert without spending hours in the kitchen.
How to Serve Your Quick Berry Cream Cups
These versatile berry cream cups can be served in numerous delightful ways, making them suitable for various occasions:
- Classic Dessert: Serve them chilled as a simple and elegant dessert after lunch or dinner. Their refreshing taste is perfect for concluding a summer meal.
- Summer Party Treat: Ideal for summer barbecues, picnics, or garden parties. Prepare them ahead of time and transport them in a cooler to keep them chilled.
- Individual Dessert Shooters: For a more sophisticated presentation, layer the berries and cream in small dessert shooter glasses. This is perfect for cocktail parties or upscale events.
- Breakfast or Brunch Delight: Enjoy them as a lighter, sweeter option for brunch. They pair wonderfully with coffee or tea and offer a refreshing start to the day.
- Kids’ Party Favorite: A guaranteed hit at children’s parties! Kids love the sweetness and the vibrant colors of the berries. You can even let them help assemble their own cups for a fun activity.
- Top with Extra Goodies: Enhance the presentation and flavor by topping with a sprinkle of toasted nuts (almonds, pecans, or walnuts), a drizzle of honey or maple syrup, a dusting of cocoa powder, or a few chocolate shavings.
- Alongside Other Desserts: Serve them as part of a dessert buffet alongside other summer treats like fruit tarts, ice cream, or sorbet for a varied and appealing dessert spread.
- With a Beverage Pairing: Pair them with a light and crisp white wine like Moscato or Riesling, a sparkling rosé, or a refreshing iced tea or lemonade for a complete and delightful experience.
Additional Tips for Perfect Berry Cream Cups
Elevate your Quick Berry Cream Cups to the next level with these helpful tips:
- Use Cold Ingredients: Ensure both your heavy cream and mixing bowl are thoroughly chilled before whipping the cream. Cold ingredients whip up faster and result in a firmer, more stable whipped cream. You can even chill your whisk or beaters for even better results.
- Don’t Overwhip the Cream: Watch the cream carefully while whipping. Stop as soon as stiff peaks form. Overwhipping can cause the cream to become grainy and eventually turn into butter. If you accidentally overwhip slightly, you can try gently folding in a tablespoon or two of fresh, cold heavy cream to loosen it up.
- Berry Variety is Key: Don’t be afraid to experiment with different combinations of berries. Consider adding other seasonal fruits like sliced peaches, nectarines, or plums for a delightful twist. Seasonal fruit will always be at its peak flavor and sweetness.
- Sweetness Adjustment: Adjust the amount of powdered sugar to your preference. If your berries are very sweet, you might want to reduce the sugar slightly. Taste the whipped cream before assembling and adjust as needed.
- Make it Dairy-Free: For a dairy-free version, substitute the heavy cream with chilled full-fat coconut cream. Scoop out the thick cream from the top of a chilled can of full-fat coconut milk and whip it up just like heavy cream. It will provide a similar rich and creamy texture.
- Add a Liqueur Kick (For Adults): For an adult twist, consider adding a tablespoon of liqueur to the whipped cream or drizzling a little over the berries. Grand Marnier, Chambord (raspberry liqueur), or a berry-flavored liqueur would complement the flavors beautifully.
- Prepare Ahead (Partially): You can prepare the whipped cream and the berries separately in advance. Store the whipped cream in an airtight container in the refrigerator for up to a day. Prepare the berries and store them separately as well. Assemble the cups just before serving for the best texture and freshness.
- Elevate with Toppings: Get creative with toppings to add extra texture and flavor. Consider adding a sprinkle of granola, crushed meringue cookies, chopped nuts, shredded coconut, or a drizzle of chocolate sauce or caramel for a more decadent treat.
Frequently Asked Questions (FAQ) about Quick Berry Cream Cups
Here are some common questions about making and enjoying Quick Berry Cream Cups:
Q1: Can I use frozen berries instead of fresh berries?
A: While fresh berries are highly recommended for the best flavor and texture, you can use frozen berries in a pinch. If using frozen berries, thaw them completely and drain off any excess juice before using. Keep in mind that thawed frozen berries might be softer and release more liquid than fresh berries.
Q2: Can I make these berry cream cups ahead of time?
A: Yes, you can prepare the whipped cream and the berries separately up to a day in advance. However, it’s best to assemble the cups shortly before serving (within a few hours) to maintain the best texture of the cream and prevent the berries from making the base soggy (if using one). If you assemble them further in advance, the berries might release juices and soften any base you’ve used.
Q3: How long will these berry cream cups last in the refrigerator?
A: Assembled berry cream cups are best enjoyed within 2-3 hours of assembly for optimal texture and freshness. They can be stored in the refrigerator for up to a day, but the berries may release some juice, and the whipped cream might slightly deflate over time. The flavor will still be delicious, but the texture might be slightly altered.
Q4: Can I use a different type of sweetener instead of powdered sugar?
A: Yes, you can use granulated sugar, but powdered sugar is preferred as it dissolves more easily into cold cream and creates a smoother texture. If using granulated sugar, make sure it dissolves completely by whipping for a bit longer. You can also use liquid sweeteners like honey or maple syrup, but be mindful that they will add extra liquid and might slightly alter the texture of the whipped cream. Start with a smaller amount and adjust to taste.
Q5: What are some good substitutes for ladyfingers or shortbread cookies as a base?
A: If you don’t have ladyfingers or shortbread cookies, you can use a variety of other bases. Good substitutes include: angel food cake, pound cake, sponge cake, graham crackers, vanilla wafers, or even a layer of granola for a crunchy base. You can also skip the base entirely for a lighter dessert.
Q6: Can I make these berry cream cups vegan?
A: Yes, you can easily make vegan berry cream cups. Substitute the heavy cream with chilled full-fat coconut cream (as mentioned in the tips). Ensure any base you use (like cookies or cake) is also vegan. You can find vegan ladyfingers or shortbread cookies in some stores, or use a vegan sponge cake or granola base.
Q7: How do I prevent the whipped cream from becoming grainy?
A: The key to preventing grainy whipped cream is to avoid overwhipping. Watch the cream closely as you whip it, and stop as soon as stiff peaks form. Using cold cream and a chilled bowl also helps. If you are using powdered sugar, sift it before adding it to the cream to prevent lumps, which can sometimes contribute to a grainy texture.
Q8: Can I add other flavors to the whipped cream besides vanilla and lemon zest?
A: Absolutely! Feel free to experiment with other flavors in your whipped cream. Some delicious additions include: almond extract, orange zest, a pinch of cinnamon, a tablespoon of cocoa powder for a chocolate cream, or a splash of coffee liqueur for a coffee-flavored cream. Get creative and customize the flavors to your liking!
Print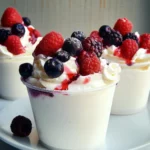
Quick Berry Cream Cups
Ingredients
This recipe is all about fresh, quality ingredients. Here’s what you’ll need to create these delightful berry cream cups:
- Fresh Berries (5 cups): A mix of your favorite berries is key! Think strawberries (hulled and sliced or quartered, depending on size), blueberries, raspberries, and blackberries. Using a variety adds complexity in flavor and visual appeal. Fresh berries are essential for that burst of summer sweetness and vibrant color.
- Heavy Cream (2 cups): The foundation of our creamy delight. Heavy cream, also known as whipping cream, is crucial for achieving that rich, fluffy texture. Make sure it’s cold for optimal whipping.
- Powdered Sugar (1/4 cup): Also known as confectioners’ sugar, powdered sugar dissolves smoothly into the cold cream, providing sweetness without any graininess. Adjust the amount to your sweetness preference.
- Vanilla Extract (1 teaspoon): A touch of vanilla extract enhances the overall flavor profile, adding warmth and depth to the cream. Use pure vanilla extract for the best taste.
- Lemon Zest (1 teaspoon): Finely grated lemon zest adds a bright, citrusy note that cuts through the richness of the cream and complements the berries beautifully. Use only the yellow part of the lemon peel, avoiding the bitter white pith.
- Optional Base (Ladyfingers, Shortbread Cookies, or Angel Food Cake – as needed): For an extra layer of texture and flavor, you can add a base to your cups. Ladyfingers offer a light and airy sponge cake texture, shortbread cookies provide a buttery crunch, and angel food cake brings a delicate sweetness. Choose your favorite or skip it for a lighter dessert.
Instructions
Making these Quick Berry Cream Cups is incredibly simple and fast. Follow these easy steps for a perfect dessert every time:
- Prepare the Berries: Gently wash and dry all your chosen berries. Hull the strawberries and slice or quarter them depending on their size. If using larger blackberries, you might want to halve or quarter them as well. Combine all the prepared berries in a bowl. Set aside a small handful of the most beautiful berries for garnishing the finished cups later.
- Zest the Lemon: Wash a lemon thoroughly. Using a microplane or fine grater, carefully zest about a teaspoon of lemon zest, ensuring you only grate the yellow part of the peel and avoid the white pith underneath, which can be bitter. Set the lemon zest aside.
- Whip the Cream: In a large, chilled mixing bowl, pour in the cold heavy cream. It’s crucial that both the bowl and the cream are cold for the cream to whip up properly and quickly. Using an electric mixer (hand mixer or stand mixer with the whisk attachment), begin to whip the cream on medium speed.
- Add Sweetness and Flavor: As the cream starts to thicken and form soft peaks (this usually takes a couple of minutes), gradually add the powdered sugar and vanilla extract. Continue to whip the cream on medium-high speed until stiff peaks form. Stiff peaks mean that when you lift the whisk, the peaks of whipped cream stand straight up and don’t collapse. Be careful not to overwhip, as this can turn the cream grainy or buttery.
- Fold in Lemon Zest: Once the cream has reached stiff peaks, gently fold in the prepared lemon zest using a spatula. Folding is a gentle mixing technique that preserves the airiness of the whipped cream. Stir just until the lemon zest is evenly distributed.
- Assemble the Berry Cream Cups: Now it’s time to assemble your delightful cups! You can use individual dessert cups, small glasses, or even mason jars.
- With a Base (Optional): If you’re using a base, place a layer of ladyfingers, crumbled shortbread cookies, or cubed angel food cake at the bottom of each cup. You can lightly soak the ladyfingers or angel food cake with a touch of fruit juice or liqueur for extra moisture and flavor if desired, though it’s not necessary.
- Layer with Berries and Cream: Spoon a generous layer of the mixed fresh berries over the base (or directly into the cup if you’re skipping the base). Then, top the berries with a generous dollop of the freshly whipped lemon-vanilla cream.
- Garnish and Chill: Garnish each cup with a few of the reserved beautiful berries. For an extra touch of elegance, you can add a sprinkle of extra lemon zest, a mint leaf, or a dusting of powdered sugar. Refrigerate the assembled berry cream cups for at least 30 minutes before serving. Chilling allows the flavors to meld together and the cream to set slightly, making them even more refreshing and delicious. They can be chilled for up to 2-3 hours before serving.
- Serve and Enjoy! Serve your chilled Quick Berry Cream Cups and watch the smiles bloom! These are best enjoyed fresh, but can be stored in the refrigerator for up to a day, although the berries might release some juices over time.
Nutrition
- Serving Size: one normal portion
- Calories: 300
- Fat: 25g