I still remember the afternoon I first perfected these Roasted Chickpeas Italian Style. The kitchen filled with the warm, inviting aroma of garlic and herbs mingling with the nutty scent of roasting chickpeas. My family, initially skeptical about “healthy snacks,” were drawn in by the smell alone. When I finally pulled the baking sheet from the oven, revealing perfectly golden, crisp little nuggets, they couldn’t resist. Tentative first bites quickly turned into enthusiastic handfuls. Now, these crispy, savory morsels are a regular request – devoured straight from the cooling rack, tossed into salads for a fantastic crunch, or served alongside drinks when friends come over. They are incredibly simple to make, yet deliver such satisfying flavor and texture, proving that healthy eating can be absolutely delicious and effortless. This recipe isn’t just about a snack; it’s about transforming a humble pantry staple into something truly special, a testament to the power of simple ingredients and classic Italian flavors. They’ve become our go-to for movie nights, a quick protein boost after school, and even a crunchy topping for soups. The sheer versatility and crowd-pleasing nature of these Italian roasted chickpeas make them a true winner in my household, and I’m confident they will be in yours too.
Ingredients
- 2 cans (15-ounce each) Chickpeas (Garbanzo Beans): The foundation of our recipe. Canned chickpeas offer convenience, but ensure they are rinsed and drained very well. Thorough drying is crucial for achieving maximum crispiness. Also known as garbanzo beans, these legumes are packed with protein and fiber.
- 2 tablespoons Extra Virgin Olive Oil: Provides richness, helps the chickpeas crisp up beautifully in the oven, and carries the flavors of the seasonings. Use a good quality olive oil for the best taste.
- 1 ½ teaspoons Dried Italian Seasoning: A fragrant blend typically containing oregano, basil, thyme, rosemary, and marjoram. This blend provides the signature herbaceous, aromatic flavor profile characteristic of Italian cuisine. Feel free to use your favorite store-bought blend or make your own.
- ¾ teaspoon Garlic Powder: Delivers a savory, pungent garlic flavor that infuses the chickpeas without the risk of fresh garlic burning during the roasting process. It distributes evenly for consistent taste.
- ½ teaspoon Onion Powder: Adds a subtle, savory sweetness and depth that complements the garlic and herbs, creating a more rounded flavor profile.
- ½ teaspoon Fine Sea Salt (or to taste): Essential for enhancing all the other flavors. Fine sea salt dissolves and distributes easily. Adjust the amount based on your preference and whether your canned chickpeas were packed with salt.
- ¼ teaspoon Freshly Ground Black Pepper (or to taste): Adds a gentle warmth and spice that balances the richness of the olive oil and the herbaceous notes. Freshly ground pepper offers the most potent flavor.
- Optional: Pinch of Red Pepper Flakes: For those who enjoy a little heat, a small pinch adds a delightful kick that contrasts nicely with the savory herbs. Add according to your heat tolerance.
Instructions
- Preheat and Prepare: Preheat your oven to 400°F (200°C). Line a large, rimmed baking sheet with parchment paper for easy cleanup and to prevent sticking. This also helps in achieving an even roast.
- Drain and Rinse Chickpeas: Open the cans of chickpeas and pour them into a colander. Rinse them thoroughly under cold running water. This removes the canning liquid (aquafaba) and any excess sodium. Shake the colander well to remove as much water as possible initially.
- Dry the Chickpeas Thoroughly: This is the most critical step for achieving crispy roasted chickpeas. Spread the rinsed chickpeas onto a clean kitchen towel or several layers of paper towels. Gently pat them dry. You can even let them air dry for 15-20 minutes on the towel if you have time. The drier the chickpeas, the crispier they will become, as excess moisture prevents browning and leads to steaming instead of roasting. Roll them around gently on the towel to ensure all sides are dry. Remove any loose skins that come off easily, though this is optional.
- Season the Chickpeas: Transfer the thoroughly dried chickpeas to a medium-sized mixing bowl. Drizzle the extra virgin olive oil over the chickpeas. Sprinkle the Italian seasoning, garlic powder, onion powder, fine sea salt, black pepper, and optional red pepper flakes (if using) over the oiled chickpeas.
- Toss to Coat Evenly: Use a spoon or your hands to gently toss the chickpeas until they are evenly coated with the oil and seasonings. Ensure every chickpea has a nice layer of flavor clinging to it.
- Arrange on Baking Sheet: Pour the seasoned chickpeas onto the prepared baking sheet. Spread them out in a single, even layer. Do not overcrowd the pan. If necessary, use two baking sheets. Spreading them out ensures that hot air can circulate around each chickpea, promoting even roasting and crispiness. Overcrowding will lead to steaming and softer chickpeas.
- Roast the Chickpeas: Place the baking sheet in the preheated oven. Roast for 20-30 minutes. About halfway through the roasting time (around the 10-15 minute mark), give the baking sheet a good shake or use a spatula to stir the chickpeas around. This helps them cook evenly on all sides and prevents burning.
- Check for Doneness: Continue roasting until the chickpeas are golden brown, slightly shrunken, and feel firm and crispy to the touch. The exact time will depend on your oven and how dry the chickpeas were initially. Taste one (carefully, it will be hot!) to check for desired crispiness. If they aren’t quite crispy enough, you can roast them for another 5-10 minutes, keeping a close eye on them to prevent burning. They should sound slightly ‘rattly’ when you shake the pan.
- Cool Slightly and Serve: Once perfectly roasted, remove the baking sheet from the oven. Let the chickpeas cool on the baking sheet for a few minutes. They will continue to crisp up slightly as they cool. Serve warm or at room temperature.
Nutrition Facts
- Serving Size: Approximately ½ cup (This recipe yields about 4 servings)
- Calories per Serving: Approximately 180-220 kcal (Estimate varies based on oil quantity and specific chickpea brand)
- Protein: A good source of plant-based protein (approx. 6-8g per serving), essential for muscle building and satiety. Makes these a filling and nutritious snack option.
- Fiber: High in dietary fiber (approx. 6-8g per serving), promoting digestive health and helping you feel full longer. Contributes to stable blood sugar levels.
- Healthy Fats: Primarily contains monounsaturated fats from the extra virgin olive oil, which are beneficial for heart health.
(Note: Nutritional information is an estimate and can vary based on specific ingredients and portion sizes used. These values highlight key nutritional benefits.)
Preparation Time
- Total Time: Approximately 35-45 minutes
- Preparation: 10-15 minutes (Includes draining, rinsing, thorough drying, and seasoning the chickpeas)
- Cooking: 25-30 minutes (Roasting time in the oven, may vary slightly depending on desired crispiness and oven performance)
This recipe is relatively quick to prepare, with the most hands-on time spent ensuring the chickpeas are properly dried. The roasting process is largely hands-off, requiring just a quick stir halfway through.
How to Serve Roasted Chickpeas Italian Style
These versatile Italian Roasted Chickpeas can be enjoyed in numerous ways. Here are some serving suggestions:
- Standalone Healthy Snack:
- Serve them warm or at room temperature in a bowl for guilt-free munching.
- Pack them in small containers for on-the-go snacking, work lunches, or school snacks.
- Salad Topper:
- Use them instead of traditional croutons for a gluten-free, protein-packed crunch on Caesar salads, Greek salads, or simple mixed green salads.
- Their savory flavor complements vinaigrettes beautifully.
- Soup Garnish:
- Sprinkle generously over creamy tomato soup, lentil soup, minestrone, or roasted vegetable soups just before serving.
- They add a delightful textural contrast to smooth soups.
- Bowl Enhancer:
- Add a handful to grain bowls, Buddha bowls, or Mediterranean-inspired bowls for extra texture, flavor, and protein.
- They pair well with quinoa, farro, rice, roasted vegetables, and greens.
- Antipasto Platter Addition:
- Include a small bowl of these roasted chickpeas on an Italian antipasto platter alongside cheeses, cured meats, olives, and marinated vegetables.
- Pasta and Grain Dishes:
- Toss them into pasta salads for a surprising crunch.
- Stir them into warm pasta dishes or risotto near the end of cooking for a textural element.
- Trail Mix Component:
- Mix them with nuts, seeds, and dried fruit for a savory and satisfying homemade trail mix.
- Wrap or Pita Filling:
- Add them to vegetarian wraps or pitas with hummus, fresh vegetables, and feta cheese for a crunchy, flavorful filling.
- Side Dish:
- Serve alongside grilled chicken, fish, or roasted vegetables as a simple, flavorful side dish.
Additional Tips for Perfect Italian Roasted Chickpeas
- The Drying Imperative: Cannot stress this enough! The drier your chickpeas are before adding oil and seasoning, the crispier the final result. Water creates steam, which is the enemy of crispiness. Use paper towels or a clean kitchen towel, and consider air drying for 15-20 minutes if time permits.
- Achieve Even Oil Coating: Don’t just dump the oil on top. Drizzle it evenly and toss thoroughly but gently. Every chickpea needs a light coating of oil to help it crisp up and allow the seasonings to adhere properly. Using your hands can sometimes be more effective than a spoon for this.
- Single Layer Roasting is Non-Negotiable: Spread the chickpeas in a single layer on the baking sheet. If they are piled up or too close together, they will steam instead of roast. Use two baking sheets if your chickpeas don’t fit comfortably on one. Give them space!
- Know Your Oven & Doneness Signs: Ovens vary. Start checking around the 20-minute mark. Look for a deep golden-brown color and a slightly shrunken appearance. They should feel firm when touched (carefully!) and make a slight rattling sound when you shake the pan. Taste one (after cooling slightly) to confirm crispness. Avoid burning – dark brown is okay, black is burnt and bitter.
- Seasoning Strategy: While adding seasonings before roasting helps them adhere and toast slightly, you can also add a final sprinkle of salt or even some finely grated Parmesan cheese (if not vegan) immediately after they come out of the oven while still hot for an extra flavor boost. Delicate fresh herbs like parsley should only be added after roasting.
- Control the Heat: If you like a spicy kick, be precise with the red pepper flakes – a little goes a long way. Start with a small pinch and add more next time if desired. Conversely, omit them entirely if you prefer no heat.
- Storage and Crispiness: Roasted chickpeas are undeniably best enjoyed fresh, ideally within a few hours of roasting, for maximum crispiness. Store leftovers in an airtight container at room temperature for up to 3-4 days, but be aware they will soften over time. You can briefly re-crisp them in a hot oven (350°F/175°C) or an air fryer for a few minutes before serving again. Avoid refrigerating, as the moisture will make them soft quickly.
- Flavor Variations: Don’t be afraid to experiment! While Italian seasoning is classic, try other spice blends like smoked paprika and cumin for a smoky flavor, curry powder for an Indian twist, or za’atar for a Middle Eastern flair. A squeeze of fresh lemon juice or some lemon zest added after roasting can brighten the flavors significantly. Adding nutritional yeast along with the seasonings before roasting can provide a cheesy, umami flavor for a vegan option.
Frequently Asked Questions (FAQ) about Italian Roasted Chickpeas
- Q: Can I use dried chickpeas instead of canned?
- A: Yes, absolutely! However, you must cook them first. Soak the dried chickpeas overnight, then cook them according to package directions (or using a pressure cooker) until tender but not mushy. Drain them very well and proceed with the drying and roasting steps as outlined in the recipe. Using cooked-from-scratch chickpeas often results in an even better texture.
- Q: How can I make my roasted chickpeas extra, extra crispy?
- A: The keys are: 1) Extreme Drying: Pat them incredibly dry, let them air dry for 30 minutes. 2) Sufficient Oil: Ensure they are lightly but evenly coated. 3) Single Layer: No crowding on the pan. 4) Adequate Heat: 400°F (200°C) is usually ideal. 5) Cook Time: Roast them until they are deeply golden and firm. Some even turn off the oven and leave the chickpeas inside with the door slightly ajar for 10-15 minutes to help them dry out further. An air fryer can also yield very crispy results (see next question).
- Q: Can I make these Italian Roasted Chickpeas in an air fryer?
- A: Yes, an air fryer works wonderfully for making crispy chickpeas! Prepare the chickpeas as directed (dry thoroughly, toss with oil and seasonings). Preheat your air fryer to around 380°F-390°F (195°C). Place the chickpeas in the air fryer basket in a single layer (you may need to cook in batches). Air fry for 12-18 minutes, shaking the basket every 5 minutes, until golden brown and crispy. Air fryer times can vary, so keep an eye on them.
- Q: How long will these roasted chickpeas stay crispy?
- A: They are at their absolute crispiest peak shortly after cooling from the oven, within the first few hours. While they remain delicious, they will gradually lose some crispness when stored. Store them in a container that is not perfectly airtight (like a jar with the lid slightly loose, or a paper bag) at room temperature can sometimes help maintain crispness longer than a fully sealed container, though results vary. Re-crisping in an oven or air fryer is your best bet for leftovers.
- Q: Are Roasted Chickpeas Italian Style actually healthy?
- A: Yes, they are generally considered a healthy snack. Chickpeas themselves are nutrient-dense, providing plant-based protein, high dietary fiber, vitamins, and minerals. Roasting is a healthier cooking method than frying. The main considerations are the amount of oil and salt used. Using heart-healthy extra virgin olive oil in moderation and controlling the salt makes them a nutritious choice compared to many processed snacks like chips or crackers.
- Q: Why did my chickpeas turn out soft or mushy instead of crispy?
- A: The most common culprits are: 1) Insufficient drying – excess moisture leads to steaming. 2) Overcrowding the baking sheet – again, this causes steaming. 3) Oven temperature too low – not hot enough to evaporate moisture quickly and crisp the exterior. 4) Undercooking – they simply didn’t roast long enough to reach the crispy stage. Ensure you address these points, especially the drying step.
- Q: Can I use different herbs or spices?
- A: Absolutely! This recipe is a fantastic base. Feel free to swap the Italian seasoning for other blends. Try adding smoked paprika, chili powder, cumin, coriander, curry powder, za’atar, herbes de Provence, or even just simple salt, pepper, and rosemary. Adjust seasonings to your personal preference.
- Q: Can I prepare these roasted chickpeas ahead of time for a party?
- A: You can, but with the caveat that they won’t be as perfectly crispy as when freshly made. You could roast them earlier in the day and store them loosely covered at room temperature. If possible, give them a quick 5-minute reheat in a hot oven (or air fryer) just before serving to refresh their crispness. They will still be flavorful even if slightly softened.
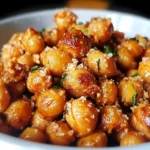
Roasted Chickpeas Italian Style
Ingredients
- 2 cans (15-ounce each) Chickpeas (Garbanzo Beans): The foundation of our recipe. Canned chickpeas offer convenience, but ensure they are rinsed and drained very well. Thorough drying is crucial for achieving maximum crispiness. Also known as garbanzo beans, these legumes are packed with protein and fiber.
- 2 tablespoons Extra Virgin Olive Oil: Provides richness, helps the chickpeas crisp up beautifully in the oven, and carries the flavors of the seasonings. Use a good quality olive oil for the best taste.
- 1 ½ teaspoons Dried Italian Seasoning: A fragrant blend typically containing oregano, basil, thyme, rosemary, and marjoram. This blend provides the signature herbaceous, aromatic flavor profile characteristic of Italian cuisine. Feel free to use your favorite store-bought blend or make your own.
- ¾ teaspoon Garlic Powder: Delivers a savory, pungent garlic flavor that infuses the chickpeas without the risk of fresh garlic burning during the roasting process. It distributes evenly for consistent taste.
- ½ teaspoon Onion Powder: Adds a subtle, savory sweetness and depth that complements the garlic and herbs, creating a more rounded flavor profile.
- ½ teaspoon Fine Sea Salt (or to taste): Essential for enhancing all the other flavors. Fine sea salt dissolves and distributes easily. Adjust the amount based on your preference and whether your canned chickpeas were packed with salt.
- ¼ teaspoon Freshly Ground Black Pepper (or to taste): Adds a gentle warmth and spice that balances the richness of the olive oil and the herbaceous notes. Freshly ground pepper offers the most potent flavor.
- Optional: Pinch of Red Pepper Flakes: For those who enjoy a little heat, a small pinch adds a delightful kick that contrasts nicely with the savory herbs. Add according to your heat tolerance.
Instructions
- Preheat and Prepare: Preheat your oven to 400°F (200°C). Line a large, rimmed baking sheet with parchment paper for easy cleanup and to prevent sticking. This also helps in achieving an even roast.
- Drain and Rinse Chickpeas: Open the cans of chickpeas and pour them into a colander. Rinse them thoroughly under cold running water. This removes the canning liquid (aquafaba) and any excess sodium. Shake the colander well to remove as much water as possible initially.
- Dry the Chickpeas Thoroughly: This is the most critical step for achieving crispy roasted chickpeas. Spread the rinsed chickpeas onto a clean kitchen towel or several layers of paper towels. Gently pat them dry. You can even let them air dry for 15-20 minutes on the towel if you have time. The drier the chickpeas, the crispier they will become, as excess moisture prevents browning and leads to steaming instead of roasting. Roll them around gently on the towel to ensure all sides are dry. Remove any loose skins that come off easily, though this is optional.
- Season the Chickpeas: Transfer the thoroughly dried chickpeas to a medium-sized mixing bowl. Drizzle the extra virgin olive oil over the chickpeas. Sprinkle the Italian seasoning, garlic powder, onion powder, fine sea salt, black pepper, and optional red pepper flakes (if using) over the oiled chickpeas.
- Toss to Coat Evenly: Use a spoon or your hands to gently toss the chickpeas until they are evenly coated with the oil and seasonings. Ensure every chickpea has a nice layer of flavor clinging to it.
- Arrange on Baking Sheet: Pour the seasoned chickpeas onto the prepared baking sheet. Spread them out in a single, even layer. Do not overcrowd the pan. If necessary, use two baking sheets. Spreading them out ensures that hot air can circulate around each chickpea, promoting even roasting and crispiness. Overcrowding will lead to steaming and softer chickpeas.
- Roast the Chickpeas: Place the baking sheet in the preheated oven. Roast for 20-30 minutes. About halfway through the roasting time (around the 10-15 minute mark), give the baking sheet a good shake or use a spatula to stir the chickpeas around. This helps them cook evenly on all sides and prevents burning.
- Check for Doneness: Continue roasting until the chickpeas are golden brown, slightly shrunken, and feel firm and crispy to the touch. The exact time will depend on your oven and how dry the chickpeas were initially. Taste one (carefully, it will be hot!) to check for desired crispiness. If they aren’t quite crispy enough, you can roast them for another 5-10 minutes, keeping a close eye on them to prevent burning. They should sound slightly ‘rattly’ when you shake the pan.
- Cool Slightly and Serve: Once perfectly roasted, remove the baking sheet from the oven. Let the chickpeas cool on the baking sheet for a few minutes. They will continue to crisp up slightly as they cool. Serve warm or at room temperature.
Nutrition
- Serving Size: one normal portion
- Calories: 220
- Fiber: 8g
- Protein: 8g