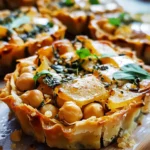
I remember the first time I decided to whip up these Savory Chickpea and Herb Tarts. It was a cool spring evening, and I wanted something a bit special for a small family get-together, but nothing too heavy or complicated. I’d been experimenting with more plant-based recipes, and the idea of combining earthy chickpeas with a burst of fresh herbs in a flaky, buttery crust just sounded divine. The aroma that filled the kitchen as they baked was incredible – a warm, herby, slightly nutty scent that had everyone peeking in. When I finally pulled them out, golden brown and beautifully rustic, they were met with oohs and aahs. The real test, of course, was the taste. My notoriously picky nephew, who usually turns his nose up at anything “too healthy,” took a tentative bite, and his eyes widened. He actually asked for a second one! The creamy, flavorful chickpea filling, brightened by lemon and a generous medley of herbs, contrasted perfectly with the crisp, tender crust. They were a resounding success, disappearing from the platter in record time. Since then, these tarts have become a go-to in our household, perfect for everything from light lunches with a side salad to elegant appetizers for guests. They feel sophisticated yet are surprisingly straightforward to make, and I always get compliments on their unique and satisfying flavor.
Ingredients
For the Flaky Tart Crust (Pâte Brisée):
- 2 ½ cups (300g) All-Purpose Flour: The structural backbone of your crust.
- 1 teaspoon Salt: Enhances flavor and controls yeast (though not used here, it’s a baking staple).
- 1 cup (226g) Unsalted Butter, very cold and cubed: Creates the flaky layers; must be cold.
- ½ cup (120ml) Ice Water: Binds the dough; coldness prevents butter from melting prematurely.
For the Savory Chickpea and Herb Filling:
- 2 (15-ounce / 425g each) Cans Chickpeas, rinsed and drained: The star protein and texture provider.
- ¼ cup (60ml) Extra Virgin Olive Oil: Adds richness and helps bind the filling.
- 1 large Lemon, zested and juiced (about ¼ cup juice): Provides brightness and cuts through richness.
- 2-3 cloves Garlic, minced: Adds a pungent, aromatic depth.
- 1 cup mixed Fresh Herbs, finely chopped: (e.g., parsley, cilantro, dill, mint, chives – choose your favorites or a combination). This is where the vibrant flavor comes from.
- ½ cup (75g) finely chopped Red Onion or Shallots: Offers a mild, sweet sharpness.
- 1 teaspoon Ground Cumin: Adds a warm, earthy spice.
- ½ teaspoon Smoked Paprika: Lends a subtle smoky depth.
- ½ teaspoon Ground Coriander: Provides a citrusy, floral spice note.
- Salt and Freshly Ground Black Pepper to taste: Essential for seasoning.
- Optional: 1-2 tablespoons Tahini: For extra creaminess and a nutty, sesame flavor.
- Optional: Pinch of Red Pepper Flakes: For a subtle kick of heat.
- 1 Large Egg, lightly beaten (for egg wash – optional): Gives the crust a golden, shiny finish.
Instructions
1. Prepare the Flaky Tart Crust:
* In a large bowl, whisk together the all-purpose flour and salt.
* Add the cold, cubed butter to the flour mixture. Using a pastry blender or your fingertips, cut the butter into the flour until the mixture resembles coarse crumbs with some pea-sized pieces of butter remaining. This process is crucial for flakiness, so work quickly to prevent the butter from melting.
* Gradually add the ice water, one tablespoon at a time, mixing lightly with a fork after each addition, until the dough just comes together. Be careful not to add too much water or overwork the dough, as this can make it tough.
* Divide the dough in half, flatten each half into a disc, wrap tightly in plastic wrap, and refrigerate for at least 1 hour (or up to 2 days). This chilling period allows the gluten to relax and the butter to firm up again.
2. Prepare the Chickpea and Herb Filling:
* In a large mixing bowl, add the rinsed and drained chickpeas. Using a potato masher or the back of a fork, roughly mash about two-thirds of the chickpeas, leaving some whole or partially mashed for texture. You’re aiming for a chunky, rustic consistency, not a smooth purée.
* To the mashed chickpeas, add the extra virgin olive oil, lemon zest, lemon juice, minced garlic, finely chopped fresh herbs, finely chopped red onion (or shallots), ground cumin, smoked paprika, and ground coriander. If using, stir in the tahini and red pepper flakes.
* Mix everything together thoroughly until well combined. Taste the mixture and season generously with salt and freshly ground black pepper. The seasoning is key, so don’t be shy – adjust until the flavors are bright and balanced. Set aside while you prepare the tart shells.
3. Assemble the Tarts:
* Preheat your oven to 400°F (200°C).
* On a lightly floured surface, take one disc of chilled dough and roll it out to about ⅛-inch thickness.
* Depending on your preference, you can make one large tart (using a 9-10 inch tart pan with a removable bottom) or several individual tarts (using 4-5 inch mini tart pans or a muffin tin for very small tartlets).
* Carefully transfer the rolled-out dough to your tart pan(s). Gently press the dough into the bottom and up the sides of the pan. Trim any excess dough from the edges using a sharp knife or by rolling your rolling pin over the rim of the pan.
* Prick the bottom of the crust(s) a few times with a fork. This helps prevent the crust from puffing up too much during baking.
* Optional Blind Baking (Recommended for a crisper crust): Line the tart shell(s) with parchment paper and fill with pie weights or dried beans. Bake for 15 minutes. Carefully remove the parchment paper and weights, then bake for another 5-7 minutes, or until the crust is lightly golden. This step helps ensure the bottom crust stays crisp even with the moist filling. If you’re short on time, you can skip blind baking, but the bottom crust might be slightly softer.
4. Fill and Bake the Tarts:
* Spoon the prepared savory chickpea and herb filling evenly into the pre-baked (or unbaked, if skipping blind baking) tart shell(s). Spread it out smoothly.
* If you made individual tarts and have leftover dough, you can cut out decorative shapes (like leaves or strips for a lattice) and place them on top of the filling.
* If desired, brush the exposed edges of the crust (and any decorative pastry on top) with the lightly beaten egg wash for a beautiful golden sheen.
* Place the tart(s) on a baking sheet (to catch any potential drips) and bake in the preheated oven at 400°F (200°C) for 25-35 minutes for a large tart, or 20-25 minutes for individual tarts. The tarts are ready when the crust is deeply golden brown and the filling is heated through and slightly puffed.
* If the crust edges start to brown too quickly, you can loosely tent them with aluminum foil.
5. Cool and Serve:
* Once baked, remove the tarts from the oven and let them cool in their pans on a wire rack for at least 10-15 minutes before attempting to remove them from the pans (if using pans with removable bottoms) or slicing. This cooling time allows the filling to set slightly, making them easier to handle and serve.
* Serve the Savory Chickpea and Herb Tarts warm or at room temperature.
Nutrition Facts
- Servings: Makes 1 large tart (8 servings) or 6-8 individual tarts.
- Calories per serving (approximate, based on 8 servings): 450-550 kcal.
- Protein: Approximately 10-12g. Primarily from the chickpeas, contributing to satiety and muscle maintenance.
- Fiber: Approximately 7-9g. Excellent source from chickpeas and whole grains (if using whole wheat flour), promoting digestive health.
- Healthy Fats: Approximately 25-30g. Mostly unsaturated fats from olive oil and tahini (if used), beneficial for heart health.
- Carbohydrates: Approximately 45-55g. Provides energy, with complex carbs from chickpeas and the crust.
- Key Vitamins & Minerals: Rich in folate, iron, and manganese from chickpeas and herbs.
(Note: Nutritional values are estimates and can vary based on specific ingredients, portion sizes, and optional additions.)
Preparation Time
- Crust Preparation & Chilling: Approximately 20 minutes active prep, plus at least 1 hour chilling time (can be done a day or two ahead).
- Filling Preparation: Approximately 15-20 minutes.
- Assembly & Baking: Approximately 10-15 minutes for assembly, plus 25-35 minutes baking time.
- Total Active Time: Roughly 45-55 minutes.
- Total Time (including chilling and baking): Approximately 2 hours 10 minutes to 2 hours 30 minutes.
How to Serve
These Savory Chickpea and Herb Tarts are wonderfully versatile. Here are some delightful ways to serve them:
- As an Elegant Appetizer:
- Cut the large tart into small wedges or serve mini tarts.
- Arrange them on a platter garnished with fresh herb sprigs (like dill or parsley) and a few lemon wedges on the side.
- A dollop of plain Greek yogurt or a light tahini-lemon drizzle can be offered as an accompaniment.
- For a Light Lunch or Brunch:
- Serve a generous slice of the tart (or one individual tart) alongside a fresh, crisp green salad tossed with a simple vinaigrette.
- A simple arugula salad with cherry tomatoes and a balsamic glaze pairs beautifully.
- Consider a side of roasted vegetables like asparagus or bell peppers.
- For brunch, pair with a fruit salad and perhaps a light soup.
- Picnic Perfect:
- These tarts travel well and are delicious at room temperature, making them ideal for picnics.
- Pack individual tarts or a pre-sliced large tart for easy serving.
- Complement with other picnic favorites like olives, cheese, and fresh fruit.
- Part of a Buffet or Mezze Spread:
- Include them as a savory vegetarian option in a larger spread.
- They sit beautifully alongside dips like hummus or baba ghanoush, pita bread, and other small bites.
- With a Flavorful Drizzle or Dollop:
- Lemon-Tahini Drizzle: Whisk together tahini, lemon juice, water (to thin), a pinch of garlic powder, and salt.
- Herbed Yogurt Sauce: Mix plain Greek yogurt or dairy-free yogurt with chopped fresh dill, mint, a squeeze of lemon juice, and salt.
- Spicy Harissa Yogurt: Stir a teaspoon of harissa paste into plain yogurt for a fiery kick.
- Garnish Gracefully:
- A final sprinkle of fresh, finely chopped herbs just before serving can re-brighten the flavors.
- A light dusting of smoked paprika or sumac adds color and a subtle tang.
- A drizzle of high-quality extra virgin olive oil can enhance richness.
Additional Tips
- Cold is Key for the Crust: Ensure your butter and water are ice cold when making the pastry. This prevents the butter from melting into the flour, which is essential for creating those desirable flaky layers. If your kitchen is warm, you can even chill your flour and bowl beforehand.
- Don’t Overwork the Dough: Mix the pastry dough only until it just comes together. Overworking develops the gluten too much, resulting in a tough, rather than tender and flaky, crust. A few visible streaks or small lumps of butter are perfectly fine and even desirable.
- Herb Harmony: While the recipe suggests a mix, feel free to customize the herbs based on your preference or what’s available. Parsley, cilantro, and dill make a classic combination. Mint adds a lovely freshness, while chives or green onions can provide a mild oniony note. Always use fresh herbs for the best flavor; dried herbs won’t have the same vibrant impact in this filling.
- Taste and Adjust Filling Seasoning: Chickpeas can be quite bland on their own, so tasting and adjusting the seasoning of the filling is crucial. Before filling the tarts, take a small spoonful of the chickpea mixture. Does it need more salt? More lemon juice for brightness? A bigger pinch of cumin or paprika? Adjust until the flavors pop.
- Blind Baking for Crispness: For the ultimate crisp bottom crust, especially if making a larger tart, don’t skip the blind baking step. This pre-baking of the shell prevents it from becoming soggy from the moist chickpea filling. Use pie weights, dried beans, or even uncooked rice over parchment paper to weigh down the crust.
- Resting is Important: Allow the baked tarts to cool in their pans for at least 10-15 minutes before slicing or removing. This helps the filling to set properly and prevents the tarts from falling apart. They are delicious warm, but also excellent at room temperature.
- Make-Ahead Strategy: You can make the tart dough a day or two in advance and keep it well-wrapped in the refrigerator. The chickpea filling can also be prepared a day ahead and stored in an airtight container in the fridge. This makes assembly on the day of baking much quicker.
- Customize Your Filling: Feel free to add other finely chopped or grated vegetables to the chickpea filling for extra flavor and nutrition. Consider additions like finely diced sun-dried tomatoes (oil-packed, drained), chopped Kalamata olives, grated carrots, or even a small amount of crumbled feta cheese (if not keeping it vegan). Just ensure any added vegetables don’t release too much moisture.
FAQ Section
Q1: Can I make these Savory Chickpea and Herb Tarts gluten-free?
A1: Yes, absolutely! To make the tarts gluten-free, simply substitute the all-purpose flour in the crust recipe with a good quality gluten-free all-purpose flour blend that is designed for baking (often labeled as a “1-to-1” or “measure-for-measure” blend). Ensure the blend contains xanthan gum, or add it according to the flour manufacturer’s instructions, as it helps with binding and texture. The chickpea filling is naturally gluten-free.
Q2: How can I make this recipe vegan?
A2: This recipe is easily adaptable for a vegan diet. For the crust, use a good quality vegan butter substitute (solid block-style works best) in place of dairy butter. Ensure it’s very cold, just like regular butter. For the egg wash, you can skip it entirely or brush the crust with a little plant-based milk (like almond or soy milk) mixed with a touch of maple syrup or agave for browning. The chickpea filling is already nearly vegan; just ensure you’re not adding any non-vegan optional ingredients like feta. If you used tahini, it contributes to the creaminess that an egg might otherwise provide in some fillings.
Q3: Can I use store-bought pie crust?
A3: Yes, for a quicker version, you can certainly use store-bought refrigerated or frozen pie crust. Look for a good quality all-butter crust if possible, for the best flavor. Follow the package instructions for thawing and baking. You may need to adjust baking times slightly. While homemade crust is wonderful, store-bought is a great time-saver.
Q4: How long will these tarts last, and how should I store them?
A4: Leftover Savory Chickpea and Herb Tarts can be stored in an airtight container in the refrigerator for up to 3-4 days. The crust may soften slightly over time, but they will still be delicious.
Q5: Can I freeze these tarts?
A5: Yes, these tarts freeze quite well. You can freeze them baked or unbaked.
* To freeze baked tarts: Cool them completely, then wrap them tightly in plastic wrap followed by a layer of aluminum foil or place them in a freezer-safe container. They can be frozen for up to 2-3 months. Reheat from frozen in a preheated oven at 350°F (175°C) for about 20-25 minutes, or until warmed through and the crust is re-crisped.
* To freeze unbaked tarts: Assemble the tarts fully but do not apply egg wash. Freeze them on a baking sheet until solid, then wrap well as above. Bake from frozen, adding about 10-15 minutes to the original baking time. Apply egg wash (if using) just before baking.
Q6: I don’t have all the suggested fresh herbs. What are the best substitutes?
A6: The beauty of this recipe is its flexibility with herbs! If you don’t have all the suggested ones, use what you have or prefer. Parsley is a great base. Cilantro adds a distinctive zesty note. Dill offers a fresh, slightly anise-like flavor. Mint provides coolness. Chives or green onions give a mild oniony touch. If you only have one or two types of fresh herbs, increase their quantity to make up the full cup. For instance, a combination of just parsley and dill would be lovely. Avoid using only very strong herbs like rosemary or thyme unless in very small quantities, as they can overpower the chickpeas.
Q7: Can I add other vegetables to the chickpea filling?
A7: Definitely! This is a great way to customize the tarts and add more nutrients. Good additions include:
* Finely chopped spinach or kale (wilted and squeezed dry to remove excess moisture).
* Grated carrots or zucchini (squeeze out excess moisture from zucchini).
* Finely diced bell peppers (any color).
* Chopped sun-dried tomatoes (oil-packed and drained).
* Chopped artichoke hearts (canned or jarred, drained well).
Ensure any vegetables with high water content are pre-cooked or squeezed to prevent a soggy filling.
Q8: My tart crust turned out tough, not flaky. What did I do wrong?
A8: A tough crust is usually due to one of two main reasons:
* Overworking the dough: When you mix the flour and water, gluten develops. The more you mix or knead, the more gluten develops, leading to a tougher crust. Mix only until the dough just comes together.
* Butter was too warm or melted: If the butter melts into the flour instead of remaining in small, distinct pieces, you lose the layers that create flakiness. Ensure your butter is very cold and work quickly. If the dough becomes warm, chill it again before rolling.
* Too much water: Adding too much water can also contribute to toughness. Add it gradually, just until the dough holds together.
Remember, for a flaky crust, keep everything cold and handle the dough minimally!
Savory Chickpea and Herb Tarts
Ingredients
For the Flaky Tart Crust (Pâte Brisée):
- 2 ½ cups (300g) All-Purpose Flour: The structural backbone of your crust.
- 1 teaspoon Salt: Enhances flavor and controls yeast (though not used here, it’s a baking staple).
- 1 cup (226g) Unsalted Butter, very cold and cubed: Creates the flaky layers; must be cold.
- ½ cup (120ml) Ice Water: Binds the dough; coldness prevents butter from melting prematurely.
For the Savory Chickpea and Herb Filling:
- 2 (15-ounce / 425g each) Cans Chickpeas, rinsed and drained: The star protein and texture provider.
- ¼ cup (60ml) Extra Virgin Olive Oil: Adds richness and helps bind the filling.
- 1 large Lemon, zested and juiced (about ¼ cup juice): Provides brightness and cuts through richness.
- 2–3 cloves Garlic, minced: Adds a pungent, aromatic depth.
- 1 cup mixed Fresh Herbs, finely chopped: (e.g., parsley, cilantro, dill, mint, chives – choose your favorites or a combination). This is where the vibrant flavor comes from.
- ½ cup (75g) finely chopped Red Onion or Shallots: Offers a mild, sweet sharpness.
- 1 teaspoon Ground Cumin: Adds a warm, earthy spice.
- ½ teaspoon Smoked Paprika: Lends a subtle smoky depth.
- ½ teaspoon Ground Coriander: Provides a citrusy, floral spice note.
- Salt and Freshly Ground Black Pepper to taste: Essential for seasoning.
- Optional: 1-2 tablespoons Tahini: For extra creaminess and a nutty, sesame flavor.
- Optional: Pinch of Red Pepper Flakes: For a subtle kick of heat.
- 1 Large Egg, lightly beaten (for egg wash – optional): Gives the crust a golden, shiny finish.
Instructions
1. Prepare the Flaky Tart Crust:
* In a large bowl, whisk together the all-purpose flour and salt.
* Add the cold, cubed butter to the flour mixture. Using a pastry blender or your fingertips, cut the butter into the flour until the mixture resembles coarse crumbs with some pea-sized pieces of butter remaining. This process is crucial for flakiness, so work quickly to prevent the butter from melting.
* Gradually add the ice water, one tablespoon at a time, mixing lightly with a fork after each addition, until the dough just comes together. Be careful not to add too much water or overwork the dough, as this can make it tough.
* Divide the dough in half, flatten each half into a disc, wrap tightly in plastic wrap, and refrigerate for at least 1 hour (or up to 2 days). This chilling period allows the gluten to relax and the butter to firm up again.
2. Prepare the Chickpea and Herb Filling:
* In a large mixing bowl, add the rinsed and drained chickpeas. Using a potato masher or the back of a fork, roughly mash about two-thirds of the chickpeas, leaving some whole or partially mashed for texture. You’re aiming for a chunky, rustic consistency, not a smooth purée.
* To the mashed chickpeas, add the extra virgin olive oil, lemon zest, lemon juice, minced garlic, finely chopped fresh herbs, finely chopped red onion (or shallots), ground cumin, smoked paprika, and ground coriander. If using, stir in the tahini and red pepper flakes.
* Mix everything together thoroughly until well combined. Taste the mixture and season generously with salt and freshly ground black pepper. The seasoning is key, so don’t be shy – adjust until the flavors are bright and balanced. Set aside while you prepare the tart shells.
3. Assemble the Tarts:
* Preheat your oven to 400°F (200°C).
* On a lightly floured surface, take one disc of chilled dough and roll it out to about ⅛-inch thickness.
* Depending on your preference, you can make one large tart (using a 9-10 inch tart pan with a removable bottom) or several individual tarts (using 4-5 inch mini tart pans or a muffin tin for very small tartlets).
* Carefully transfer the rolled-out dough to your tart pan(s). Gently press the dough into the bottom and up the sides of the pan. Trim any excess dough from the edges using a sharp knife or by rolling your rolling pin over the rim of the pan.
* Prick the bottom of the crust(s) a few times with a fork. This helps prevent the crust from puffing up too much during baking.
* Optional Blind Baking (Recommended for a crisper crust): Line the tart shell(s) with parchment paper and fill with pie weights or dried beans. Bake for 15 minutes. Carefully remove the parchment paper and weights, then bake for another 5-7 minutes, or until the crust is lightly golden. This step helps ensure the bottom crust stays crisp even with the moist filling. If you’re short on time, you can skip blind baking, but the bottom crust might be slightly softer.
4. Fill and Bake the Tarts:
* Spoon the prepared savory chickpea and herb filling evenly into the pre-baked (or unbaked, if skipping blind baking) tart shell(s). Spread it out smoothly.
* If you made individual tarts and have leftover dough, you can cut out decorative shapes (like leaves or strips for a lattice) and place them on top of the filling.
* If desired, brush the exposed edges of the crust (and any decorative pastry on top) with the lightly beaten egg wash for a beautiful golden sheen.
* Place the tart(s) on a baking sheet (to catch any potential drips) and bake in the preheated oven at 400°F (200°C) for 25-35 minutes for a large tart, or 20-25 minutes for individual tarts. The tarts are ready when the crust is deeply golden brown and the filling is heated through and slightly puffed.
* If the crust edges start to brown too quickly, you can loosely tent them with aluminum foil.
5. Cool and Serve:
* Once baked, remove the tarts from the oven and let them cool in their pans on a wire rack for at least 10-15 minutes before attempting to remove them from the pans (if using pans with removable bottoms) or slicing. This cooling time allows the filling to set slightly, making them easier to handle and serve.
* Serve the Savory Chickpea and Herb Tarts warm or at room temperature.
Nutrition
- Serving Size: one normal portion
- Calories: 550
- Fat: 30g
- Carbohydrates: 55g
- Fiber: 9g
- Protein: 12g