It’s funny how some desserts just have a way of becoming instant classics in your household. For us, this Silky Vanilla Bean Panna Cotta is exactly that. From the first time I nervously whisked together cream and vanilla, hoping for that perfect wobble, to the countless times since where it’s been requested for everything from casual weeknight dinners to slightly-more-fancy celebrations, this recipe has never failed to impress. My kids, usually the harshest critics, devour it with gusto, and my partner? Well, let’s just say he’s been known to sneak an extra serving (or two!) when he thinks no one’s looking. There’s something undeniably luxurious about the smooth, creamy texture and the pure, clean vanilla flavor. It’s elegant yet surprisingly simple to make, which in my book, is the perfect combination for a go-to dessert recipe. If you’re looking for a dessert that’s guaranteed to wow and is easier to make than you might think, look no further. This Silky Vanilla Bean Panna Cotta is about to become your new best friend in the kitchen.
Ingredients for Silky Vanilla Bean Panna Cotta
- 2 cups (480ml) Heavy Cream: The foundation of our panna cotta, heavy cream (also sometimes labelled whipping cream) is crucial for achieving that signature rich and velvety texture. It provides the fat content necessary for a truly decadent dessert.
- 1 cup (240ml) Whole Milk: Adding whole milk lightens the panna cotta slightly without sacrificing creaminess and balances the richness of the heavy cream. It also contributes to a smoother, less dense final product.
- 1/3 cup (approx. 70g) Granulated Sugar: Sugar not only sweetens the panna cotta but also helps to create the right texture. It dissolves into the warm cream and milk, contributing to the overall smoothness.
- 1 Vanilla Bean: The star of the show! A real vanilla bean infuses the panna cotta with an unparalleled depth of flavor. The tiny black seeds scattered throughout are a visual cue to the authentic vanilla taste.
- 1 ½ tablespoons (about 10-11g) Unflavored Gelatin Powder: Unflavored gelatin is the setting agent that gives panna cotta its characteristic wobble. It’s important to use the correct amount to achieve a silky set without it becoming rubbery.
- 3 tablespoons (45ml) Cold Water: Used to bloom the gelatin, cold water is essential for properly hydrating the gelatin powder, ensuring it dissolves smoothly and evenly into the cream mixture.
- Pinch of Salt: A tiny pinch of salt enhances the sweetness and balances the flavors, preventing the panna cotta from tasting one-dimensional.
How to Make Silky Vanilla Bean Panna Cotta: Step-by-Step Instructions
- Bloom the Gelatin: In a small bowl, sprinkle the gelatin powder over cold water. Let it sit for 5-10 minutes. This process, called blooming, hydrates the gelatin and ensures it dissolves smoothly into the warm cream mixture. You’ll notice the gelatin mixture becomes thicker and more jelly-like as it blooms.
- Infuse the Cream with Vanilla: In a medium saucepan, combine the heavy cream, whole milk, and granulated sugar. Split the vanilla bean lengthwise using a sharp paring knife. Scrape out the vanilla seeds with the back of the knife and add both the seeds and the pod to the saucepan. Place the saucepan over medium heat and stir gently to dissolve the sugar.
- Heat the Cream Mixture: Heat the cream mixture until it is just simmering around the edges. You’ll see small bubbles forming and wisps of steam rising. Do not let it boil vigorously, as boiling can affect the texture of the panna cotta and potentially scorch the milk solids. Simmering gently is key to infusing the vanilla flavor without overheating.
- Dissolve the Gelatin: Remove the saucepan from the heat. Add the bloomed gelatin to the warm cream mixture and whisk gently until the gelatin is completely dissolved. Ensure there are no lumps of gelatin remaining. The warmth of the cream will melt the bloomed gelatin easily. Continue whisking for a minute or two to ensure even distribution.
- Strain the Mixture (Optional but Recommended): For the silkiest texture, strain the panna cotta mixture through a fine-mesh sieve into a clean bowl or measuring cup. This step removes the vanilla bean pod and any potential undissolved gelatin or milk solids, resulting in an ultra-smooth final product.
- Pour into Serving Dishes: Divide the panna cotta mixture evenly among your desired serving dishes. You can use ramekins, small glasses, or even teacups. Leave some headspace at the top for any potential toppings or garnishes later.
- Chill to Set: Cover each serving dish with plastic wrap or place them in an airtight container. Refrigerate for at least 4-6 hours, or preferably overnight, to allow the panna cotta to fully set. The chilling time is crucial for the gelatin to work its magic and create that signature wobble. The longer it chills, the firmer it will become.
- Unmold (Optional): If desired, you can unmold the panna cotta before serving. To unmold, gently run a thin knife or spatula around the edge of each panna cotta to loosen it. Dip the bottom of the ramekin briefly in hot water (be careful not to let the water reach the panna cotta itself). Invert the ramekin onto a serving plate and gently tap the bottom to release the panna cotta. If using glasses or decorative dishes, unmolding isn’t necessary, and they can be served directly in their dishes.
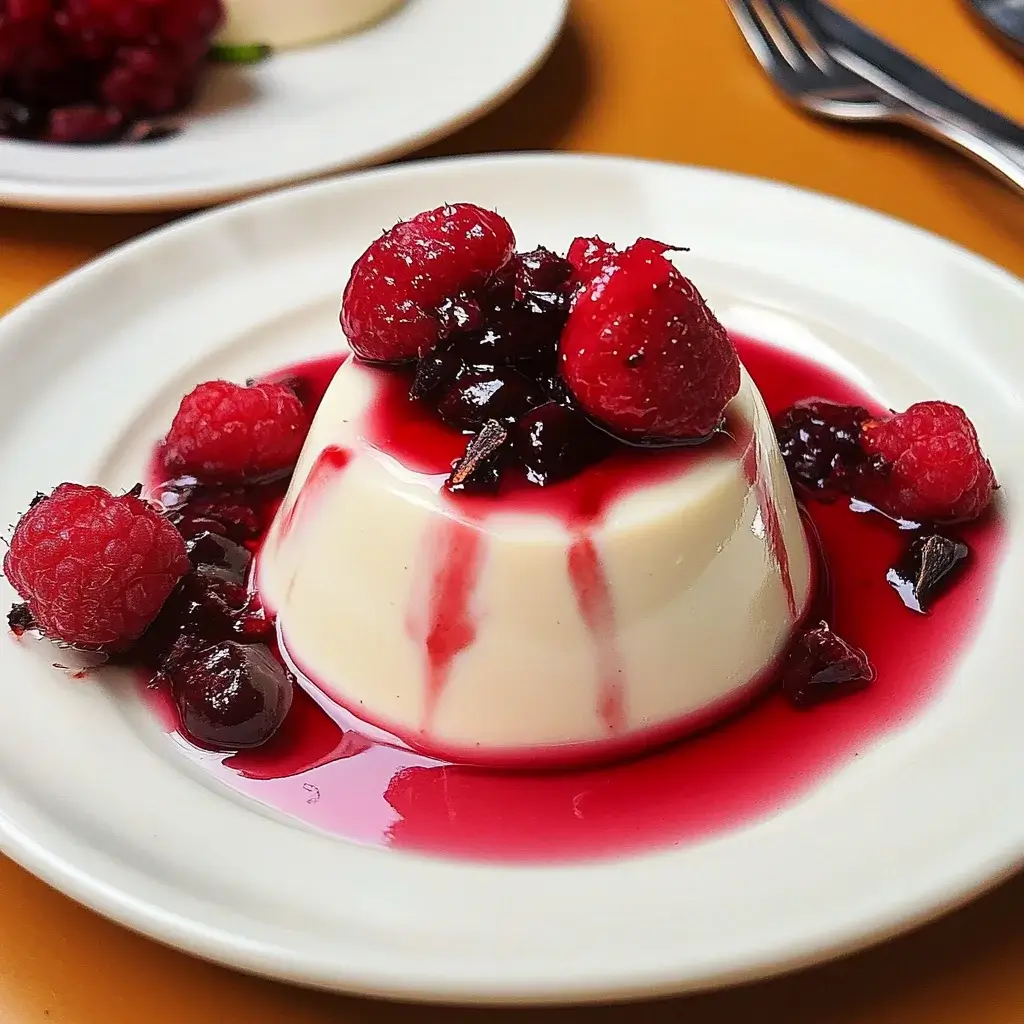
- Serve and Garnish: Once set and unmolded (if desired), your Silky Vanilla Bean Panna Cotta is ready to be served. Garnish as desired with fresh fruit, berries, sauces, or other toppings. See the “How to Serve” section below for more inspiration.
Silky Vanilla Bean Panna Cotta Nutrition Facts
(Approximate values per serving, based on 6 servings. Nutritional values can vary based on specific ingredients and serving sizes.)
- Servings: 6
- Calories per serving: Approximately 350-400 kcal
- Fat: 30-35g
(Please note: These values are estimates and for informational purposes only. For precise nutritional information, calculate based on the specific brands and quantities of ingredients used.)
Preparation Time for Vanilla Bean Panna Cotta
- Active Preparation Time: Approximately 20-25 minutes. This includes blooming the gelatin, heating the cream mixture, infusing the vanilla, and pouring into dishes.
- Chilling Time: Minimum 4-6 hours, ideally overnight. This is mostly hands-off time, allowing the panna cotta to set in the refrigerator.
- Total Time: Approximately 4 hours 20 minutes to overnight, including chilling.
The beauty of panna cotta is that while it requires chilling time, the active preparation is quite quick and straightforward, making it an excellent make-ahead dessert.
Serving Suggestions: Elevating Your Panna Cotta Experience
Panna cotta is incredibly versatile and can be served in a multitude of ways. Its delicate vanilla flavor pairs beautifully with a wide range of accompaniments. Here are some ideas to elevate your panna cotta experience:
- Fresh Berries: A classic pairing! Serve with a mix of fresh raspberries, blueberries, strawberries, or blackberries. Their tartness contrasts beautifully with the creamy sweetness of the panna cotta.
- Berry Coulis or Sauce: For a more elegant touch, drizzle with a homemade berry coulis. Simply blend fresh or frozen berries with a little sugar and lemon juice, then strain for a smooth sauce. Raspberry, strawberry, or mixed berry coulis are all excellent choices.
- Caramel Sauce: The rich, buttery notes of caramel sauce create a delightful contrast to the vanilla. A salted caramel sauce adds an extra layer of complexity.
- Chocolate Shavings or Sauce: For chocolate lovers, a sprinkle of dark chocolate shavings or a drizzle of chocolate sauce is a decadent addition. The bitterness of dark chocolate balances the sweetness of the panna cotta.
- Fruit Compote: A warm fruit compote, such as cherry, apple, or pear, provides a comforting and seasonal pairing, especially during colder months.
- Toasted Nuts: Add a textural element with toasted almonds, hazelnuts, or pistachios. Their nutty flavor complements the vanilla and creaminess.
- Citrus Zest: A sprinkle of lemon or orange zest brightens the flavor and adds a refreshing touch.
- Espresso or Coffee Sauce: For a sophisticated twist, serve with a chilled espresso or coffee sauce. The bitterness of coffee creates a lovely contrast with the sweet vanilla.
- Honeycomb Candy: Crumbled honeycomb candy adds a delightful crunch and caramelized sweetness that pairs wonderfully with vanilla.
- Seasonal Fruits: Adapt your toppings to the season. Peaches and plums in summer, figs and grapes in fall, and blood oranges in winter all make delicious accompaniments.
- Mint Sprigs: A simple sprig of fresh mint not only adds a pop of color but also a refreshing aroma that enhances the overall presentation.
No matter how you choose to serve it, Silky Vanilla Bean Panna Cotta is a dessert that is sure to impress with its elegance and delicious flavor.
Expert Tips for Perfect Panna Cotta Every Time
Achieving perfectly silky and wobbly panna cotta is easier than you might think, but a few expert tips can help ensure success every time:
- Use High-Quality Vanilla: Since vanilla is the star flavor, invest in a good quality vanilla bean. Madagascar vanilla beans are a classic choice known for their rich, creamy flavor. If using vanilla extract, opt for pure vanilla extract rather than imitation for the best taste. While vanilla paste is also an option, a fresh bean truly elevates the flavor profile.
- Bloom Gelatin Properly: Don’t skip the blooming step! Blooming gelatin in cold water is crucial for proper hydration. This prevents lumps and ensures the gelatin dissolves smoothly and evenly into the warm cream mixture. Allow it to bloom for the full 5-10 minutes, or until it becomes a thick, jelly-like consistency.
- Gentle Heating is Key: Heat the cream mixture gently over medium heat and avoid boiling. Boiling can alter the texture of the cream and potentially lead to a grainy or less smooth panna cotta. Simmering gently is all you need to infuse the vanilla flavor and dissolve the sugar.
- Don’t Overcook the Gelatin: Once you add the bloomed gelatin to the warm cream, whisk it in gently until just dissolved. Overheating gelatin after it’s bloomed can weaken its setting power, resulting in a panna cotta that doesn’t set properly or has a less desirable texture.
- Strain for Ultimate Silkiness: Straining the panna cotta mixture through a fine-mesh sieve is an optional but highly recommended step for achieving the absolute silkiest texture. This removes any vanilla bean pod pieces, undissolved gelatin, or milk solids, resulting in a flawlessly smooth dessert.
- Chill for Long Enough: Allow ample chilling time, at least 4-6 hours or preferably overnight. This ensures the gelatin has enough time to fully set the panna cotta and develop its signature wobble. Rushing the chilling process can lead to a soft or runny panna cotta.
- Adjust Sweetness to Taste: The sugar amount in the recipe is a good starting point, but you can adjust it to your preference. If you prefer a less sweet dessert, reduce the sugar slightly. Taste the cream mixture before adding the gelatin and adjust sweetness as needed.
- Experiment with Variations: Once you master the basic vanilla bean panna cotta, don’t be afraid to experiment with variations. Try adding citrus zest to the cream mixture for a lemon or orange panna cotta. Infuse the cream with other flavors like lavender, cardamom, or coffee. You can also swirl in fruit purees or sauces before chilling for a marbled effect.
By following these tips, you’ll be well on your way to creating perfect, silky smooth vanilla bean panna cotta that is sure to impress every time.
Frequently Asked Questions About Vanilla Bean Panna Cotta (FAQ)
Q1: Can I make panna cotta ahead of time?
A1: Absolutely! Panna cotta is an ideal make-ahead dessert. In fact, it needs to be made ahead of time to allow for proper chilling and setting. You can prepare panna cotta up to 2-3 days in advance and store it covered in the refrigerator. This makes it perfect for entertaining or when you want to get dessert prep out of the way.
Q2: Can I use vanilla extract instead of a vanilla bean?
A2: Yes, you can substitute vanilla extract if you don’t have a vanilla bean. Use 1-2 teaspoons of pure vanilla extract, adding it to the cream mixture after you remove it from the heat and just before adding the bloomed gelatin. While vanilla extract provides vanilla flavor, a vanilla bean offers a more complex and nuanced taste with those beautiful specks of vanilla seeds.
Q3: What if my panna cotta doesn’t set?
A3: If your panna cotta doesn’t set, the most common reason is not enough gelatin or insufficient chilling time. Ensure you are using the correct amount of gelatin as specified in the recipe and that you bloomed it properly. Also, make sure you chill the panna cotta for at least 4-6 hours, or preferably overnight. If it’s still too soft, you can try gently reheating the mixture, adding a little more bloomed gelatin, and then chilling it again. However, be cautious not to overheat the gelatin.
Q4: Can I use agar-agar instead of gelatin?
A4: Yes, you can use agar-agar powder as a vegetarian alternative to gelatin. Agar-agar is derived from seaweed and has a stronger setting power than gelatin. You’ll typically need to use less agar-agar than gelatin. Follow the instructions on your agar-agar package, as activation methods and ratios can vary. Generally, you’ll need to boil agar-agar in the liquid to activate its setting properties.
Q5: How do I store leftover panna cotta?
A5: Store leftover panna cotta covered in the refrigerator. If you unmolded the panna cotta, store it in an airtight container to prevent it from drying out. Panna cotta will keep well in the refrigerator for up to 3 days.
Q6: Can I freeze panna cotta?
A6: Freezing panna cotta is not recommended as it can alter the texture. Freezing and thawing can cause the panna cotta to become grainy or watery. It’s best enjoyed fresh or within a few days of making it.
Q7: Can I make panna cotta dairy-free or vegan?
A7: Making panna cotta dairy-free or vegan requires some substitutions. You can replace heavy cream and whole milk with full-fat coconut milk or a combination of coconut milk and other plant-based milks like cashew or oat milk. For a vegan setting agent, use agar-agar powder instead of gelatin. Be aware that the flavor and texture will be slightly different from traditional dairy-based panna cotta, but it can still be delicious.
Q8: How do I know when panna cotta is perfectly set?
A8: Perfectly set panna cotta should be firm enough to hold its shape but still have a slight wobble when gently shaken. It should be creamy and smooth, not rubbery or stiff. If you unmold it, it should hold its shape without collapsing. If serving in dishes, a gentle jiggle is a good sign of perfect panna cotta.
With these tips and answers, you’re fully equipped to create and enjoy delicious Silky Vanilla Bean Panna Cotta. Happy cooking and even happier indulging!
Print
Silky Vanilla Bean Panna Cotta
Ingredients
- Heavy Cream: The foundation of our panna cotta, heavy cream (also sometimes labelled whipping cream) is crucial for achieving that signature rich and velvety texture. It provides the fat content necessary for a truly decadent dessert.
- Whole Milk: Adding whole milk lightens the panna cotta slightly without sacrificing creaminess and balances the richness of the heavy cream. It also contributes to a smoother, less dense final product.
- Granulated Sugar: Sugar not only sweetens the panna cotta but also helps to create the right texture. It dissolves into the warm cream and milk, contributing to the overall smoothness.
- Vanilla Bean: The star of the show! A real vanilla bean infuses the panna cotta with an unparalleled depth of flavor. The tiny black seeds scattered throughout are a visual cue to the authentic vanilla taste.
- Gelatin Powder: Unflavored gelatin is the setting agent that gives panna cotta its characteristic wobble. It’s important to use the correct amount to achieve a silky set without it becoming rubbery.
- Cold Water: Used to bloom the gelatin, cold water is essential for properly hydrating the gelatin powder, ensuring it dissolves smoothly and evenly into the cream mixture.
- Pinch of Salt: A tiny pinch of salt enhances the sweetness and balances the flavors, preventing the panna cotta from tasting one-dimensional.
Instructions
- Bloom the Gelatin: In a small bowl, sprinkle the gelatin powder over cold water. Let it sit for 5-10 minutes. This process, called blooming, hydrates the gelatin and ensures it dissolves smoothly into the warm cream mixture. You’ll notice the gelatin mixture becomes thicker and more jelly-like as it blooms.
- Infuse the Cream with Vanilla: In a medium saucepan, combine the heavy cream, whole milk, and granulated sugar. Split the vanilla bean lengthwise using a sharp paring knife. Scrape out the vanilla seeds with the back of the knife and add both the seeds and the pod to the saucepan. Place the saucepan over medium heat and stir gently to dissolve the sugar.
- Heat the Cream Mixture: Heat the cream mixture until it is just simmering around the edges. You’ll see small bubbles forming and wisps of steam rising. Do not let it boil vigorously, as boiling can affect the texture of the panna cotta and potentially scorch the milk solids. Simmering gently is key to infusing the vanilla flavor without overheating.
- Dissolve the Gelatin: Remove the saucepan from the heat. Add the bloomed gelatin to the warm cream mixture and whisk gently until the gelatin is completely dissolved. Ensure there are no lumps of gelatin remaining. The warmth of the cream will melt the bloomed gelatin easily. Continue whisking for a minute or two to ensure even distribution.
- Strain the Mixture (Optional but Recommended): For the silkiest texture, strain the panna cotta mixture through a fine-mesh sieve into a clean bowl or measuring cup. This step removes the vanilla bean pod and any potential undissolved gelatin or milk solids, resulting in an ultra-smooth final product.
- Pour into Serving Dishes: Divide the panna cotta mixture evenly among your desired serving dishes. You can use ramekins, small glasses, or even teacups. Leave some headspace at the top for any potential toppings or garnishes later.
- Chill to Set: Cover each serving dish with plastic wrap or place them in an airtight container. Refrigerate for at least 4-6 hours, or preferably overnight, to allow the panna cotta to fully set. The chilling time is crucial for the gelatin to work its magic and create that signature wobble. The longer it chills, the firmer it will become.
- Unmold (Optional): If desired, you can unmold the panna cotta before serving. To unmold, gently run a thin knife or spatula around the edge of each panna cotta to loosen it. Dip the bottom of the ramekin briefly in hot water (be careful not to let the water reach the panna cotta itself). Invert the ramekin onto a serving plate and gently tap the bottom to release the panna cotta. If using glasses or decorative dishes, unmolding isn’t necessary, and they can be served directly in their dishes.
- Serve and Garnish: Once set and unmolded (if desired), your Silky Vanilla Bean Panna Cotta is ready to be served. Garnish as desired with fresh fruit, berries, sauces, or other toppings. See the “How to Serve” section below for more inspiration.
Nutrition
- Serving Size: one normal portion
- Calories: 400
- Fat: 35g