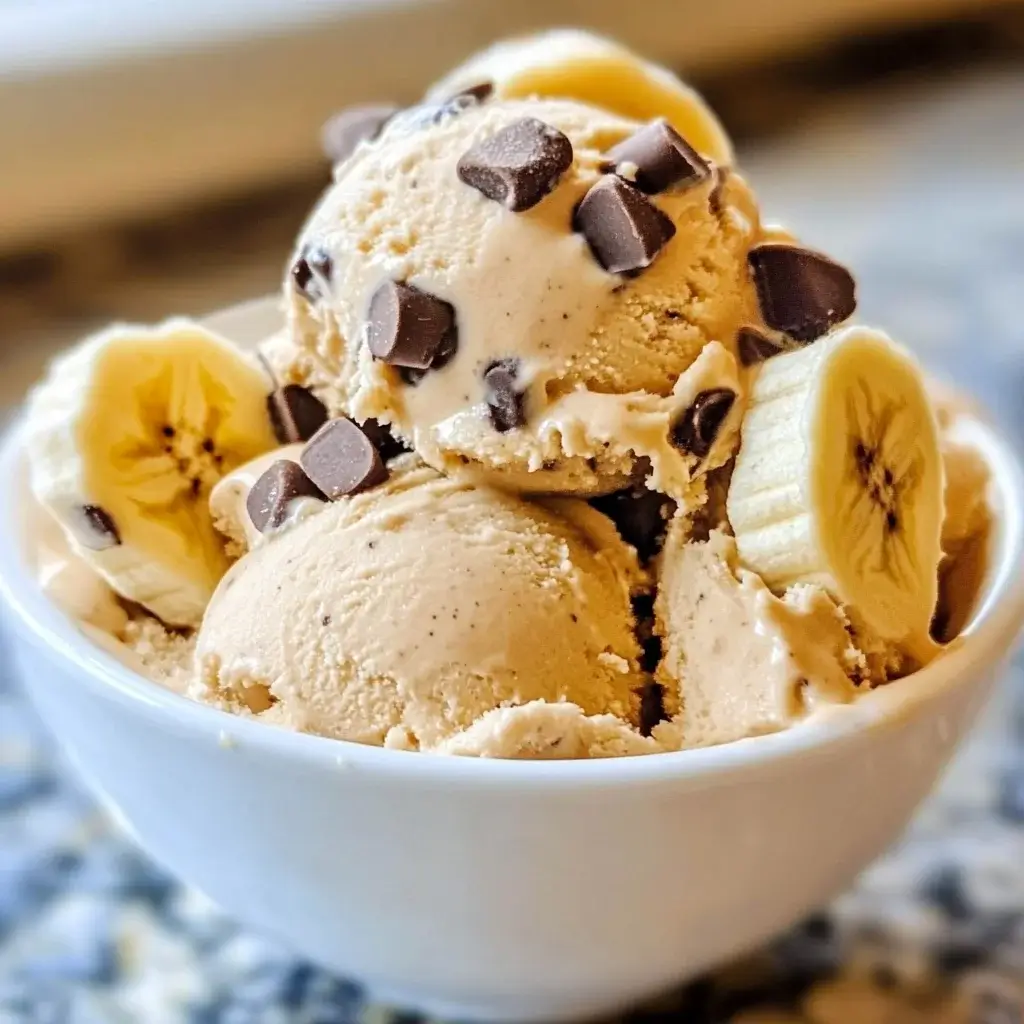
Oh, banana ice cream, where have you been all my life? Seriously, discovering this recipe was a game-changer for our family, especially during those sweltering summer months when the ice cream cravings hit hard. We’re always trying to find healthier alternatives to sugary treats, and this simple banana ice cream has become our absolute go-to. My kids, who are usually suspicious of anything remotely healthy, devour it without a second thought. They genuinely believe it’s just regular ice cream, and honestly, the creamy texture and natural sweetness are so satisfying, I sometimes forget it’s just bananas! It’s incredibly quick to whip up – perfect for those impromptu dessert moments – and requires minimal ingredients, which is a huge win in my book. If you’re looking for a delicious, healthy, and ridiculously easy dessert that will please everyone, from picky eaters to health enthusiasts, you absolutely have to try this. Trust me, you’ll be amazed at how something so simple can be so incredibly delicious.
Ingredients
- Ripe Bananas: (4-6, depending on size and desired quantity) – The star of the show! Ripe bananas are essential for sweetness and creamy texture. Look for bananas with brown spots, indicating they are perfectly ripe and full of natural sugars.
- Optional Flavor Enhancements:
- Vanilla Extract: (1 teaspoon) – Adds a classic ice cream flavor note, enhancing the overall taste.
- Cinnamon: (½ teaspoon) – A warm spice that complements banana beautifully, adding depth and cozy flavor.
- Cocoa Powder: (1-2 tablespoons) – For a chocolatey twist, unsweetened cocoa powder creates a rich and decadent flavor profile.
- Peanut Butter or Almond Butter: (1-2 tablespoons) – Adds creaminess, protein, and a nutty flavor, making it even more satisfying.
- Milk (Dairy or Non-Dairy): (1-2 tablespoons, optional) – If your blender struggles or you prefer a slightly softer consistency, a splash of milk can help.
Instructions
- Peel and Slice the Bananas: Start by peeling your ripe bananas. Slice them into roughly 1-inch thick coins. This helps them freeze faster and more evenly, making the blending process smoother later on.
- Freeze the Banana Slices: Place the sliced bananas in a single layer on a baking sheet lined with parchment paper or a silicone mat. Freezing them in a single layer prevents them from clumping together into a giant banana block, which would be harder to blend. Freeze for at least 2 hours, or ideally overnight, until they are completely solid. The colder and harder the bananas, the creamier your ice cream will be.
- Blend the Frozen Bananas: Once the banana slices are frozen solid, transfer them to a high-speed blender or food processor. If you’re using a food processor, you might need to scrape down the sides more frequently. Start blending on a low speed, gradually increasing to high. Initially, the bananas will look crumbly and dry. Don’t worry, keep blending!
- Continue Blending Until Creamy: As you continue to blend, the frozen bananas will start to break down and become creamy. This process might take a few minutes, depending on the power of your blender. You may need to stop occasionally to scrape down the sides of the blender or food processor to ensure everything is blending evenly. Be patient; the transformation from crumbly to creamy is magical! If you are adding any optional flavor enhancements like vanilla extract, cinnamon, or cocoa powder, add them now, while the mixture is blending and incorporate them thoroughly.
- Achieve Desired Consistency: Blend until the mixture reaches a smooth, soft-serve ice cream consistency. If you prefer a thicker, more scoopable ice cream, you can transfer the blended mixture to a freezer-safe container and freeze for another 30-60 minutes. This will firm it up further, resembling traditional hard-packed ice cream.
- Serve Immediately or Freeze for Later: For a soft-serve style treat, serve your banana ice cream immediately after blending. If you prefer a firmer texture, freeze it for a short while. If you are not serving immediately, transfer the banana ice cream to an airtight, freezer-safe container and store it in the freezer. Keep in mind that it might become quite hard when frozen solid, so you may need to let it thaw slightly for a few minutes before scooping and serving.
Nutrition Facts
(Per serving, using 1 medium banana, approximate values)
- Serving Size: 1 serving (approximately ½ cup)
- Calories: 105-120 kcal
- Total Fat: Less than 1g
- Saturated Fat: 0g
- Potassium: 422mg (approx. 12% DV)
Note: Nutritional values can vary slightly depending on banana size and ripeness, and any added optional ingredients.
Preparation Time
- Prep Time: 10 minutes (peeling and slicing bananas)
- Freeze Time: Minimum 2 hours (ideally overnight)
- Blend Time: 5-10 minutes
- Total Time: 2 hours 15 minutes (minimum, including freezing)
This simple banana ice cream requires minimal active preparation time. The majority of the time is passive freezing, making it a convenient dessert to plan ahead for.
How to Serve
Banana ice cream is incredibly versatile and can be enjoyed in countless ways. Here are some delicious serving suggestions:
- Classic Bowl: Simply scoop the banana ice cream into a bowl and enjoy as is! Its natural sweetness and creamy texture are satisfying on their own.
- Ice Cream Cones: For a fun and classic ice cream experience, serve it in cones. This is especially popular with kids (and adults!).
- Toppings Galore: Elevate your banana ice cream with a variety of toppings. Consider:
- Fresh Fruits: Sliced strawberries, blueberries, raspberries, mango, or extra banana slices.
- Nuts and Seeds: Chopped walnuts, almonds, pecans, peanuts, chia seeds, or flax seeds for added crunch and healthy fats.
- Chocolate Sauce or Syrup: Drizzle with your favorite chocolate sauce, caramel sauce, or maple syrup for extra sweetness and indulgence.
- Sprinkles: Colorful sprinkles are always a fun addition, especially for children’s parties.
- Whipped Cream (Dairy or Coconut): A dollop of whipped cream adds a touch of extra richness and decadence.
- Granola: Sprinkle granola on top for added texture and a satisfying crunch.
- Nut Butters: A swirl of peanut butter, almond butter, or cashew butter adds extra flavor and creaminess.
- Shredded Coconut: Toasted or unsweetened shredded coconut adds a tropical touch.
- In Smoothies and Milkshakes: Blend banana ice cream into smoothies or milkshakes for extra creaminess and natural sweetness. It’s a fantastic way to thicken smoothies and add a healthy, dessert-like element.
- Dessert Parfaits: Layer banana ice cream with granola, fresh fruit, and yogurt to create a delicious and visually appealing parfait.
- Alongside Other Desserts: Serve a scoop of banana ice cream alongside warm desserts like brownies, cobblers, or pies for a delightful contrast of temperatures and textures.
- Banana Splits: Create a healthier banana split by using banana ice cream as the base and loading it up with fruit, nuts, and a drizzle of chocolate sauce.
- Affogato Style: Pour a shot of hot espresso over a scoop of banana ice cream for a simple and sophisticated affogato dessert.
Additional Tips for Perfect Banana Ice Cream
- Use Perfectly Ripe Bananas: The key to naturally sweet and creamy banana ice cream is using ripe bananas. Look for bananas that are yellow with brown spots. These bananas have converted more of their starch into sugar, resulting in a sweeter and more flavorful ice cream. Green or underripe bananas will be less sweet and have a starchier texture.
- Freeze Bananas Solid: Ensure the banana slices are completely frozen solid before blending. This is crucial for achieving that creamy, ice cream-like texture. If the bananas are not frozen hard enough, the mixture might become more like a smoothie than ice cream. Overnight freezing is highly recommended for best results.
- High-Speed Blender is Best: While you can make banana ice cream in a food processor or even a less powerful blender, a high-speed blender will yield the smoothest and creamiest results in the shortest amount of time. High-speed blenders have the power to break down the frozen bananas quickly and efficiently, creating a velvety texture.
- Be Patient During Blending: The blending process might seem a little slow at first, and you might be tempted to add liquid to speed it up. Resist this urge! Patience is key. Keep blending, and the frozen bananas will eventually transform from crumbly pieces to a smooth, creamy mixture. Stopping to scrape down the sides of the blender periodically will help ensure even blending.
- Control the Consistency: You can control the consistency of your banana ice cream by adjusting the blending time. For a softer, soft-serve consistency, blend until just smooth. For a firmer, scoopable ice cream, blend until smooth, then transfer to a freezer-safe container and freeze for an additional 30-60 minutes.
- Experiment with Flavors: Don’t be afraid to get creative with flavors! Banana ice cream is a fantastic base for endless variations. Try adding different spices like nutmeg or cardamom, extracts like almond or peppermint, or even a pinch of salt to enhance the sweetness. Mix-ins like chocolate chips, chopped nuts, or cookie pieces can also be added after blending for extra texture and flavor.
- Thaw Slightly Before Scooping if Frozen Solid: If you freeze your banana ice cream for longer periods, it might become quite hard. To make it easier to scoop, let it thaw at room temperature for 5-10 minutes before serving. This will soften it slightly, making it easier to scoop without melting too quickly.
- Store Properly for Best Texture: Store leftover banana ice cream in an airtight, freezer-safe container in the freezer. To minimize freezer burn and maintain the best texture, press a piece of parchment paper or plastic wrap directly onto the surface of the ice cream before sealing the container. This helps prevent ice crystals from forming on the surface.
Frequently Asked Questions (FAQ)
Q1: Can I use unripe bananas for banana ice cream?
A: While you can use unripe bananas, it’s highly recommended to use ripe bananas for the best flavor and texture. Ripe bananas are sweeter and softer, resulting in a naturally sweet and creamy ice cream. Unripe bananas will be less sweet, starchier, and may have a slightly bitter taste. For optimal results, always choose ripe bananas with brown spots.
Q2: How long does banana ice cream last in the freezer?
A: Banana ice cream is best enjoyed fresh or within a few days of making it for the best texture. It can be stored in an airtight container in the freezer for up to 1-2 months, but the texture may become icier over time. For optimal quality, it’s recommended to consume it within a week. Proper storage (as mentioned in tip #8) can help maintain the texture for longer.
Q3: Can I add other fruits to banana ice cream?
A: Absolutely! Banana ice cream is a fantastic base for adding other fruits. Berries like strawberries, blueberries, and raspberries blend beautifully with banana. Mango, pineapple, and peaches are also delicious additions. For best results, freeze the additional fruits along with the bananas before blending. Adding fruits will alter the flavor profile and nutritional content, but can create exciting variations.
Q4: Is banana ice cream really considered “ice cream” if it’s just bananas?
A: Technically, traditional ice cream contains dairy and added sugar. However, banana ice cream has gained popularity as a healthy and delicious alternative, often referred to as “nice cream.” The magic of banana ice cream lies in the natural sugars and creamy texture of blended frozen bananas, which mimic the taste and consistency of traditional soft-serve ice cream. While it may not be ice cream in the strictest definition, it certainly satisfies ice cream cravings in a healthier way.
Q5: Can I make banana ice cream without a high-speed blender?
A: Yes, you can make banana ice cream without a high-speed blender, but it may require a bit more effort and patience. A food processor or even a less powerful blender can work, but you might need to blend for longer and stop more frequently to scrape down the sides. You may also need to add a tablespoon or two of liquid (milk or water) to help the blending process, but add it sparingly to avoid making it too liquidy. The texture might be slightly less smooth compared to using a high-speed blender.
Q6: Can I refreeze banana ice cream if it melts?
A: It’s generally not recommended to refreeze banana ice cream if it has completely melted. Refreezing can alter the texture, making it icier and less creamy. However, if it has only slightly softened, you can try refreezing it quickly in a shallow container to minimize ice crystal formation. For best results, try to serve and consume banana ice cream in one go or freeze in smaller portions to avoid thawing and refreezing.
Q7: Is banana ice cream vegan and gluten-free?
A: Yes! Simple banana ice cream made with just bananas is naturally vegan and gluten-free. It’s a great option for people with dietary restrictions or preferences. If you are adding optional ingredients, be sure to check that they are also vegan and gluten-free if needed.
Q8: Can I make banana ice cream in advance for a party?
A: Yes, you can prepare banana ice cream in advance for a party. Blend it to your desired consistency, then transfer it to a freezer-safe container and freeze. For a soft-serve texture, blend it closer to serving time. For a firmer, scoopable texture, freeze it for at least 30-60 minutes after blending. Remember to let it thaw slightly before scooping if it becomes too hard from freezing. You can also prepare the frozen banana slices in advance and blend them just before serving for the freshest taste and texture.
Print
Simple Banana Ice Cream
Ingredients
- Ripe Bananas: (4-6, depending on size and desired quantity) – The star of the show! Ripe bananas are essential for sweetness and creamy texture. Look for bananas with brown spots, indicating they are perfectly ripe and full of natural sugars.
- Optional Flavor Enhancements:
- Vanilla Extract: (1 teaspoon) – Adds a classic ice cream flavor note, enhancing the overall taste.
- Cinnamon: (½ teaspoon) – A warm spice that complements banana beautifully, adding depth and cozy flavor.
- Cocoa Powder: (1-2 tablespoons) – For a chocolatey twist, unsweetened cocoa powder creates a rich and decadent flavor profile.
- Peanut Butter or Almond Butter: (1-2 tablespoons) – Adds creaminess, protein, and a nutty flavor, making it even more satisfying.
- Milk (Dairy or Non-Dairy): (1-2 tablespoons, optional) – If your blender struggles or you prefer a slightly softer consistency, a splash of milk can help.
Instructions
- Peel and Slice the Bananas: Start by peeling your ripe bananas. Slice them into roughly 1-inch thick coins. This helps them freeze faster and more evenly, making the blending process smoother later on.
- Freeze the Banana Slices: Place the sliced bananas in a single layer on a baking sheet lined with parchment paper or a silicone mat. Freezing them in a single layer prevents them from clumping together into a giant banana block, which would be harder to blend. Freeze for at least 2 hours, or ideally overnight, until they are completely solid. The colder and harder the bananas, the creamier your ice cream will be.
- Blend the Frozen Bananas: Once the banana slices are frozen solid, transfer them to a high-speed blender or food processor. If you’re using a food processor, you might need to scrape down the sides more frequently. Start blending on a low speed, gradually increasing to high. Initially, the bananas will look crumbly and dry. Don’t worry, keep blending!
- Continue Blending Until Creamy: As you continue to blend, the frozen bananas will start to break down and become creamy. This process might take a few minutes, depending on the power of your blender. You may need to stop occasionally to scrape down the sides of the blender or food processor to ensure everything is blending evenly. Be patient; the transformation from crumbly to creamy is magical! If you are adding any optional flavor enhancements like vanilla extract, cinnamon, or cocoa powder, add them now, while the mixture is blending and incorporate them thoroughly.
- Achieve Desired Consistency: Blend until the mixture reaches a smooth, soft-serve ice cream consistency. If you prefer a thicker, more scoopable ice cream, you can transfer the blended mixture to a freezer-safe container and freeze for another 30-60 minutes. This will firm it up further, resembling traditional hard-packed ice cream.
- Serve Immediately or Freeze for Later: For a soft-serve style treat, serve your banana ice cream immediately after blending. If you prefer a firmer texture, freeze it for a short while. If you are not serving immediately, transfer the banana ice cream to an airtight, freezer-safe container and store it in the freezer. Keep in mind that it might become quite hard when frozen solid, so you may need to let it thaw slightly for a few minutes before scooping and serving.
Nutrition
- Serving Size: one normal portion
- Calories: 120
- Fat: 1g
- Saturated Fat: 0g