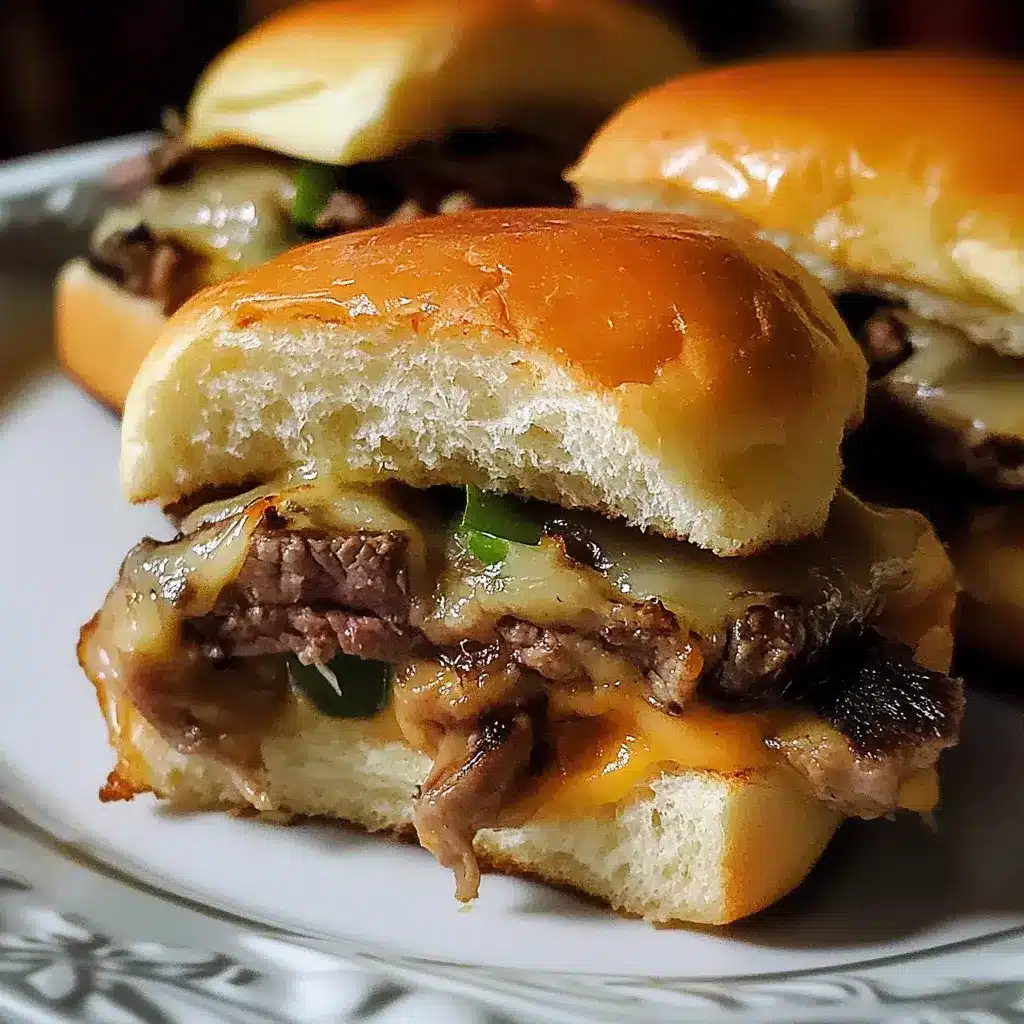
It’s slider night at our house, and let me tell you, it’s always a hit! There’s something undeniably fun and satisfying about these mini versions of classic sandwiches. Forget boring weeknight dinners; these Steak & Cheese Sliders have become a family favorite for a reason. The juicy, tender steak, melty cheese, and soft, toasted buns… it’s a flavor explosion in every bite. Even my picky eaters devour them! They’re perfect for a casual family dinner, game day gatherings, or even a fun appetizer for parties. Honestly, once you try these, you’ll find yourself craving them all the time. Get ready to experience slider perfection – this recipe is a guaranteed crowd-pleaser!
Ingredients for Irresistible Steak & Cheese Sliders
- 12 Slider Buns: The foundation of our sliders! Look for soft, slightly sweet slider buns. Hawaiian rolls or brioche slider buns work exceptionally well, providing a tender and flavorful base that complements the savory filling.
- 1 lb Steak: The star of the show! Choose a tender cut of steak that cooks quickly and remains juicy. Sirloin, ribeye, or flank steak are excellent choices. Slice it thinly against the grain for maximum tenderness in each slider.
- 8-12 slices Cheese: Melty, gooey cheese is a must. Provolone, mozzarella, cheddar, or Monterey Jack are all fantastic options. Consider using a combination for a richer flavor profile. Pre-sliced cheese is convenient for sliders, ensuring even coverage.
- 1 medium Onion: Adds a savory depth and subtle sweetness. Yellow or white onions, thinly sliced, caramelize beautifully and enhance the steak’s flavor. You can also use red onion for a sharper bite if preferred.
- 1 medium Bell Pepper: Provides a pop of color and a slightly sweet, vegetal note. Green bell peppers are classic, but red, yellow, or orange bell peppers offer a sweeter taste and visual appeal. Slice them thinly to ensure they cook quickly and evenly.
- 1-2 tbsp Olive Oil: Essential for sautéing the vegetables and searing the steak. Extra virgin olive oil adds a subtle fruity flavor, but regular olive oil or vegetable oil can also be used.
- 2-3 tbsp Butter: Adds richness and flavor, especially when toasting the slider buns. Unsalted butter is recommended to control the overall saltiness of the dish.
- 1 tsp Garlic Powder: A simple way to infuse the steak and vegetables with savory garlic flavor. Garlic powder is convenient, but fresh minced garlic can also be used for a more pungent taste.
- 1 tsp Onion Powder: Enhances the savory onion flavor and complements the garlic powder. It adds depth and complexity to the overall seasoning.
- ½ tsp Salt (or to taste): Essential for seasoning and bringing out the flavors of all the ingredients. Use kosher salt or sea salt for the best flavor.
- ¼ tsp Black Pepper (or to taste): Adds a touch of spice and enhances the savory notes. Freshly ground black pepper is always preferred for its bolder flavor.
- Optional Toppings: Customize your sliders! Consider adding toppings like sautéed mushrooms, jalapenos (for a spicy kick), caramelized onions (for extra sweetness), or a drizzle of your favorite steak sauce or aioli.
Instructions: Crafting Perfect Steak & Cheese Sliders
- Prepare the Vegetables: Begin by prepping your vegetables. Wash and thinly slice one medium yellow onion and one bell pepper (any color you prefer). Thinly slicing ensures they cook quickly and evenly, becoming tender and slightly caramelized in the sliders. Set them aside.
- Slice the Steak: Take your chosen cut of steak (sirloin, ribeye, or flank steak works well). For optimal tenderness in sliders, it’s crucial to slice the steak thinly against the grain. Identifying the grain (the direction of the muscle fibers) is key. Slice perpendicular to the grain. Thin slices will cook quickly and be much easier to bite into in a slider format. Aim for slices about ¼ inch thick. Set the sliced steak aside.
- Sauté the Vegetables: Heat a tablespoon of olive oil in a large skillet or cast iron pan over medium heat. Once the oil is shimmering, add the sliced onions and bell peppers to the pan. Sauté them, stirring occasionally, for about 5-7 minutes, or until they become softened and slightly caramelized. You want them to be tender and fragrant, but not overly browned. Remove the sautéed vegetables from the pan and set aside in a bowl.
- Sear the Steak: In the same skillet, add another tablespoon of olive oil and increase the heat to medium-high. Ensure the pan is nice and hot before adding the steak. Working in batches is crucial to avoid overcrowding the pan, which can lower the temperature and steam the steak instead of searing it. Add a single layer of sliced steak to the hot pan. Season each batch generously with garlic powder, onion powder, salt, and black pepper. Sear the steak for only 1-2 minutes per side, or until it’s nicely browned and cooked to your desired level of doneness (medium-rare to medium is recommended for sliders to keep them juicy). Remove each batch of seared steak from the pan and set aside with the vegetables. Repeat this process until all the steak is seared.
- Preheat the Oven & Prepare Sliders: Preheat your oven to 350°F (175°C). While the oven is preheating, it’s time to assemble the sliders. Slice your slider buns in half horizontally, creating tops and bottoms. In a small bowl, melt two tablespoons of butter (you can do this in the microwave or on the stovetop). Brush the melted butter generously over the cut sides of both the top and bottom slider buns. This butter layer will help them toast beautifully and add flavor.
- Assemble the Sliders: Arrange the bottom halves of the slider buns on a baking sheet. On each bottom bun, layer a generous portion of the sautéed onions and bell peppers. Then, top the vegetables with the seared steak slices, distributing them evenly among the sliders. Finally, place slices of your chosen cheese (provolone, mozzarella, cheddar, etc.) over the steak on each slider. Ensure the cheese covers the steak well for maximum meltiness. Place the top halves of the slider buns on top of the cheese, completing the sliders.
- Bake the Sliders: Place the baking sheet with the assembled sliders in the preheated oven. Bake for 8-10 minutes, or until the slider buns are lightly golden brown and toasted, and the cheese is melted and gooey. Keep a close eye on them to prevent the buns from burning.
- Serve and Enjoy: Once the sliders are perfectly toasted and cheesy, remove them from the oven. Let them cool slightly for a minute or two before serving. This allows the cheese to set a bit and prevents burning your mouth. Serve these delicious Steak & Cheese Sliders immediately while they are warm, cheesy, and utterly irresistible! Consider serving them with your favorite dipping sauces like steak sauce, aioli, or even a creamy horseradish sauce.
Nutrition Facts (per slider)
- Serving Size: 1 slider
- Calories: Approximately 250 kcal
- Protein: 15g
Note: Nutritional values are estimates and can vary based on specific ingredients, portion sizes, and bun type. For precise nutritional information, use a nutrition calculator and input the exact ingredients you use.
Preparation Time: Quick & Delicious
This Steak & Cheese Sliders recipe is wonderfully efficient, perfect for a satisfying meal without spending hours in the kitchen. The total preparation time, from start to finish, is approximately 30-40 minutes. This includes about 15 minutes for prepping the vegetables and slicing the steak, 15-20 minutes for cooking the steak and vegetables, and just 8-10 minutes for baking the assembled sliders. The quick cooking time of the steak and vegetables, combined with the short baking time, makes this recipe ideal for weeknight dinners or when you need to whip up a crowd-pleasing appetizer in a hurry. Enjoy the deliciousness without the lengthy kitchen commitment!
How to Serve Steak & Cheese Sliders for Maximum Enjoyment
Steak & Cheese Sliders are incredibly versatile and can be served in numerous ways to elevate your meal or gathering. Here are some fantastic serving suggestions:
- Classic Sides:
- Crispy French Fries: A timeless pairing! Serve your sliders with a generous portion of crispy French fries, seasoned with salt and pepper or your favorite fry seasoning.
- Sweet Potato Fries: For a slightly healthier and sweeter option, sweet potato fries offer a delicious contrast to the savory sliders.
- Onion Rings: Another classic diner side that complements sliders perfectly. The crispy onion rings add a satisfying crunch.
- Potato Chips: Keep it simple with a bowl of your favorite potato chips. Kettle chips or flavored chips add extra flavor and texture.
- Fresh & Light Sides:
- Coleslaw: A creamy or vinegar-based coleslaw provides a cool and refreshing counterpoint to the rich sliders.
- Garden Salad: A simple green salad with a light vinaigrette dressing offers a healthy and refreshing balance.
- Cucumber Salad: A refreshing cucumber salad with dill and vinegar provides a cool and crisp side dish.
- Fruit Salad: A light and colorful fruit salad adds a touch of sweetness and freshness to the meal.
- Dipping Sauces: Offer a variety of dipping sauces to customize the flavor of your sliders:
- Steak Sauce: A classic choice that enhances the savory steak flavor.
- Aioli: Garlic aioli, chipotle aioli, or roasted red pepper aioli add creamy richness and flavor.
- Horseradish Sauce: For a spicy kick, creamy horseradish sauce complements the steak beautifully.
- BBQ Sauce: A smoky BBQ sauce adds a different flavor profile and pairs well with steak and cheese.
- Ketchup & Mustard: Classic condiments that are always crowd-pleasers.
- Presentation Ideas:
- Slider Platters: Arrange the sliders attractively on a large platter for parties or gatherings. Garnish with fresh herbs like parsley or chives for visual appeal.
- Individual Plates: Serve 2-3 sliders per person on individual plates for a satisfying meal.
- Slider Bar: Set up a slider bar with the cooked steak, vegetables, cheese, buns, and various toppings and sauces. Let everyone assemble their own sliders for a fun and interactive experience.
- Skewered Sliders: For a fun and unique presentation, thread the sliders onto skewers, alternating buns, steak, cheese, and vegetables.
- Occasions:
- Game Day: Steak & Cheese Sliders are perfect for game day gatherings and tailgates. They are easy to eat while watching the game and are always a crowd-pleaser.
- Parties & Appetizers: These sliders make fantastic appetizers for parties, potlucks, or casual get-togethers. Their small size makes them easy to handle and enjoy.
- Weeknight Dinners: Quick and satisfying, these sliders are a great option for busy weeknight meals.
- BBQs & Cookouts: Add sliders to your BBQ menu for a delicious and crowd-pleasing alternative to burgers.
- Family Movie Night: Make slider night a fun family tradition for movie nights at home.
Additional Tips for Slider Perfection
- Choose the Right Steak Cut: While sirloin, ribeye, and flank steak are recommended, consider your budget and preferences. Skirt steak is another flavorful and affordable option that slices well for sliders. Just be sure to slice it thinly against the grain. For a leaner option, consider using top round steak, but marinating it will help keep it tender.
- Marinate for Extra Flavor (Optional): For even more flavorful steak, consider marinating it for at least 30 minutes or up to a few hours before cooking. A simple marinade of olive oil, soy sauce, Worcestershire sauce, garlic, and black pepper will enhance the steak’s taste and tenderness.
- Don’t Overcook the Steak: Steak for sliders should be cooked to medium-rare or medium to ensure it remains juicy and tender. Overcooked steak will be dry and tough, especially in small slider portions. Use a meat thermometer to ensure accurate doneness if you’re unsure.
- Caramelize Onions for Deeper Flavor: For a richer, sweeter onion flavor, take the time to properly caramelize the onions. Sauté them over medium-low heat for a longer period (around 20-30 minutes), stirring occasionally, until they become deeply golden brown and sweet. Caramelized onions add an incredible depth of flavor to the sliders.
- Toast the Buns for Texture: Don’t skip toasting the slider buns! Buttering and toasting them in the oven adds a delightful crispness and prevents them from becoming soggy from the fillings. Toasted buns also hold up better to the juicy steak and cheese.
- Melt the Cheese Perfectly: Ensure the cheese is melted and gooey by placing it on top of the hot steak while the sliders bake in the oven. Using pre-sliced cheese helps ensure even melting. For extra melty cheese, you can briefly broil the sliders for the last minute of baking, keeping a close eye on them to prevent burning.
- Get Creative with Cheese Combinations: Experiment with different cheese combinations to create unique flavor profiles. Try provolone and mozzarella for a classic Italian flavor, cheddar and Monterey Jack for a cheesy and slightly spicy kick, or pepper jack for a bolder, spicier slider.
- Make Ahead Components: To save time, you can prepare components of the sliders ahead of time. Sauté the vegetables and slice the steak in advance. Store them separately in the refrigerator for up to 24 hours. When ready to assemble, simply sear the steak, assemble the sliders, and bake. This makes slider preparation much quicker, especially for parties or gatherings.
Frequently Asked Questions (FAQ) about Steak & Cheese Sliders
Q1: Can I use a different type of steak for these sliders?
A: Absolutely! While sirloin, ribeye, and flank steak are excellent choices, you can use other tender cuts like skirt steak, top sirloin, or even thinly sliced ribeye roast. The key is to choose a cut that is flavorful and cooks quickly. Just be sure to slice it thinly against the grain for maximum tenderness in slider form.
Q2: What are the best buns for steak sliders?
A: Soft slider buns are essential! Hawaiian rolls or brioche slider buns are highly recommended as they are tender, slightly sweet, and hold up well to the fillings. Potato slider buns are another good option, offering a slightly denser texture. Avoid using overly dense or crusty rolls, as they can be difficult to bite into as sliders.
Q3: Can I make these sliders vegetarian?
A: Yes, you can easily adapt this recipe for vegetarians! Substitute the steak with portobello mushrooms, sliced and grilled halloumi cheese, or marinated and grilled tofu. Portobello mushrooms provide a meaty texture, while halloumi offers a savory and slightly salty flavor. Tofu, when marinated and grilled, can also be a delicious and protein-rich vegetarian alternative.
Q4: How do I prevent the sliders from getting soggy?
A: To prevent soggy sliders, toast the buns! Buttering and toasting the inside of the slider buns creates a barrier that prevents moisture from soaking into the bread. Also, avoid adding overly wet ingredients or sauces directly onto the buns before baking. Layer the vegetables and steak first, then top with cheese before placing the top bun.
Q5: Can I prepare these sliders ahead of time?
A: You can prepare components ahead of time to streamline the process. Sauté the vegetables and slice the steak in advance and store them separately in the refrigerator for up to 24 hours. Assemble and bake the sliders just before serving for the best quality and texture. Assembled sliders are best enjoyed fresh, but you can assemble them a couple of hours in advance and keep them refrigerated, then bake just before serving.
Q6: What are some good cheese alternatives for these sliders?
A: Beyond provolone, mozzarella, cheddar, and Monterey Jack, explore other melting cheeses! Gouda offers a nutty and slightly sweet flavor, Gruyere is rich and complex, and pepper jack adds a spicy kick. For a smoky flavor, try smoked gouda or smoked provolone. Experiment with different cheese combinations to find your favorite slider flavor profile.
Q7: Can I add other vegetables to these sliders?
A: Absolutely! Feel free to customize your sliders with other vegetables. Sautéed mushrooms are a classic addition, adding an earthy and umami flavor. Caramelized onions enhance the sweetness and depth. Roasted red peppers add a smoky sweetness. Jalapeños provide a spicy kick. Get creative and add your favorite vegetables to personalize your sliders.
Q8: How do I reheat leftover steak sliders?
A: Leftover steak sliders are best reheated in the oven or an air fryer to maintain their texture. Preheat your oven or air fryer to 350°F (175°C). Wrap the sliders loosely in foil and reheat for 10-15 minutes, or until heated through and the cheese is melted again. Avoid microwaving them, as this can make the buns soggy. Reheating in the oven or air fryer will help crisp up the buns and melt the cheese nicely.

Steak & Cheese Sliders
Ingredients
- Slider Buns: The foundation of our sliders! Look for soft, slightly sweet slider buns. Hawaiian rolls or brioche slider buns work exceptionally well, providing a tender and flavorful base that complements the savory filling.
- Steak: The star of the show! Choose a tender cut of steak that cooks quickly and remains juicy. Sirloin, ribeye, or flank steak are excellent choices. Slice it thinly against the grain for maximum tenderness in each slider.
- Cheese: Melty, gooey cheese is a must. Provolone, mozzarella, cheddar, or Monterey Jack are all fantastic options. Consider using a combination for a richer flavor profile. Pre-sliced cheese is convenient for sliders, ensuring even coverage.
- Onion: Adds a savory depth and subtle sweetness. Yellow or white onions, thinly sliced, caramelize beautifully and enhance the steak’s flavor. You can also use red onion for a sharper bite if preferred.
- Bell Pepper: Provides a pop of color and a slightly sweet, vegetal note. Green bell peppers are classic, but red, yellow, or orange bell peppers offer a sweeter taste and visual appeal. Slice them thinly to ensure they cook quickly and evenly.
- Olive Oil: Essential for sautéing the vegetables and searing the steak. Extra virgin olive oil adds a subtle fruity flavor, but regular olive oil or vegetable oil can also be used.
- Butter: Adds richness and flavor, especially when toasting the slider buns. Unsalted butter is recommended to control the overall saltiness of the dish.
- Garlic Powder: A simple way to infuse the steak and vegetables with savory garlic flavor. Garlic powder is convenient, but fresh minced garlic can also be used for a more pungent taste.
- Onion Powder: Enhances the savory onion flavor and complements the garlic powder. It adds depth and complexity to the overall seasoning.
- Salt: Essential for seasoning and bringing out the flavors of all the ingredients. Use kosher salt or sea salt for the best flavor.
- Black Pepper: Adds a touch of spice and enhances the savory notes. Freshly ground black pepper is always preferred for its bolder flavor.
- Optional Toppings: Customize your sliders! Consider adding toppings like sautéed mushrooms, jalapenos (for a spicy kick), caramelized onions (for extra sweetness), or a drizzle of your favorite steak sauce or aioli.
Instructions
- Prepare the Vegetables: Begin by prepping your vegetables. Wash and thinly slice one medium yellow onion and one bell pepper (any color you prefer). Thinly slicing ensures they cook quickly and evenly, becoming tender and slightly caramelized in the sliders. Set them aside.
- Slice the Steak: Take your chosen cut of steak (sirloin, ribeye, or flank steak works well). For optimal tenderness in sliders, it’s crucial to slice the steak thinly against the grain. Identifying the grain (the direction of the muscle fibers) is key. Slice perpendicular to the grain. Thin slices will cook quickly and be much easier to bite into in a slider format. Aim for slices about ¼ inch thick. Set the sliced steak aside.
- Sauté the Vegetables: Heat a tablespoon of olive oil in a large skillet or cast iron pan over medium heat. Once the oil is shimmering, add the sliced onions and bell peppers to the pan. Sauté them, stirring occasionally, for about 5-7 minutes, or until they become softened and slightly caramelized. You want them to be tender and fragrant, but not overly browned. Remove the sautéed vegetables from the pan and set aside in a bowl.
- Sear the Steak: In the same skillet, add another tablespoon of olive oil and increase the heat to medium-high. Ensure the pan is nice and hot before adding the steak. Working in batches is crucial to avoid overcrowding the pan, which can lower the temperature and steam the steak instead of searing it. Add a single layer of sliced steak to the hot pan. Season each batch generously with garlic powder, onion powder, salt, and black pepper. Sear the steak for only 1-2 minutes per side, or until it’s nicely browned and cooked to your desired level of doneness (medium-rare to medium is recommended for sliders to keep them juicy). Remove each batch of seared steak from the pan and set aside with the vegetables. Repeat this process until all the steak is seared.
- Preheat the Oven & Prepare Sliders: Preheat your oven to 350°F (175°C). While the oven is preheating, it’s time to assemble the sliders. Slice your slider buns in half horizontally, creating tops and bottoms. In a small bowl, melt two tablespoons of butter (you can do this in the microwave or on the stovetop). Brush the melted butter generously over the cut sides of both the top and bottom slider buns. This butter layer will help them toast beautifully and add flavor.
- Assemble the Sliders: Arrange the bottom halves of the slider buns on a baking sheet. On each bottom bun, layer a generous portion of the sautéed onions and bell peppers. Then, top the vegetables with the seared steak slices, distributing them evenly among the sliders. Finally, place slices of your chosen cheese (provolone, mozzarella, cheddar, etc.) over the steak on each slider. Ensure the cheese covers the steak well for maximum meltiness. Place the top halves of the slider buns on top of the cheese, completing the sliders.
- Bake the Sliders: Place the baking sheet with the assembled sliders in the preheated oven. Bake for 8-10 minutes, or until the slider buns are lightly golden brown and toasted, and the cheese is melted and gooey. Keep a close eye on them to prevent the buns from burning.
- Serve and Enjoy: Once the sliders are perfectly toasted and cheesy, remove them from the oven. Let them cool slightly for a minute or two before serving. This allows the cheese to set a bit and prevents burning your mouth. Serve these delicious Steak & Cheese Sliders immediately while they are warm, cheesy, and utterly irresistible! Consider serving them with your favorite dipping sauces like steak sauce, aioli, or even a creamy horseradish sauce.
Nutrition
- Serving Size: one normal portion
- Calories: 250
- Protein: 15g