Introduction
Sticky Rice Cake, known as Biko in the Philippines, is a quintessential Filipino dessert that has been enjoyed across generations. This sweet delight combines the rich flavors of glutinous rice, coconut milk, and brown sugar, creating a unique and satisfying treat. Biko is often served during festive occasions, family gatherings, or as a comfort food that reminds many of home. In this comprehensive guide, we will explore everything you need to know about making this delicious dessert, from ingredients and instructions to serving suggestions and nutritional information. Whether you’re a seasoned cook or a beginner looking to expand your culinary repertoire, this article will walk you through the process of making the perfect Biko.
Ingredients
To create this classic Filipino dessert, you’ll need a handful of simple ingredients that are readily available in most grocery stores. Here’s what you’ll need:
- 2 cups of glutinous rice
- 4 cups of coconut milk
- 1 ½ cups of dark brown sugar
- ½ teaspoon of salt
- Banana leaves or butter for lining the baking dish (optional)
- Toppings (optional):
- Latik (coconut milk curds)
- Toasted shredded coconut
Instructions
Creating Biko involves a few straightforward steps. Follow this detailed guide to achieve the perfect sticky rice cake:
Step 1: Prepare the Rice
- Rinse the Glutinous Rice: Rinse the glutinous rice under cold water until the water runs clear. This helps remove excess starch and prevents the rice from becoming too sticky.
- Cook the Rice: In a large pot, combine the rinsed glutinous rice with 2 cups of coconut milk and a pinch of salt. Cook over medium heat, stirring occasionally, until the rice absorbs the coconut milk and becomes tender. This usually takes about 15-20 minutes.
Step 2: Make the Coconut Milk Syrup
- Prepare the Syrup: In a separate saucepan, combine the remaining 2 cups of coconut milk and 1 ½ cups of dark brown sugar. Cook over medium heat, stirring continuously, until the sugar dissolves and the mixture thickens into a syrupy consistency. This should take about 10-15 minutes.
Step 3: Combine and Cook
- Mix the Syrup and Rice: Once the rice is cooked, pour the coconut milk syrup into the pot with the rice. Stir well to ensure the rice is thoroughly coated with the syrup.
- Continue Cooking: Reduce the heat to low and continue cooking the rice and syrup mixture, stirring frequently to prevent sticking and burning. Cook until the rice absorbs most of the syrup and reaches a sticky and glossy consistency. This will take an additional 10-15 minutes.
Step 4: Assemble the Biko
- Prepare a Baking Dish: Line a baking dish with banana leaves or lightly grease it with butter. This will prevent the Biko from sticking to the dish and add a subtle flavor.
- Transfer the Rice: Pour the cooked rice mixture into the prepared baking dish. Use a spatula to spread it evenly and smooth the top.
- Add Toppings (Optional): If you wish, top the Biko with latik or toasted shredded coconut for added texture and flavor.
- Bake (Optional): While traditional Biko is often not baked, you can bake it in a preheated oven at 350°F (175°C) for 15-20 minutes to firm it up if desired.
Step 5: Cool and Serve
- Cool: Allow the Biko to cool for at least 30 minutes before cutting it into squares or rectangles.
Nutrition Facts
Understanding the nutritional content of Biko can help you enjoy this dessert as part of a balanced diet. Here’s an approximate breakdown per serving based on a recipe yielding 12 servings:
- Calories: 290
- Carbohydrates: 52g
- Protein: 3g
- Fat: 7g
- Saturated Fat: 6g
Note: Actual nutritional values may vary based on specific ingredients and preparation methods.
How to Serve
Biko, a beloved Filipino rice cake made from glutinous rice, coconut milk, and brown sugar, is not just a treat for the palate but also a versatile dessert that can be enjoyed in numerous ways. Whether you’re hosting a gathering, preparing for a special occasion, or simply indulging in a sweet craving, the way you serve Biko can enhance its appeal. Below are detailed serving suggestions that will elevate your Biko experience.
1. Warm or Cold: Choosing the Right Temperature
One of the delightful aspects of Biko is that it can be served either warm or cold, each temperature offering a distinct experience:
- Warm Biko: When served warm, Biko retains a soft and slightly gooey texture, allowing the flavors of coconut and brown sugar to meld beautifully. This version is particularly comforting during cooler months or as a cozy dessert after a hearty meal. To warm Biko, simply place it in the microwave for a few seconds or steam it gently.
- Chilled Biko: On the other hand, cold Biko has a firmer texture that makes it easier to slice and serve. Refrigerating Biko for a few hours allows the flavors to deepen, and the coconut cream on top can firm up, providing a refreshing contrast to the sweetness. Cold Biko is an excellent choice for warm weather gatherings or picnics, where a cool dessert can be particularly enjoyable.
2. Perfect Pairings: Coffee or Tea
Biko pairs wonderfully with beverages, making it an ideal snack for any time of the day:
- With Coffee: The rich, sweet taste of Biko complements the bold flavors of coffee beautifully. Whether you prefer a dark roast, a creamy latte, or a sweetened iced coffee, serving Biko alongside your favorite coffee beverage can transform an ordinary afternoon into a delightful experience. The slight bitterness of coffee balances the sweetness of Biko, making each bite a harmonious treat.
- With Tea: For those who lean towards tea, Biko can be paired with various types, such as black tea, green tea, or herbal infusions. The lightness of tea, especially when served hot or iced, can enhance the flavors of Biko, providing a refreshing contrast to its richness. Consider pairing it with a floral tea like jasmine or a mint tea, which can cleanse the palate after enjoying this decadent dessert.
3. Dessert Delight: A Sweet Ending to a Meal
Biko serves as an exquisite dessert option after any meal. Its creamy texture and sweet profile make it a perfect finale:
- Plating and Presentation: When serving Biko as a dessert, consider cutting it into neat squares or diamond shapes for a polished presentation. You can also drizzle additional coconut cream or sprinkle toasted coconut flakes on top for visual appeal. A dollop of whipped cream or a scoop of vanilla ice cream can add a modern twist to this traditional dessert.
- Complementing Other Dishes: Biko can also be served alongside other Filipino desserts, such as leche flan or ube halaya (purple yam cake), creating a delightful dessert platter that showcases the rich culinary heritage of the Philippines.
4. Special Occasions: A Festive Treat
Biko holds a special place in Filipino culture, often featured during celebrations, holidays, and family gatherings. Here’s how to serve it on special occasions:
- Traditional Presentation: For a more authentic touch, serve Biko on a decorative platter lined with banana leaves. This not only adds an aesthetic appeal but also infuses the dessert with a subtle aroma. You might also consider garnishing the Biko with sliced fruits like mango or jackfruit for added color and flavor.
- Celebratory Events: Biko is often present at birthdays, weddings, and fiestas. During these occasions, you can create a towering display of Biko squares, perhaps incorporating different flavors or toppings to entice guests. Consider offering a variety of Biko, such as those topped with sweetened coconut or drizzled with caramel sauce, to cater to diverse tastes.
- Gift-Giving: Biko is also a thoughtful gift for friends and family during special occasions. Consider packaging it in decorative boxes or wrapping it in banana leaves tied with a ribbon for a personal touch. This not only showcases the dessert but also conveys the love and effort that went into making it.
Conclusion
Biko is more than just a dessert; it is a versatile treat that can be enjoyed in multiple ways, each serving method enhancing its delightful flavors. Whether served warm or cold, paired with coffee or tea, or presented as a centerpiece for special occasions, Biko remains a cherished part of Filipino culinary tradition. By incorporating these serving suggestions, you can ensure that your Biko experience is not only delicious but also memorable.
Additional Tips
Additional Tips for Perfecting Your Biko
To ensure your Biko—a beloved Filipino sticky rice dessert—turns out perfectly every time, consider these additional tips that enhance both flavor and presentation:
Use Fresh Coconut Milk
One of the key ingredients in Biko is coconut milk, and using fresh coconut milk can significantly elevate the dish. Freshly squeezed coconut milk not only provides a creamier texture but also imparts a richer, more aromatic flavor than canned alternatives. If you’re unable to source fresh coconut milk, look for high-quality canned varieties that are free of preservatives and additives. When using canned coconut milk, consider shaking the can well before opening to ensure an even consistency, as the cream often separates from the liquid during storage.
Adjust Sweetness
Biko is known for its sweet, sticky richness, but sweetness is subjective. The recipe typically calls for brown sugar, which adds depth and a hint of caramel flavor. However, you can easily adjust the amount to match your personal taste. For those who prefer a less sweet dessert, start by reducing the brown sugar by one tablespoon, and taste the mixture before adding more. Alternatively, consider using natural sweeteners like honey or maple syrup for a different flavor profile. Remember that the sweetness will balance with the saltiness of the latik or other toppings, so be mindful of how these elements complement each other.
Monitor Cooking Temperature
The cooking temperature plays a vital role in achieving the perfect texture and consistency for Biko. It’s essential to maintain a low to medium heat when combining the glutinous rice with the coconut milk and sugar. High heat can cause the mixture to burn or stick to the bottom of your pot, leading to an undesirable texture and flavor. Stir the mixture frequently to prevent it from settling and scorching. A good rule of thumb is to keep the heat low enough that you see gentle bubbles rather than vigorous boiling. This approach allows the rice to absorb the coconut milk fully, resulting in a beautifully creamy and cohesive dessert.
Experiment with Toppings
While traditional Biko is often topped with latik—crispy coconut curds that add a delightful crunch—there’s plenty of room for creativity in your presentation. Consider experimenting with various toppings to bring a modern twist to this classic dish. Toasted nuts such as almonds or cashews can add a satisfying crunch and nutty flavor that contrasts beautifully with the soft texture of the rice. Drizzling a bit of caramel sauce over the top can enhance the sweetness and provide a glossy finish that is visually appealing. Additionally, fresh fruits like mango or banana slices can introduce a refreshing element that balances the richness of the Biko. For a more festive touch, consider garnishing with edible flowers or a sprinkle of toasted sesame seeds for added texture and visual interest.
Consider Serving Suggestions
Biko can be enjoyed on its own, but consider pairing it with complementary dishes to create a more rounded dessert experience. Serve it alongside fresh fruits, such as ripe mangoes or lychees, which provide a refreshing contrast to the sweet, sticky rice. You could also present it with a scoop of coconut sorbet or vanilla ice cream for a delightful mix of temperatures and textures. This not only enhances the overall flavor experience but also adds visual appeal to your dessert table.
By incorporating these additional tips, you can ensure that your Biko is not only delicious but also a beautiful centerpiece for any occasion. Enjoy the process of making this cherished dish, and don’t hesitate to make it your own through experimentation and personalization!
FAQs
Q1: Can I use regular rice instead of glutinous rice?
A1: No, glutinous rice is essential for achieving the sticky and chewy texture characteristic of Biko. Regular rice will not produce the same results.
Q2: How long can I store Biko?
A2: Biko can be stored in an airtight container in the refrigerator for up to 3 days. For longer storage, you can freeze it for up to a month. Thaw it at room temperature before serving.
Q3: Can I make Biko vegan?
A3: Yes, Biko is naturally vegan as it does not contain any animal products. Ensure that any toppings you use, such as latik, are also vegan-friendly.
Q4: What is the best way to reheat Biko?
A4: To reheat Biko, place it in a microwave-safe dish and heat it in the microwave for about 30 seconds to 1 minute, or until warmed through. Alternatively, you can steam it for a few minutes to restore its original texture.
Conclusion
Biko, the beloved Filipino Sticky Rice Cake, is more than just a dessert; it’s a celebration of Filipino culture and tradition. With its simple yet luscious combination of glutinous rice, coconut milk, and brown sugar, Biko offers a delightful treat that is both comforting and satisfying. Whether you’re making it for a special occasion or simply indulging in a sweet craving, this guide provides all the steps and tips you need to create the perfect Biko. Enjoy the process of making this classic dish and savor the rich flavors it brings to your table.
Print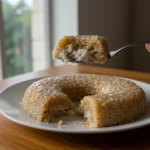
Sticky Rice Cake (Biko)
Ingredients
To create this classic Filipino dessert, you’ll need a handful of simple ingredients that are readily available in most grocery stores. Here’s what you’ll need:
- 2 cups of glutinous rice
- 4 cups of coconut milk
- 1 ½ cups of dark brown sugar
- ½ teaspoon of salt
- Banana leaves or butter for lining the baking dish (optional)
- Toppings (optional):
- Latik (coconut milk curds)
- Toasted shredded coconut
Instructions
Creating Biko involves a few straightforward steps. Follow this detailed guide to achieve the perfect sticky rice cake:
Step 1: Prepare the Rice
- Rinse the Glutinous Rice: Rinse the glutinous rice under cold water until the water runs clear. This helps remove excess starch and prevents the rice from becoming too sticky.
- Cook the Rice: In a large pot, combine the rinsed glutinous rice with 2 cups of coconut milk and a pinch of salt. Cook over medium heat, stirring occasionally, until the rice absorbs the coconut milk and becomes tender. This usually takes about 15-20 minutes.
Step 2: Make the Coconut Milk Syrup
- Prepare the Syrup: In a separate saucepan, combine the remaining 2 cups of coconut milk and 1 ½ cups of dark brown sugar. Cook over medium heat, stirring continuously, until the sugar dissolves and the mixture thickens into a syrupy consistency. This should take about 10-15 minutes.
Step 3: Combine and Cook
- Mix the Syrup and Rice: Once the rice is cooked, pour the coconut milk syrup into the pot with the rice. Stir well to ensure the rice is thoroughly coated with the syrup.
- Continue Cooking: Reduce the heat to low and continue cooking the rice and syrup mixture, stirring frequently to prevent sticking and burning. Cook until the rice absorbs most of the syrup and reaches a sticky and glossy consistency. This will take an additional 10-15 minutes.
Step 4: Assemble the Biko
- Prepare a Baking Dish: Line a baking dish with banana leaves or lightly grease it with butter. This will prevent the Biko from sticking to the dish and add a subtle flavor.
- Transfer the Rice: Pour the cooked rice mixture into the prepared baking dish. Use a spatula to spread it evenly and smooth the top.
- Add Toppings (Optional): If you wish, top the Biko with latik or toasted shredded coconut for added texture and flavor.
- Bake (Optional): While traditional Biko is often not baked, you can bake it in a preheated oven at 350°F (175°C) for 15-20 minutes to firm it up if desired.
Step 5: Cool and Serve
- Cool: Allow the Biko to cool for at least 30 minutes before cutting it into squares or rectangles.
Nutrition
- Serving Size: one normal portion
- Calories: 290
- Fat: 7g
- Saturated Fat: 6g
- Carbohydrates: 52g
- Protein: 3g