My family has a collective sweet tooth that could rival the best of candy shops, so finding treats that satisfy everyone without requiring hours in the kitchen is always a win in my book. These No-Bake Cookie Dough Bites have become an absolute staple in our home for exactly that reason. From the moment I first whipped up a batch, the response was overwhelmingly enthusiastic – my kids devoured them in minutes, and even my usually dessert-skeptical partner couldn’t resist sneaking a few (or maybe more than a few!). The best part? They are incredibly simple to make, require minimal ingredients, and are the perfect solution when you crave that classic cookie dough flavor without the baking hassle. Whether it’s a quick afternoon snack, a fun treat for a party, or just a little something sweet to brighten the day, these No-Bake Cookie Dough Bites are guaranteed to be a crowd-pleaser, and I’m thrilled to share this recipe that has brought so much joy (and deliciousness!) to our kitchen.
Ingredients
- Unsalted Butter: (1 cup, softened) – Provides richness, flavor, and the perfect texture. Softened butter is crucial for smooth mixing.
- Granulated Sugar: (¾ cup) – Adds sweetness and contributes to the classic cookie dough taste.
- Brown Sugar: (¾ cup, packed) – Lends a deeper, molasses-like flavor and moisture, enhancing the chewy texture of the bites.
- Vanilla Extract: (2 teaspoons) – Essential for that signature cookie dough aroma and flavor, amplifying the sweetness and rounding out the taste profile.
- Salt: (½ teaspoon) – Balances the sweetness and enhances all the other flavors in the recipe.
- All-Purpose Flour: (2 ½ cups) – Forms the base of the cookie dough bites, giving them structure. Heat-treating the flour is important for safety.
- Milk: (2-4 tablespoons) – Helps to bring the dough together to the desired consistency. Adjust as needed for your preferred texture.
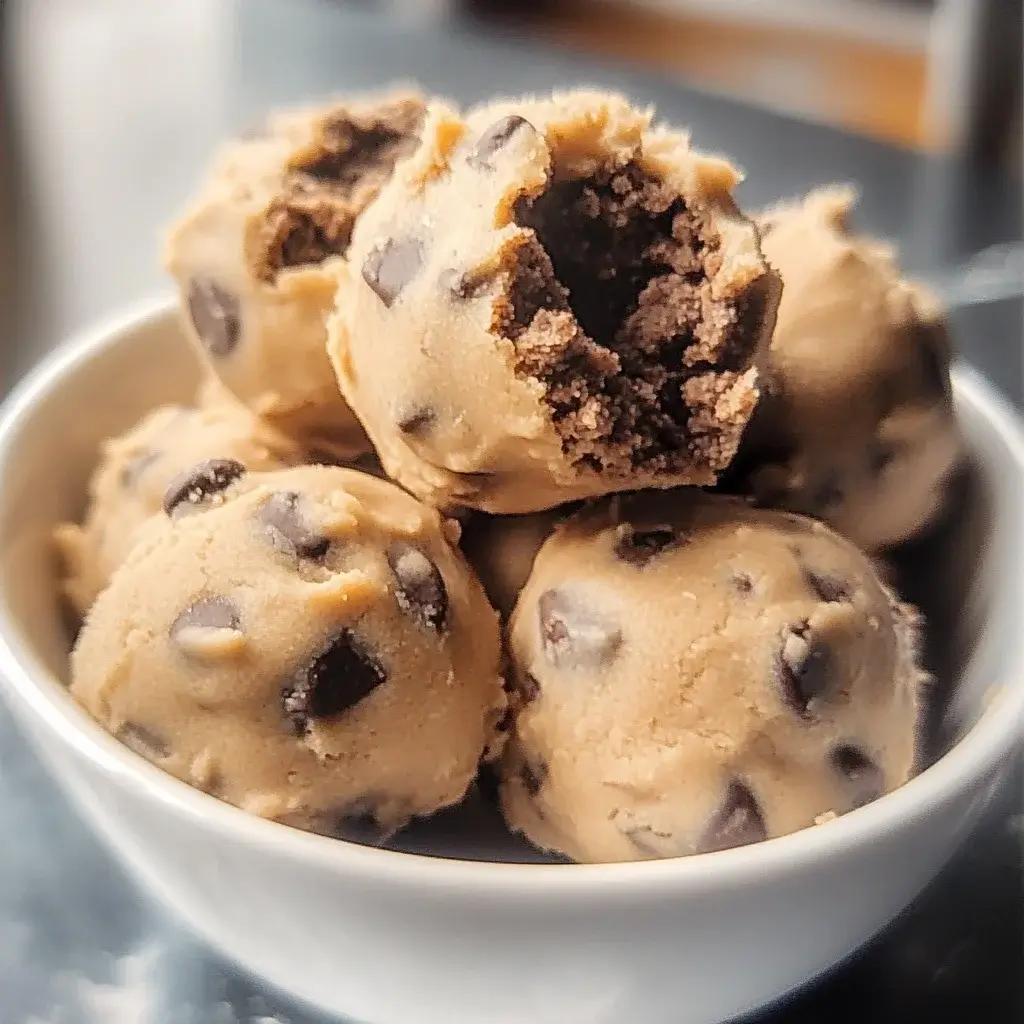
- Chocolate Chips: (1 ½ cups) – The quintessential cookie dough addition, providing bursts of chocolatey goodness. You can use semi-sweet, milk chocolate, or dark chocolate chips based on preference.
Instructions
- Heat Treat the Flour: Safety first! Since we are making no-bake cookie dough, it’s crucial to heat treat the flour to eliminate any potential bacteria. Spread the all-purpose flour in a thin, even layer on a baking sheet. Preheat your oven to 350°F (175°C). Bake the flour for 5-7 minutes, stirring halfway through, until the temperature reaches 165°F (74°C). You can use a kitchen thermometer to check if you want to be precise, but ensuring it’s heated throughout is key. Alternatively, you can microwave the flour in 30-second intervals, stirring in between, until it reaches 165°F (74°C). Let the heat-treated flour cool completely before using it in the recipe. This step is non-negotiable for safe consumption of no-bake cookie dough. Cooling the flour is also important as adding hot flour to butter and sugar can melt the butter and affect the texture of your dough.
- Cream Butter and Sugars: In a large mixing bowl, using an electric mixer (hand mixer or stand mixer), cream together the softened unsalted butter, granulated sugar, and packed brown sugar. Beat on medium speed until the mixture is light, fluffy, and pale in color. This creaming process is essential for incorporating air into the mixture, which results in a softer and more tender cookie dough bite. Scrape down the sides of the bowl with a spatula as needed to ensure all ingredients are evenly combined. Creaming the butter and sugars properly can take a few minutes, so don’t rush this step. The change in color and texture is a good indicator that it’s ready.
- Incorporate Wet Ingredients: Add the vanilla extract and salt to the creamed butter and sugar mixture. Mix on low speed until just combined. The vanilla extract infuses the dough with its classic cookie dough flavor, while the salt balances the sweetness and enhances all the other flavors. Make sure to mix until just combined to avoid overmixing at this stage.
- Add Heat-Treated Flour Gradually: Gradually add the cooled, heat-treated flour to the wet ingredients, mixing on low speed. Add the flour in about ½ cup increments, mixing until just combined after each addition. Be careful not to overmix at this point. Overmixing can develop the gluten in the flour, even heat-treated flour, which can result in tougher cookie dough bites. Mix until the flour is just incorporated, and you start to see the dough coming together.
- Adjust Consistency with Milk: Check the consistency of the dough. If it seems too dry and crumbly, add milk one tablespoon at a time, mixing on low speed after each addition, until the dough comes together and is moist enough to roll into balls. Start with 2 tablespoons and add more as needed, up to 4 tablespoons. The goal is to achieve a dough that is easily scoopable and rollable but not sticky or wet. The amount of milk needed can vary slightly depending on the humidity and the exact measurement of your ingredients.
- Fold in Chocolate Chips: Once the dough has reached the desired consistency, remove the mixing bowl from the stand mixer or turn off your hand mixer. Add the chocolate chips to the dough. Use a spatula or wooden spoon to gently fold in the chocolate chips until they are evenly distributed throughout the dough. Folding ensures that the chocolate chips are incorporated without overworking the dough.
- Chill the Dough (Optional but Recommended): For easier handling and rolling, cover the bowl with plastic wrap and chill the dough in the refrigerator for at least 30 minutes, or up to an hour. Chilling firms up the butter in the dough, making it less sticky and much easier to roll into balls. While you can technically roll the dough immediately, chilling significantly improves the ease of handling and the final shape of the cookie dough bites. If you are in a rush, you can skip this step, but be prepared for the dough to be a bit stickier to work with.
- Roll into Bites: Once chilled (or if you skipped chilling), use a tablespoon or a small cookie scoop to scoop out portions of the cookie dough. Roll each portion between your palms to form smooth, round balls. Aim for consistent sizes for even bites. You can make them slightly larger or smaller depending on your preference.
- Optional Coating (Chocolate or Sprinkles): If desired, you can further enhance your No-Bake Cookie Dough Bites by dipping or rolling them in melted chocolate or sprinkles. For chocolate-covered bites, melt semi-sweet, milk, or dark chocolate chips in a microwave-safe bowl or using a double boiler until smooth. Dip each cookie dough bite into the melted chocolate, allowing excess chocolate to drip off. Place the chocolate-covered bites on a parchment-lined baking sheet to set. For sprinkle-covered bites, simply roll the freshly rolled dough balls in your favorite sprinkles before they chill too much.
- Set and Store: If you coated the bites in chocolate, allow the chocolate to set completely at room temperature or in the refrigerator for a faster set. Once set (or if you didn’t coat them), store the No-Bake Cookie Dough Bites in an airtight container in the refrigerator. They are best enjoyed chilled and will keep well in the refrigerator for up to a week. Keeping them refrigerated is important because they contain butter and are no-bake, so they are best stored cold for both freshness and food safety.
Nutrition Facts
Serving Size: 1 Cookie Dough Bite (approx. 1.5 inches diameter)
Servings Per Recipe: Approximately 36 bites (depending on size)
(Please note: Nutritional values are estimates and can vary based on specific ingredients and portion sizes.)
- Calories: 130 kcal
- Fat: 7g
- Cholesterol: 20mg
Preparation Time
Total Time: Approximately 30-45 minutes (including flour heat treatment, dough preparation, and chilling time if chosen).
- Prep Time: 20 minutes (includes heat-treating flour and dough mixing)
- Chill Time (Optional but Recommended): 30 minutes – 1 hour
- Rolling & Coating Time: 10-15 minutes
This recipe is wonderfully efficient. The active preparation time is quite minimal, especially considering the delicious result. The optional chilling time does add to the overall duration, but it significantly improves the ease of handling the dough. Even without chilling, you can have these delightful treats ready to enjoy in under an hour.
How to Serve
These No-Bake Cookie Dough Bites are incredibly versatile and can be served in a variety of ways, making them perfect for different occasions:
- Casual Snacking:
- Enjoy them straight from the refrigerator as a quick and satisfying afternoon snack.
- Pack them in lunchboxes for a delightful treat.
- Keep a container in the fridge for a grab-and-go dessert whenever a sweet craving strikes.
- Dessert Platters:
- Include them as part of a dessert platter alongside other no-bake treats like brownies, fudge, or fruit skewers.
- Arrange them attractively on a plate for a simple yet elegant dessert presentation.
- Offer a variety of coatings or toppings (like mini chocolate chips, sprinkles, chopped nuts) for guests to customize their bites.
- Party Favors:
- Package a few bites in small cellophane bags tied with ribbons for cute and edible party favors.
- Set up a “cookie dough bite bar” at parties where guests can roll their own bites and choose from various toppings.
- Kid-Friendly Fun:
- Get kids involved in rolling the dough balls and decorating them with sprinkles or mini chocolate chips – a great activity for birthday parties or rainy days.
- Serve them at kids’ parties or playdates as a guaranteed crowd-pleaser.
- Make mini cookie dough bite pops by inserting lollipop sticks into the balls before chilling and then dipping in chocolate.
- Holiday Treats:
- Adapt the sprinkles or coatings to match holiday themes (red and green sprinkles for Christmas, pastel sprinkles for Easter, etc.).
- Present them in festive containers or on holiday-themed platters.
Additional Tips for Perfect No-Bake Cookie Dough Bites
- Use Room Temperature Butter: Softened butter is essential for creaming properly with the sugars. If your butter is too cold, it won’t cream smoothly; if it’s melted, the dough will be too soft. Take your butter out of the refrigerator about an hour before you plan to bake, or gently soften it in the microwave in short intervals, being careful not to melt it.
- Don’t Skip Heat Treating the Flour: This is crucial for food safety. Raw flour can contain bacteria like E. coli, which can cause illness. Heat-treating eliminates this risk, making the cookie dough safe to eat without baking. Always ensure the flour reaches an internal temperature of 165°F (74°C) during the heat-treating process.
- Measure Flour Accurately: Too much flour can result in dry, crumbly cookie dough bites. Use the spoon and level method to measure your flour. Spoon flour into your measuring cup until it’s overflowing, then level off the excess with a straight edge. Avoid scooping flour directly from the bag, as this can pack it down and lead to using too much.
- Adjust Sweetness to Taste: If you prefer a less sweet cookie dough, you can reduce the amount of granulated sugar or brown sugar slightly. However, remember that sugar contributes to the texture and moisture of the bites, so drastic reductions might affect the final result.
- Customize with Extracts and Flavors: Vanilla extract is classic, but you can experiment with other extracts like almond extract, butter extract, or even a hint of peppermint extract for a holiday twist. You can also add a pinch of cinnamon or nutmeg for warmth.
- Incorporate Different Mix-Ins: While chocolate chips are traditional, feel free to get creative with mix-ins! Try chopped nuts (walnuts, pecans, macadamia nuts), dried cranberries, toffee bits, M&Ms, white chocolate chips, peanut butter chips, or even chopped pretzels for a salty-sweet combination.
- Control the Dough Consistency: If your dough is too dry, add milk one teaspoon at a time until it reaches the desired consistency. If it’s too wet, add a little more heat-treated flour, a tablespoon at a time. Remember that chilling the dough will also firm it up.
- Storage is Key: Store your No-Bake Cookie Dough Bites in an airtight container in the refrigerator. This will keep them fresh and prevent them from becoming too soft. They will last for up to a week in the refrigerator, making them a great make-ahead treat. For longer storage, you can freeze them in an airtight container for up to 2 months. Thaw in the refrigerator before serving.
FAQ About No-Bake Cookie Dough Bites
Q1: Is it safe to eat raw flour in cookie dough?
A: No, it is not safe to eat raw flour. Raw flour can contain harmful bacteria like E. coli, which can cause foodborne illness. That’s why it’s essential to heat-treat the flour before using it in no-bake recipes like these cookie dough bites. Heat-treating kills any potential bacteria, making the flour safe to consume.
Q2: How do I properly heat treat flour for no-bake recipes?
A: There are two main methods for heat-treating flour: oven baking and microwaving. For oven baking, spread the flour in a thin layer on a baking sheet and bake at 350°F (175°C) for 5-7 minutes, stirring halfway through, until it reaches 165°F (74°C). For microwaving, microwave the flour in 30-second intervals, stirring in between, until it reaches 165°F (74°C). Let the flour cool completely before using it in your recipe.
Q3: Can I use salted butter instead of unsalted butter?
A: Yes, you can use salted butter if that’s what you have on hand. However, if you use salted butter, you should reduce the amount of added salt in the recipe to ¼ teaspoon instead of ½ teaspoon, to avoid the bites being too salty. Unsalted butter is generally preferred in baking and no-bake recipes as it gives you better control over the salt level.
Q4: Can I make these cookie dough bites vegan?
A: Yes, you can make vegan No-Bake Cookie Dough Bites with a few substitutions. Replace the unsalted butter with a vegan butter alternative (like coconut oil or vegan butter sticks). Ensure your chocolate chips are also vegan (many dark chocolate chips are). Use a plant-based milk alternative, such as almond milk, soy milk, or oat milk, in place of cow’s milk. With these swaps, you can enjoy a delicious vegan version of this treat.
Q5: How long do these cookie dough bites last?
A: When stored properly in an airtight container in the refrigerator, No-Bake Cookie Dough Bites will last for up to a week. For longer storage, you can freeze them for up to 2 months. Thaw them in the refrigerator overnight before serving. They are best enjoyed chilled straight from the fridge.
Q6: Can I add nuts to these cookie dough bites?
A: Absolutely! Adding nuts is a fantastic way to customize these bites. Chopped walnuts, pecans, macadamia nuts, or even peanuts would all work well. Add about ½ to 1 cup of chopped nuts along with the chocolate chips, folding them into the dough at the end. Make sure to consider any allergies when adding nuts, especially if you are serving these to others.
Q7: My cookie dough is too dry. What can I do?
A: If your cookie dough is too dry and crumbly, it likely needs more moisture. Add milk, one tablespoon at a time, and mix on low speed until the dough comes together and is moist enough to roll. Start with 1 tablespoon and add up to 2-3 more if needed, checking the consistency after each addition.
Q8: Can I make these ahead of time?
A: Yes, No-Bake Cookie Dough Bites are perfect for making ahead of time! In fact, chilling them in the refrigerator is recommended to firm them up and make them easier to handle. You can prepare the dough, roll the bites, and store them in the refrigerator up to a week in advance. This makes them ideal for parties, gatherings, or meal prepping desserts for the week.
These No-Bake Cookie Dough Bites are truly a delightful treat that’s both easy to make and incredibly satisfying. From the simple ingredient list to the quick preparation, they are a perfect solution for sweet cravings, kid-friendly fun, and effortless entertaining. Enjoy the classic cookie dough flavor without any baking, and get creative with coatings and mix-ins to make them your own signature treat!
Print
No-Bake Cookie Dough Bites
Ingredients
- Unsalted Butter: (1 cup, softened) – Provides richness, flavor, and the perfect texture. Softened butter is crucial for smooth mixing.
- Granulated Sugar: (¾ cup) – Adds sweetness and contributes to the classic cookie dough taste.
- Brown Sugar: (¾ cup, packed) – Lends a deeper, molasses-like flavor and moisture, enhancing the chewy texture of the bites.
- Vanilla Extract: (2 teaspoons) – Essential for that signature cookie dough aroma and flavor, amplifying the sweetness and rounding out the taste profile.
- Salt: (½ teaspoon) – Balances the sweetness and enhances all the other flavors in the recipe.
- All-Purpose Flour: (2 ½ cups) – Forms the base of the cookie dough bites, giving them structure. Heat-treating the flour is important for safety.
- Milk: (2-4 tablespoons) – Helps to bring the dough together to the desired consistency. Adjust as needed for your preferred texture.
- Chocolate Chips: (1 ½ cups) – The quintessential cookie dough addition, providing bursts of chocolatey goodness. You can use semi-sweet, milk chocolate, or dark chocolate chips based on preference.
Instructions
- Heat Treat the Flour: Safety first! Since we are making no-bake cookie dough, it’s crucial to heat treat the flour to eliminate any potential bacteria. Spread the all-purpose flour in a thin, even layer on a baking sheet. Preheat your oven to 350°F (175°C). Bake the flour for 5-7 minutes, stirring halfway through, until the temperature reaches 165°F (74°C). You can use a kitchen thermometer to check if you want to be precise, but ensuring it’s heated throughout is key. Alternatively, you can microwave the flour in 30-second intervals, stirring in between, until it reaches 165°F (74°C). Let the heat-treated flour cool completely before using it in the recipe. This step is non-negotiable for safe consumption of no-bake cookie dough. Cooling the flour is also important as adding hot flour to butter and sugar can melt the butter and affect the texture of your dough.
- Cream Butter and Sugars: In a large mixing bowl, using an electric mixer (hand mixer or stand mixer), cream together the softened unsalted butter, granulated sugar, and packed brown sugar. Beat on medium speed until the mixture is light, fluffy, and pale in color. This creaming process is essential for incorporating air into the mixture, which results in a softer and more tender cookie dough bite. Scrape down the sides of the bowl with a spatula as needed to ensure all ingredients are evenly combined. Creaming the butter and sugars properly can take a few minutes, so don’t rush this step. The change in color and texture is a good indicator that it’s ready.
- Incorporate Wet Ingredients: Add the vanilla extract and salt to the creamed butter and sugar mixture. Mix on low speed until just combined. The vanilla extract infuses the dough with its classic cookie dough flavor, while the salt balances the sweetness and enhances all the other flavors. Make sure to mix until just combined to avoid overmixing at this stage.
- Add Heat-Treated Flour Gradually: Gradually add the cooled, heat-treated flour to the wet ingredients, mixing on low speed. Add the flour in about ½ cup increments, mixing until just combined after each addition. Be careful not to overmix at this point. Overmixing can develop the gluten in the flour, even heat-treated flour, which can result in tougher cookie dough bites. Mix until the flour is just incorporated, and you start to see the dough coming together.
- Adjust Consistency with Milk: Check the consistency of the dough. If it seems too dry and crumbly, add milk one tablespoon at a time, mixing on low speed after each addition, until the dough comes together and is moist enough to roll into balls. Start with 2 tablespoons and add more as needed, up to 4 tablespoons. The goal is to achieve a dough that is easily scoopable and rollable but not sticky or wet. The amount of milk needed can vary slightly depending on the humidity and the exact measurement of your ingredients.
- Fold in Chocolate Chips: Once the dough has reached the desired consistency, remove the mixing bowl from the stand mixer or turn off your hand mixer. Add the chocolate chips to the dough. Use a spatula or wooden spoon to gently fold in the chocolate chips until they are evenly distributed throughout the dough. Folding ensures that the chocolate chips are incorporated without overworking the dough.
- Chill the Dough (Optional but Recommended): For easier handling and rolling, cover the bowl with plastic wrap and chill the dough in the refrigerator for at least 30 minutes, or up to an hour. Chilling firms up the butter in the dough, making it less sticky and much easier to roll into balls. While you can technically roll the dough immediately, chilling significantly improves the ease of handling and the final shape of the cookie dough bites. If you are in a rush, you can skip this step, but be prepared for the dough to be a bit stickier to work with.
- Roll into Bites: Once chilled (or if you skipped chilling), use a tablespoon or a small cookie scoop to scoop out portions of the cookie dough. Roll each portion between your palms to form smooth, round balls. Aim for consistent sizes for even bites. You can make them slightly larger or smaller depending on your preference.
- Optional Coating (Chocolate or Sprinkles): If desired, you can further enhance your No-Bake Cookie Dough Bites by dipping or rolling them in melted chocolate or sprinkles. For chocolate-covered bites, melt semi-sweet, milk, or dark chocolate chips in a microwave-safe bowl or using a double boiler until smooth. Dip each cookie dough bite into the melted chocolate, allowing excess chocolate to drip off. Place the chocolate-covered bites on a parchment-lined baking sheet to set. For sprinkle-covered bites, simply roll the freshly rolled dough balls in your favorite sprinkles before they chill too much.
- Set and Store: If you coated the bites in chocolate, allow the chocolate to set completely at room temperature or in the refrigerator for a faster set. Once set (or if you didn’t coat them), store the No-Bake Cookie Dough Bites in an airtight container in the refrigerator. They are best enjoyed chilled and will keep well in the refrigerator for up to a week. Keeping them refrigerated is important because they contain butter and are no-bake, so they are best stored cold for both freshness and food safety.
Nutrition
- Serving Size: one normal portion
- Calories: 130
- Fat: 7g
- Cholesterol: 20mg