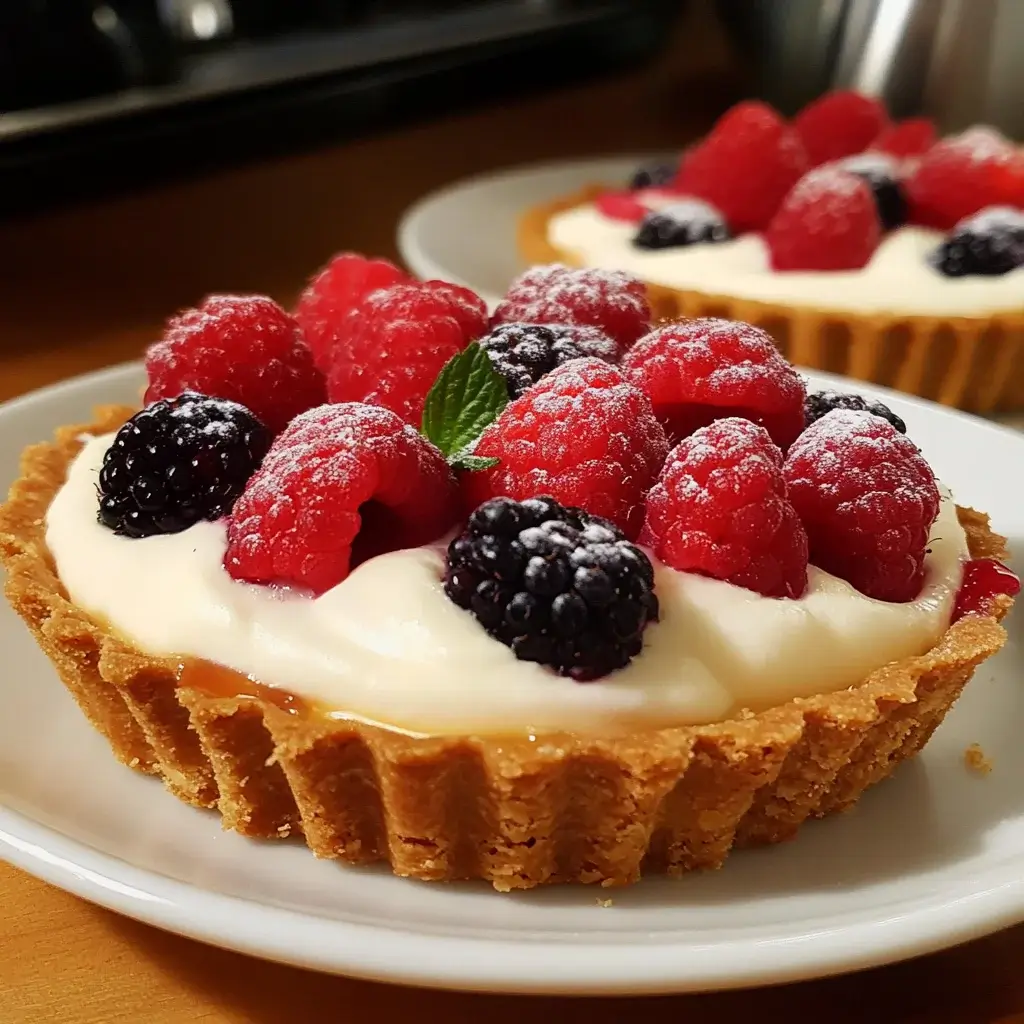
The first time I whipped up these Quick No-Bake Berry Tarts, it was a sweltering summer afternoon. The thought of turning on the oven was unbearable, but I’d promised my family a special dessert for our weekend barbecue. Skeptical glances turned into wide-eyed delight as they took their first bites. The crisp, buttery crust, the cool and tangy cream cheese filling, and the burst of sweet, fresh berries were an instant hit. My youngest, usually a picky eater when it comes to fruit, declared them “the best tiny pies ever!” Since then, these little tarts have become my go-to recipe whenever I need an effortless yet impressive dessert. They look stunning, taste divine, and the fact that they come together without any baking feels like a delicious magic trick. They are incredibly versatile, perfect for everything from casual family dinners to elegant garden parties, and the sheer ease of preparation means less time in the kitchen and more time enjoying the company and the compliments!
Ingredients
Here’s what you’ll need to create these delightful no-bake treats:
- Graham Crackers (1 ½ cups crushed / about 10-12 full sheets): Forms the sweet, crumbly base of our tart crust. Provides a classic, slightly honeyed flavor.
- Unsalted Butter (6 tablespoons / ¾ stick, melted): Acts as the binder for the graham cracker crumbs, creating a firm yet tender crust upon chilling. Adds richness.
- Granulated Sugar (¼ cup): Adds a touch of sweetness to the crust, balancing the tang of the filling and berries.
- Cream Cheese (8 ounces / 1 block, softened): The star of the filling, providing a rich, tangy, and smooth base. Ensure it’s fully softened for a lump-free texture.
- Powdered Sugar (½ cup, sifted): Sweetens the cream cheese filling and helps create a smooth, velvety consistency. Sifting prevents lumps.
- Heavy Cream (½ cup, cold) OR Whipped Topping (1 cup, thawed): Incorporates air into the filling, making it light and fluffy. Cold heavy cream whips best; thawed whipped topping offers convenience.
- Vanilla Extract (1 teaspoon): Enhances the flavors of the filling, adding warmth and depth.
- Fresh Mixed Berries (2-3 cups): The vibrant topping! Use a combination like strawberries (hulled and sliced/quartered), blueberries, raspberries, and blackberries for color, texture, and flavor variety. Washed and thoroughly dried.
- Optional: Lemon Zest (1 teaspoon): Can be added to the filling or sprinkled on top for an extra burst of freshness and brightness that complements the berries beautifully.
- Optional: Mint Sprigs: For a lovely garnish, adding a pop of green and a hint of freshness.
Instructions
Follow these simple steps to assemble your Quick No-Bake Berry Tarts:
- Prepare the Crust:
- Place the graham cracker sheets into a food processor and pulse until they form fine crumbs. Alternatively, place them in a sturdy zip-top bag and crush them using a rolling pin. Measure out 1 ½ cups of crumbs.
- In a medium bowl, combine the graham cracker crumbs and granulated sugar. Stir well.
- Pour the melted unsalted butter over the crumb mixture. Stir with a fork until all the crumbs are evenly moistened. The mixture should resemble wet sand.
- Divide the crumb mixture evenly among 6-8 standard-size muffin cups or individual tartlet pans (4-inch diameter works well). Using the bottom of a small glass or your fingers, press the crumbs firmly and evenly onto the bottom and up the sides of each cup/pan to form the crusts. Ensure the base and sides are well-compacted.
- Place the muffin tin or tartlet pans in the freezer for at least 15-20 minutes (or the refrigerator for 30 minutes) to allow the crusts to firm up significantly. This step is crucial for preventing them from crumbling later.
- Make the Cream Cheese Filling:
- Ensure your cream cheese is fully softened to room temperature to avoid lumps. Place the softened cream cheese in a large bowl.
- Using an electric hand mixer or a stand mixer fitted with the paddle attachment, beat the cream cheese on medium speed until completely smooth and creamy, scraping down the sides of the bowl as needed.
- Gradually add the sifted powdered sugar to the cream cheese, beating on low speed initially (to avoid a sugar cloud!), then increasing to medium speed until fully incorporated and the mixture is smooth.
- Beat in the vanilla extract and optional lemon zest (if using) until combined.
- If using Heavy Cream: In a separate, chilled bowl, whip the cold heavy cream with clean beaters until stiff peaks form (be careful not to overbeat into butter). Gently fold the whipped cream into the cream cheese mixture in two or three additions until just combined and no streaks remain. Be careful not to deflate the whipped cream too much – fold gently!
- If using Whipped Topping: Gently fold the thawed whipped topping into the cream cheese mixture until evenly combined and smooth.
- Assemble the Tarts:
- Remove the chilled crusts from the freezer or refrigerator.
- Carefully spoon or pipe the cream cheese filling evenly into each prepared crust, smoothing the tops lightly with the back of a spoon or a small offset spatula. Fill them almost to the top, leaving a little space for the berries.
- Arrange the fresh mixed berries generously over the cream cheese filling in each tart. You can create patterns or simply pile them on for a rustic look. Ensure berries are washed and patted thoroughly dry before adding to prevent excess moisture.
- Chill Before Serving:
- Place the assembled tarts back into the refrigerator for at least 30 minutes (or up to 2-4 hours) before serving. This allows the filling to set further and the flavors to meld. It also ensures they are nicely chilled, which enhances their refreshing quality.
- Serve:
- Carefully remove the tarts from the muffin tin or tartlet pans just before serving. If using a muffin tin with paper liners, this is easy. If not, you may need to gently loosen the edges with a thin knife. If using tartlet pans with removable bottoms, simply push them up from the bottom.
- Garnish with fresh mint sprigs, an extra dusting of powdered sugar, or a drizzle of berry coulis if desired. Serve immediately and enjoy!
Nutrition Facts
(Approximate values per tart, assuming recipe makes 8 tarts. Actual values may vary based on specific ingredients and portion sizes.)
- Servings: 6-8 individual tarts
- Calories per serving: Approx. 350-450 kcal. Primarily from the crust (butter, sugar, crackers) and the filling (cream cheese, cream/whipped topping, sugar).
- Fat: Approx. 25-35g. Significant portion comes from butter in the crust and cream cheese/heavy cream in the filling. Includes saturated and unsaturated fats.
- Carbohydrates: Approx. 25-35g. Mainly from the graham crackers, sugar (in crust and filling), and natural sugars in the berries. Includes dietary fiber from berries and crackers.
- Sugar: Approx. 15-25g. Includes added sugars (granulated, powdered) and natural sugars from the fruit. The amount can vary depending on berry sweetness and exact sugar quantities used.
- Protein: Approx. 4-6g. Primarily contributed by the cream cheese and graham crackers.
Disclaimer: These are estimates only. For precise nutritional information, calculate based on the specific ingredients and brands used.
Preparation Time
- Active Preparation Time: Approximately 20-25 minutes. This includes crushing the crackers, mixing the crust, preparing the filling, and assembling the tarts.
- Chilling Time: Minimum 45-50 minutes total (15-20 minutes for the crust to firm up + 30 minutes for the assembled tarts to set). Longer chilling (up to 2-4 hours for the final chill) is recommended for best results and flavor melding.
- Total Time (minimum): Approximately 1 hour 5 minutes to 1 hour 15 minutes.
- Description: This recipe lives up to its “quick” name, requiring under half an hour of hands-on effort. The majority of the time is passive chilling, making it perfect for preparing ahead while you focus on other things. No oven time means no preheating waits and a cooler kitchen!
How to Serve
These Quick No-Bake Berry Tarts are versatile and can be presented beautifully in various ways. Here are some serving suggestions:
- Individual Dessert Plates: Serve each tart on its own small plate for an elegant presentation.
- Dust the plate lightly with powdered sugar around the tart.
- Add a small dollop of extra whipped cream beside the tart.
- Place a few loose berries and a mint sprig next to it for color contrast.
- Dessert Platter: Arrange the tarts attractively on a larger platter for parties or gatherings.
- Alternate berry patterns or use different single-berry toppings for visual variety if making a larger batch.
- Fill gaps on the platter with extra fresh berries or edible flowers.
- Accompaniments: Enhance the tarts with simple additions.
- Sauces: Offer a light drizzle of berry coulis (raspberry or strawberry works well), melted white chocolate, or even a balsamic glaze for a sophisticated twist.
- Cream: A quenelle of freshly whipped cream or a scoop of vanilla bean ice cream pairs wonderfully, especially on warm days.
- Crunch: A sprinkle of toasted sliced almonds or chopped pistachios can add a nice textural contrast.
- Occasions: These tarts shine in many settings.
- Summer Barbecues & Picnics: Their cool, refreshing nature makes them ideal for outdoor events. Transport them chilled in their muffin tin or a container.
- Brunches & Baby Showers: Their pretty appearance and individual portions are perfect for celebratory daytime gatherings.
- Afternoon Tea: Serve alongside scones and finger sandwiches for a delightful tea-time treat.
- Easy Weeknight Dessert: Simple enough to make after dinner for a special touch without much fuss.
- Holiday Gatherings: Adapt the berries to the season (e.g., cranberries and orange zest for winter holidays).
Additional Tips
Elevate your Quick No-Bake Berry Tarts with these helpful tips:
- Crust Variations: Don’t limit yourself to graham crackers! Try using crushed digestive biscuits, shortbread cookies, vanilla wafers, Biscoff cookies (for a spiced flavor), or even gingersnaps (great for fall). For a chocolate twist, use crushed Oreo cookies (remove the cream filling first or use less butter). You can also add a tablespoon of cocoa powder to the graham cracker crust for a subtle chocolate note. For a slightly healthier, nuttier base, consider adding finely chopped pecans or almonds to the crumb mixture.
- Filling Flavor Boosts: Enhance the cream cheese filling by adding citrus zest (lemon, lime, or orange work beautifully with berries). A splash of almond extract instead of or alongside vanilla can add a different dimension. For a richer flavor, consider adding ¼ cup of melted and cooled white chocolate to the cream cheese mixture before folding in the cream/whipped topping.
- Berry Preparation is Key: Ensure your berries are completely dry after washing. Excess water can make the filling or crust soggy. Gently pat them dry with paper towels. If using larger strawberries, slice or quarter them for easier eating and better distribution on the tart.
- Make-Ahead Strategy: You can make components ahead of time to streamline assembly. The crusts can be pressed into the pans and stored, covered, in the refrigerator for up to 2 days or frozen for longer. The cream cheese filling (without the whipped cream/topping folded in, if making from scratch) can be made and stored in an airtight container in the refrigerator for 2-3 days. Whip the cream and assemble the tarts a few hours before serving for the best texture. Avoid adding berries too far in advance (more than 4-6 hours) as they can release juices and potentially make the filling watery or stain it.
- Achieving the Perfect Crust Texture: Press the crust mixture firmly into the pans. This is crucial for ensuring it holds together when removed. Using the flat bottom of a small drinking glass or measuring cup helps create an even, compact base and sides. Don’t skip the initial chilling step for the crust – it solidifies the butter and makes the crust much more stable.
- Sweetness Adjustment: Taste the cream cheese filling before adding the whipped cream or topping. Adjust the powdered sugar level to your preference. Remember that the graham cracker crust also adds sweetness, and the berries contribute their natural sugars. If your berries are particularly tart, you might want a slightly sweeter filling, and vice-versa.
- Presentation Flair: For a professional look, use a piping bag fitted with a large star or round tip to pipe the filling into the crusts. Create a neat swirl. Arrange the berries meticulously – concentric circles, alternating colors, or a simple, elegant pile in the center. A tiny sprinkle of edible glitter or gold dust can add a festive touch for special occasions.
- Preventing Soggy Bottoms: Besides drying berries thoroughly, ensure the crust is well-chilled and firm before adding the filling. If you are very concerned or making them significantly ahead, you could brush the inside of the chilled crusts with a thin layer of melted white chocolate and let it set before adding the filling. This creates a moisture barrier, though it adds an extra step and flavor component. Serving the tarts within a few hours of assembly is generally the best way to maintain crust crispness.
FAQ
Here are answers to some frequently asked questions about Quick No-Bake Berry Tarts:
- Q: Can I make these tarts gluten-free?
- A: Absolutely! Simply substitute the graham crackers with your favorite gluten-free vanilla cookies, shortbread-style biscuits, or gluten-free graham crackers. Crush them and use them in the same quantity as directed. Ensure all other ingredients (like vanilla extract) are certified gluten-free if needed for celiac disease. The texture might be slightly different depending on the cookie used, but the result will still be delicious.
- Q: Can I make this recipe dairy-free or vegan?
- A: Yes, with substitutions. Use dairy-free butter alternative (like a vegan butter stick) for the crust. For the filling, use a dairy-free cream cheese alternative (ensure it’s one you like the flavor and texture of) and dairy-free whipped topping (like coconut whip or a soy/almond-based whip). Check that your graham crackers or chosen cookie base are also vegan. The texture and tanginess of the filling might differ slightly from the original.
- Q: How long can I store the assembled tarts?
- A: Assembled tarts are best enjoyed within 1-2 days. Store them loosely covered in the refrigerator. The crust will gradually soften over time, especially from the moisture in the filling and berries. For the best texture, try to serve them within 4-6 hours of assembly. If storing longer, the berries might also start to weep slightly.
- Q: Can I freeze these no-bake berry tarts?
- A: Freezing assembled tarts is generally not recommended. The cream cheese filling can become grainy or weep upon thawing, and the fresh berries will likely become mushy. The crust may also become quite soft. However, you can freeze the unfilled crusts. Press them into the pans, wrap well in plastic wrap and foil, and freeze for up to 1-2 months. Thaw in the refrigerator before filling and serving.
- Q: Can I make one large tart instead of individual tartlets?
- A: Yes, you can adapt this recipe to make one large (e.g., 9-inch) tart. Use a tart pan with a removable bottom. You might need to slightly increase the crust ingredients (perhaps by 25-50%) to ensure adequate coverage for the larger pan. Press the crust firmly into the pan and chill thoroughly. Use the same amount of filling and berries. Chilling time for the large tart should be longer, at least 2-4 hours, to ensure it sets properly for slicing. Slicing might be a bit messier than with individual tarts.
- Q: My crust keeps crumbling when I try to remove the tarts. What did I do wrong?
- A: This usually happens for a few reasons: a) the crumb mixture wasn’t pressed firmly enough into the pan, b) there wasn’t quite enough melted butter to bind the crumbs (ensure accurate measurement), or c) the crust wasn’t chilled for long enough to fully solidify the butter. Make sure to press very firmly and chill in the freezer for at least 15-20 minutes (or longer in the fridge) before adding the filling. Using tartlet pans with removable bottoms or muffin liners can also make removal easier.
- Q: Can I use frozen berries instead of fresh?
- A: While fresh berries provide the best texture and appearance, you can use frozen berries in a pinch, but with caveats. Thaw the frozen berries completely first. Drain them very well on paper towels, patting gently to remove as much excess moisture as possible. Frozen berries tend to be softer and release more juice than fresh, which can make the filling watery or stain it, and potentially make the crust soggy faster. They are often better used cooked down into a compote or sauce to serve alongside the tarts, rather than placed directly on top raw.
- Q: Can I use other fruits besides berries?
- A: Absolutely! This recipe is highly adaptable. Try sliced peaches, nectarines, kiwi, mango, or passion fruit pulp. Stone fruits pair beautifully with the creamy filling. Ensure the fruit is ripe but still firm enough to hold its shape. Avoid fruits with very high water content (like watermelon) unless used sparingly as a garnish just before serving. You could also use canned fruit like mandarin oranges, but make sure they are drained extremely well. The flavor profile will change, offering exciting new combinations!